
关注 3
粉丝 5
Joss
沈阳
+
关注
已关注
+
关注
花园里是空的哦~
还没有添加花。
动态 (21)
Joss
2017年02月20日
Lavender blooms in many parts of the world , and there are few #flowers that are more cherished for romance, scent and form. What most gardeners don’t realize is that lavender is easy to grow and maintain, and can make a splash in your flower beds, add an old world touch to your flower gardens, or can have an entire garden design based around it, whether your style is modern, or old world. You can use the flowers for craft projects, aromatherapy, or even a relaxing tea! You don’t have to have a generous field of lavender in Provence to enjoy and appreciate all it can do for your garden. The featured photo above is from a recent trip to Vashon Island, WA. Simply gorgeous! Here are seven easy tips for growing lavender in any garden space!

1. Lavender needs one thing to grow well…good drainage. This is all fine and good if you have a naturally sandy or gravelly soil in your yard, but pretty problematic if your entire garden is pure clay! The solution? You can either grow your lavender in raised beds with good soil, or you can use containers. Regular planting mix is fine, just make sure there are plenty of drainage holes. If your lavender is yellowing, first thing to check is drainage. 2. Lavender is drought tolerant once established, but they do bloom better if they are watered as soon as the soil becomes dry one inch down.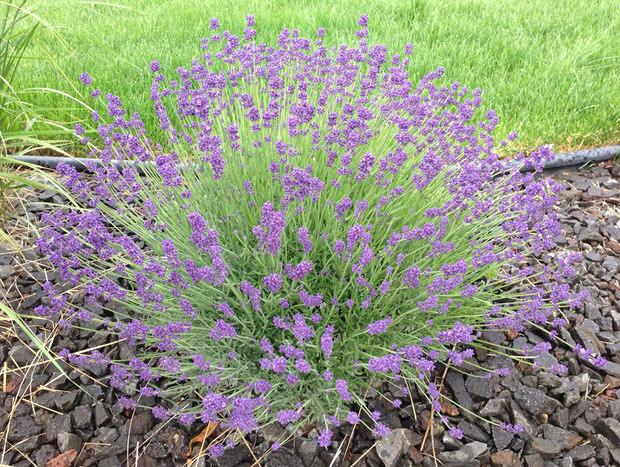
3. Lavender are short lived plants by nature. If they are happy in their spot, they will last a bit longer, but even under the best conditions, three years is not unusual for a plant to start dying out in the center. Here’s the up side of that. Lavender volunteers show up each year in droves, so there are always new plants ready to take over the ones that have passed their prime! 4. Lavender does not need much in the way of fertilizer, making them great low maintenance plants. Give them a dose of liquid fertilizer in the spring, then leave them alone, Too much fertilizer will produce plants that are large and spindly, with fewer flowers.
5. Early each spring, make sure you cut your lavender back, and don’t be a baby about it! Cut back most lavender to one third their height to rejuvenate the plant, and make sure your plant is flowering at it’s best. 6. Lavender blooms in early to mid summer, but may be convinced to re-bloom in later summer or fall. After the first flush of bloom has been harvested or died back, use scissors or shear to give the plant a light hair cut. Give it a dose of half strength liquid fertilizer, and leave it be. Chances are you will see more lavender later in the season! 7. To harvest lavender flowers, it’s best to cut them in bunches with long stems. Choosing to cut them in early morning maximizes the oils in the flowers, which gives them the best scent. You can use them fresh in vases with other cut flowers, or easily dry bunches by tying the ends together and hanging them upside down in a protected place. Dried lavender retains much of its scent and can be used in drawers, crafts or as decorative additions to wreaths or flower arrangements. Note: Lavender is thought to help induce sleep and relaxation, either made into a tea, or tucked into pillow cases. You can even throw a sachet of lavender through the dryer with your sheets and towels for a natural scent to your laundry! How to Make Lavender Dryer Sachets Lavender is easy to grow, easy to find at most nurseries, and can be found in purples, blues, roses and whites. You can choose from hardy English lavender, larger French lavender that is the form you see in photos of the French countryside, or special Spanish lavender. Keep in mind that Spanish lavender, with its flower heads that remind me of butterflies, are great in containers, but are less hardy than its cousins.
Spanish Lavender Grow lavender. Even if the only use you ever find for it is picking flowers and foliage as you pass by, and taking the time to smell that wonderful scent, fresh from your own garden.
文章
Joss
2017年02月20日
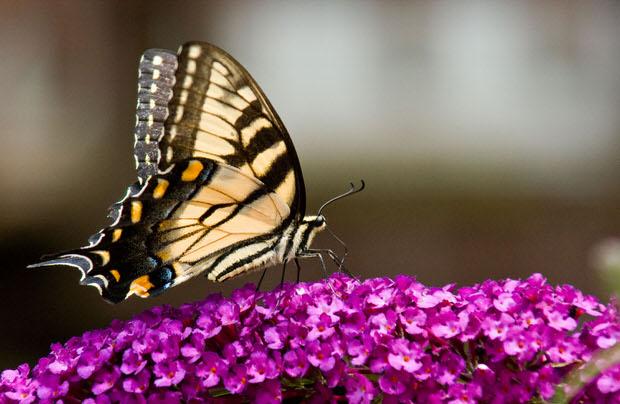
Enticing butterflies to your garden is fun and simple too. Butterflies are easy to attract to your garden if you plant a garden where the caterpillar (pupa step) has plants to eat and then the butterfly has flowers from which to sip nectar. Butterfly gardens are simple to plant and will provide you and your friends and family a chance to peek butterflies in their natural environment.
The basics are an open space with tons of sunshine and a location that is not windy. Choose a spot with lots of sunlight with a few rocks or stones that can warm up on which the butterflies will bask in the afternoon sun. Strive to locate your #garden close to hedges or shrubs that will aid in shielding them from the hardy winds. If it is too windy, the butterflies won’t stay around for any length of time. The hedge or shrub needs to develop food for the caterpillar. You can find out what the caterpillar likes best from your Nursery Garden Center.
Butterflies relish mud puddles where they can drink the water and soak up minerals. A patch of moist soil will make them joyful. Most urgent of all is that the garden be pesticide free. Some gardeners like to utilize pesticides to chase away unwanted pests, unfortunately it will keep the butterflies from visiting your garden too. Plant your butterfly garden in a cranny where it will be free of chemical pesticides. Worthier still, ask your Garden Headquarters about organic gardening. Flowers with nectar are a need for a butterfly garden. When planting these nectar sources try to put in plants that will provide nectar throughout the growing season since these are the origin of subsistence for the butterflies. Don’t discount shrubs and wildflowers. Roses, geraniums and lilies have no nectar so plant them somewhere else. Have your garden assorted to allure a the greater quantity of butterflies. Another ingredient for the butterfly garden is a source for larva food. The caterpillar needs food to develop into a butterfly. If there is no food present they will die. Plant some herbs for both of you. They love parsley, dill, and fennel for their meal. What herbs they don’t eat you can collect for home cooking with fresh herbs. A butterfly garden can also be planted in containers. Purchase some elegant pots and plant them with flowers that retain a magnificent bouquet as well as vivid pretty colors (available at your Garden Center). Petunias, daylilies or sweet alyssum will do the trick. Of course the butterfly bushes are a given, or plant some hanging baskets with Impatients (shade will be necessary). Some gardeners like to fashion there own feeder and solution. And it is easy to do. Put 4 parts water to 1 part sugar in a pot, bring it to a boil and cook it until the sugar dissolves. Bring it to room temperature. Use a container that is somewhat shallow, drench a paper towel with the solution and position it in the garden receptacle. Deposit a stone in the garden container so the butterflies have a seat to rest on while they are feeding.
This would be a great project for the kids. Have them maintain a diary of each of the various species that stop by your butterfly garden. Let them look up the butterflies on the computer to understand all about each special butterfly and it becomes not only enjoyable, but a learning experience besides. Because there are so many growing zones in the United States you will want to speak with your Nursery Headquarters for suggestions of what plants to utilize for attracting butterflies in your individual zone. There is an ancient American Indian Fable about butterflies: “To have a dream come true you must seize a butterfly. Whisper to the butterfly what your request is and then set it free. This tiny messenger will carry your wish to the Great Spirit in the sky and it will become true.” What a great folktale. Happy Gardening!
文章


Joss
2017年02月20日
A big pot of red zonal geraniums is an eye-popping spot of color. Two pots next to the mailbox is a friendly welcome! These versatile plants are ideal for window boxes, hanging baskets, wheelbarrows, plumbing fixtures, you name it. They are also excellent performers in memorial boxes.
It seems that 45 percent of all geraniums sold are red (and there are hundreds of shades of red). After that, 30 percent are salmon, 15 percent pink, and 10 percent white. That doesn’t leave out the gorgeous lavenders and yellows that are available.

And, have you seen the ivy variety? They have funky saw-toothed leaves and sweet, fuzzy flowers with all the hardy features of the regular kind. Here are a few “frequently asked questions” on geraniums and their care. Why are they called “zonal” geraniums? During cooler weather, red rings often appear on the leaves. These are referred to as “zones” and add a bright touch to the foliage. Is it better to grow geraniums from #seed or to buy started plants? Cutting-grown plants are healthier and hardier, and start to bloom sooner than those grown from seed. They stay truer to the mother’s variety, too, so there are fewer variations in flower color and quality. Always buy started plants from a reputable grower and you will experience great success. Should I pinch or deadhead my geraniums? You absolutely should pinch and deadhead your geraniums. Pinching promotes bushiness, and deadheading encourages new growth for new blooms. Pinch off approximately 1 inch of the stem (or more for leggy plants) once they’re established in their new homes. When blooms start to fade and shed petals, pinch flower stems close to the branch. It should re-bloom in a few days.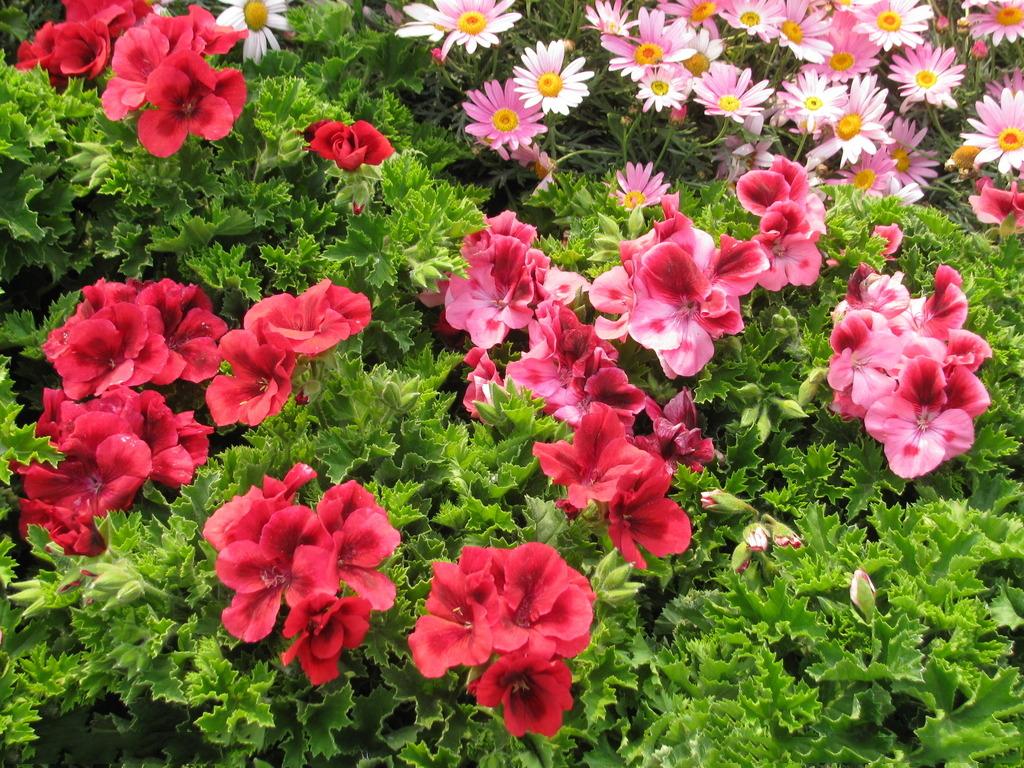
How often do I need to water? Geraniums like moist soil so check often and water thoroughly when they’re dry. They can take being too wet or too dry for a while, but they don’t like it! When you water, pour the water into the pot underneath the bottom leaves, rather than pouring it over the top. Your blooms will last longer and be prettier. Should I feed my geraniums? You bet you should feed geraniums. Water with a solution of MiracleGro or other standard fertilizer once a week. Follow the label directions to get just the right amount. Why do the bottom leaves turn yellow? You’re either under- or over-watering. Check the soil and the pot. Make sure it’s draining properly. Geraniums are full-sun plants, but they should not dry out during the hot days of summer. Just pinch off the yellow leaves and keep a close eye on your plants, and you’ll be fine.
Can I keep my geraniums over the winter? You can try. When the weather cools off down to mid- to high forties at night, repot in fresh potting mix, give them a dose of fertilizer, and set them in a sunny, southern-exposure window. (They probably won’t make it through the winter without a southern exposure.) Water when dry, and drop back on fertilizer, only feeding every few weeks. Keep your fingers crossed, and try not to be too disappointed if they give up in January. Above all, enjoy your geraniums. You’re carrying on a long tradition by growing these beautiful plants.
文章
Joss
2017年02月20日
The crocus delights us in early spring as it dares to peek through the snow and lift its face to the sun. Soon after follow tulips, narcissus, iris, lilacs… all perennials that welcome spring with vibrant color and fragrance. Perennial plants bloom at different times during the growing season and delight you with variety in color and size from earliest spring to late autumn. However, many perennials like those mentioned, bloom only for a few short weeks and then disappear from the landscape until the following year.

Annual #plants provide a garden with continuous bloom and color throughout the summer. The “mission” of an annual is to produce seed. Seeds sprout, foliage grows, flowers bloom and then the plant goes to seed. When the annual completes its mission, the entire plant – flower, foliage, and root system, dies. Some annuals have a very short life span and depending upon when they are planted, may reseed and go through two or more growing cycles per season. Other annual plants grow continuously from spring planting until the first frost of autumn.
Since annual plants die completely at season end, they need to be replaced yearly. Depending on the cultivar, annual seeds can be planted directly into a garden or sprouted indoors for transplanting when weather conditions and soil temperatures are right for growth. Annual transplants are also available each spring at gardening centers and many are sold in inexpensive flats that contain four or more plants. Annual plants can often be closely grouped to fill in barren areas of your landscape whereas perennials often need space to multiply and/or to grow to maturity. Although some perennial plants are more expensive to purchase than annuals, in the long run you may find them less expensive since they last for longer than a single growing season. You can also purchase groups of assorted perennial bulbs in very inexpensive packs. Perennial foliage and flowers also die at the end of a growing season, but contrary to annuals, the root systems of perennial plants live over winter and resprout with new growth each spring.
Another advantage of perennial plants is that although flowers and foliage die back, the branches of perennial shrubs offer some visual appeal to a winter landscape. Perennial plants may take more than one season to reach full maturity. Because perennials propagate from root structures, many types of perennials also need to be divided after three or four seasons to reduce crowding and maintain their vigor. Although all perennial plants are able to resprout for multiple seasons, perennials are divided into to categories of hardy perennials or tender perennials according to the temperature zone in which they are grown. Hardy perennials are those that can be left in the ground to return the following season. Except for occasional division and/or pruning, hardy perennial plants need little care once established. Bulbs like tulips and daffodils are among the easiest plants to grow and excellent choices for a beginning gardener. Tender perennials need your help to survive the winter. Some can over winter when covered with a layer of mulch or otherwise protected from the elements with gardening appurtenances such as rose cones. Some tender perennials need to be lifted and stored indoors over winter. So the question remains, do you need annual plants or perennials? Each type of plant is ripe with “pros” and short on “cons” if you love flowers. The best solution is to experiment by planting some of each to get a summer full of color, variety, and pure gardening enjoyment!
文章
Joss
2017年02月20日
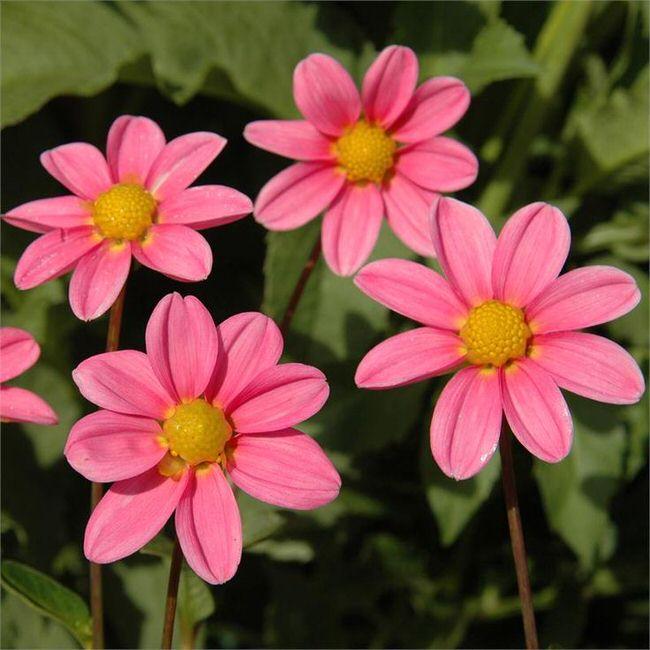
#Blue flowers are some of the most striking plants around and can add a rich splash of color to any garden. Plant them in a cluster of all blue or mix them in with other flowers for a rainbow of color.
When planting flowers, it is important to remember to follow the instructions on the tag for the plant. Always buy plants that will thrive in the conditions in which you intend to grow them. A plant that loves sun will not do well in a shady area and you will only be disappointed with the results.
When planning your garden, be aware of the bloom time of the flowers. Planting perennials with different bloom times near each other will insure a garden that has blooms all season long. Remember also to plan for the height of the plants, putting the taller ones in the back.

Consider the flowers on the list below for your garden. Polemonuim aka Blue Pearl – A compact plant with deep sky blue flowers that grows to 10″. It blooms in late spring to early summer. Plant in partial shade and in well drained soil. Blue Sea Holly – This dramatic plant has a lavender blue cone like flower with long spiked petals. It grows to 30″ and is a favorite for dried flower arrangements. Plant in full sun – blooms in mid to late summer. #Delphinium aka Butterfly Blue – Bright blue delicate flowers adorn a plant that blooms in early to mid summer. It reaches 10″ tall and prefers a sunny location with rich moist soil. #Campanula aka Blue Carpet – Bright blue to lilac colored flowers bloom for weeks in the middle of summer. This low growing perennial grows to 4″ and prefers full sun with well-drained soil. #Penstemon aka Blue Buckle – This plant has tubular shaped blooms in blue to purple and flowers in mid summer to early fall. It grows to 15″ and likes well-drained soil with full or partial sun.
#Hydrangea aka Nikko Blue – Gigantic clumps of blue flowers adorn this shrub for most of the summer. In the fall, the flowers turn a golden color. This plant is a new variety that prefers rich soil but will grow in shade, partial sun, or full sun. #Vinca – Medium blue flowers and glossy green leaves form a carpet that grows to about 6″ tall and blooms in mid spring. This plant will grow in most soil conditions, in the shade or sun. #Ajuga aka Bronze Beauty – This short bushy plant has spikes of blue flowers that grows quickly. Great as a ground cover or in raised beds. It blooms in spring and prefers a shady area. #Scabiosa aka Butterfly Blue – A bushy perennial with lavender blue flowers that bloom from June to October. This plant likes full sun and attracts butterflies and hummingbirds. Verbena aka Babylon Blue – Blue purple flowers petals adorn a plant that blooms in early spring. Great for window boxes and planters.
文章
Joss
2017年02月18日
What could smell or look lovelier than a vase full of stunning #roses ? With just a little care, they can last a very long time in a vase.

5 Tips For Cutting Roses: 1. Wait until after 3 p.m. to cut, when their nutrient levels are the highest. 2. Choose buds that have just started to open, only 1/3 to 1/2 of the way through the process. Once a bud has fully opened, it’s too late to cut. 3. Always use a sharp, clean pair of shears. Dull shears crush the stem, and dirty shears can transmit diseases. 4. Don’t remove all of the leaves — keep at least 3 to help feed the bloom. Remove only leaves that will be below the water level of the vase. 5. Once you have finished cutting all the roses for the day, bring them inside to begin the water conditioning and hardening process.
9 Tips For Preserving Roses: Now that they are cut, the clock starts ticking. The first threat to a cut rose’s health is the air pocket that entered the stem when you cut the rose outdoors. It will work its way up to the stem, cutting off the nutrient supply and shortening the bloom’s life. 1. Replace that air with water. The easiest way is to fill a bowl with hot tap water, as hot as you can stand to put your hands into. 2. Add any floral preservative you use, plus a few drops of bleach. 3. Place all of the rose stems into the bowl without the buds touching the hot water. 4. Use your shears to cut 1/4 inch off the end of each stem. 5. Leave the roses in the bowl until the water cools to room temperature. 6. Fill your vase with warm water, add a drop or 2 of bleach, and some preservative. 7. Finally add your roses. 8. Whenever the water starts to get cloudy, remove the roses, refill the vase with warm water, add another drop or 2 of bleach, and return the roses to the vase at once. 9. When the blooms begin to show signs of wilting, re-cut about an 1/8 of an inch from the stems and place them in hot water for an hour before returning them to the vase. This little bit of extra work will vastly extend the vase life of your cut roses. Roses can live for an amazingly long time in a vase if you will help them.
文章
Joss
2017年02月18日

Mums, or #Chrysanthemums , are one of the most popular and classic fall flowers for the garden of all time. With good reason! They come in a wide array of colors, last well into frost, and keep a dying landscape looking fresh and colorful while we ready ourselves for letting go of the growing season. But there are some tricks to growing them, and some of them may catch you off guard. Here are the five mistakes most people make growing Mums, and how to correct them! Mistake 1 Planting Mums from the gift section. If your Mums come in a foil wrapped pot, I have news for you. It’s gonna die. Chances are a well meaning friend gave you this plant in late fall as a gift, and intended for you to plant it in your garden for next year. The problem with that is that gift plants are grown entirely in a greenhouse. Which means, they have never been conditioned to living outdoors. Add to that the fact that nights are growing cold, and frost is just around the corner, and there is no way these plants can harden off before winter sets in. Just enjoy them on a sunny window sill. Then let them go. :) Then look for nursery grown plants called “hardy” Mums. And get them in the ground no later than early fall. (And spring is better!). Mistake 2 Forgetting to Feed! Mums are heavy feeders, and they are even more voracious if they are planted in containers. Feed, feed, feed! Mistake 3 Expecting them to be hardy while planted in containers. While I do use Chrysanthemums in containers, and I have had them overwinter and come back in the spring, this is the exception. When plants are in containers, there root systems are less protected. If you plant Mums in containers, treat them as annuals and plan to replace them next year. This is why they are cheap!

Mistake #4- Not Pinching! When Mums are about six inches tall, and then again at twelve inches, you should pinch off the tips of the branches. This forces the plant to grow more compact, and thus avoids that awkward “floppy” stage right before they are ready to open their blooms, ruining the whole seasons growth! Mistake 5 Not taking advantage of Mums in the garden bed. You know what, don’t wait for fall to think “I want some Mums to add fall color!”. Plant Mums in the spring with your other perennials, and make sure you try varieties of different size, colors and flowers shape. Think of Mums kind of like planting bulbs in the fall… you know you won’t see those tulips bloom until the next season, but it’s worth the wait.
文章