首页
动态
文章
百科
花园
设置
简体中文
已关注
+
关注
花园里是空的哦~
还没有添加花。
动态 (112)
Abigal
2017年05月21日
Abigal

There is never enough storage outside on the deck, porch or patio. I’m always having to run to the garage to look for a yard game, candles, small garden tools or a couple of outdoor pillows for that afternoon book. While we’re busy complaining, there are also never enough  places to read that book! So whether you have a small garden space, or just want to maximize your organization, we found some solutions to both problems! These DIY outdoor storage benches are a great idea for adding additional seating and always making sure that bocce ball set is just within reach. Our feature project above, is from the very talented Kim at ‘Sand and Sisal’. Her DIY outdoor storage box and bench is even on caster wheels for easy relocating. She has plenty of step by step photos on how she did it. Kim at ‘The Kim Six Fix’ designed this X leg bench with crate storage, and shares her tutorial on how she did it for around $40!
  I like this bench with hidden storage project from ‘This Old House’ because it has a back rest. Sometimes that’s all I need after working in the garden, is a spot I can lean back and relax.
  This outdoor storage bench from Ana White was designed after a West Elm line… and it looks like it! Her complete plans and tutorial are all free, so give this one a try!
  From ‘Home Depot’, this DIY outdoor corner bench with storage is from Caitlin at ‘Desert Domicile’… I love her backyard! It feels like an expensive resort. The tutorial has lot’s of instruction and step by step photos. This is one of those projects that could transform a garden space.
  From ‘Canadian Home Workshop’, this stylish water storage bench was meant for holding everything from dock supplies to pool toys!
  This DIY outdoor storage box by ‘Build Basic’ has some real style factor to it… all you have to do is turn the slats to get a coastal louvered look!
  This storage seat box from ‘Better Homes Australia’ has a cool modern look , and is portable with industrial wheels. Good photos take you through it.
  Now that you have some great skills from these tutorials, how about a couple to inspire you to do it your own way? From ‘BHG‘, these vintage locker bins make great DIY outdoor storage!
  Last, from ‘Twig Decor’, they used an old door and headboard to repurpose into an outdoor bench with storage. Ok, could this have looked any more amazing? I would love to see it still as a headboard too!
0
0
文章
Abigal
2017年05月21日
Abigal

It’s pretty tough to enjoy summer activities in a backyard that bakes in the afternoon heat. We all need a way to get out of the sun, but still be able to spend  time outdoors. We found these 9 clever DIY ways to a shady backyard oasis for you to help turn your space into a retreat! We didn’t want to just share the same ol’ wood pergolas (though if thats what you are looking for, check out our post on DIY pergolas!) so we hope these unique and creative shade structure ideas hit the shady spot! Our feature project above, is a DIY drop cloth fabric shade cover made by ‘Anything Pretty’. Check out her tutorial, it took them just a couple of hours to get this up, and made over their old pergola! LOVE the globe lights woven through the shades. Here is another tutorial for a fabric shade by ‘Koiphen’. Good close up photos here to help you understand the wire system for holding the shades.
  From ‘J and B Marvin’, this DIY fabric pergola has a quick tutorial, and a lot of good tips. Same type of system as the project above. This is fully retractable too!
  Ok, so you need Google Translate for this one, unless you read Dutch. At least, I think it’s Dutch! But I love this one, because it’s a freestanding DIY fabric pergola that can be put up even where there is no existing structure. From ‘VT Wonen’.
  Hope you were paying attention to those tutorials, ’cause these next few ideas don’t have instructions, but they follow the same principles of the ones you’ve seen so far! This space from ‘InDecora‘ has a simple wire mounted fabric shade, with grommets to string the cable through. Grommet kits can be bought at craft and sewing stores, and this could be made out of sturdy canvas drop cloths from the hardware store.

  Same idea as some of the projects above with this slide wire canopy from ‘Superior Awning’.
  From Jamie Durie of ‘HGTV‘, these sliding canvas panels are mounted and slide the same way as the fabric ones above. There are eye hooks mounted on the frame of the panels, and the wire cable slides through the hooks, over the top of the panel. These can be moved to cover different areas of the space as the sun moves.
  Also from ‘HGTV‘, covering sections of your existing pergola with canvas cloth makes a more permanent shade structure. Clever!
  Finally, if you want a cool look for over your patio, or even your pool, think about using shade sails. They come in triangular and rectangular shapes of different sizes, and are attached to posts, trees or buildings with hooks and cables. Check out our post on how to hang shade sails for more info on this project!
0
0
文章
Abigal
2017年05月21日
Abigal

I happen to live in a house just one street in from a river canyon. Love the access to the canyon trails. Hate the mosquitos! In fact, they can make my garden nearly impossible to enjoy in the early evening hours in Spring and Summer, which of course is the best time to enjoy it! So I am always on the hunt for a better mosquito trap, or repellent, or any device to keep them away! We all know about Deet, and other chemical repellants. We also have all heard about the possible dangers associated with them. We tried to find some natural solutions. Here they are, the best ways we have found on the web to zap those mosquitos… or just plain ol’ make ’em disappear! Disclaimer : We have not tried out all of these, so I can’t guarantee their effectiveness. Would love for you to share in comments whether they work for you, or if you know some other ideas that we haven’t mentioned! Your first option is to plant mosquito repellant plants in your garden. I think this works great if you can plant enough in the garden in your immediate area… One plant is not gonna cover it. A better option might be to plant them into containers that you can move and group around a patio or table area when needed. Here are the top three most popular repellent plants that are pretty, too! Lemongrass Lemongrass is a tender tropical grass that will not survive the winter in areas colder than zone 8, so is best used in containers. It is the most popular and, reportedly, effective mosquito repelling plant!
  Sage Sage is great as a garden or potted plant, and comes in ornamental varieties that are purple and golden as well. (I grow them both in my garden!) Also great tossed onto a BBQ or fire pit to add some repellent properties to the air. Learn how to grow sage.
  Lavender I also grow a lot of lavender, and I love the smell. I actually go out and pick a lavender stem when I wander my garden just to enjoy the stress relieving scent. Also a great mosquito and fly repellent. Learn how to grow lavender.
  A couple others worth a quick mention? Basil, catnip, rosemary and mint. Ok, so you’ve planted a few great plants and are ready to move on to more. Start with this DIY all natural bug spray by Tasha from ‘Designer Trapped’… She even breaks down why this is a better value than store bought bug sprays, not to mention… did we mention? All natural!
  Charlene at ‘My Frugal Adventures’ has another recipe, this one is a homemade mosquito repellent with just three ingredients!
  From Stephanie at ‘Garden Therapy’, learn how to make citronella candles with her budget friendly tutorial… These would be great to combine with the mosquito repellent plants! She has a great garden projects book out as well, check it out while you are there!
  Make these pretty mason jar citronella candles from ‘Marty’s Musings’ for a charming way to repel mosquitos. She even tells you where to get the liquid citronella fuel.
  From Melissa Caughey at ‘HGTV Gardens’, make these herbal insect repelling bundles that you can use in a fire pit or BBQ to keep bugs away. You just let them smolder at the edge of any fire source, and voila! No more bugs, and the air smells amazing!
  Ok, this one is pure genius. Jessica at ‘Mom 4 Real’ shows us how to make this cute DIY mosquito repelling bracelet! And of course, it’s all natural as well.
  This homemade mosquito trap from ‘Ehow’ is inexpensive and easy to make. It also comes with some controversy as to how effective it is, and whether it will also trap bees, which of course, we need! I understand if you add a little vinegar to these traps, bee’s will not be as attracted… This is worth a try, but one note. As with any insect traps, don’t place them near your seating areas. The trap are meant to attract the bugs, so if you put it too close to people, you are bringing them right to you!

  Another quick DIY mosquito spray? From ‘Mint Juleps N Muddin‘, try Listerine in a bottle. They suggest the original.
  Use Vicks Vapor Rub around your wrists and ankles as a natural repellent, from ‘Divine Caroline‘.
  So our last trick for you is a simple one. We ran across this article on this low tech mosquito deterrent from the ‘NY Times‘. Using the flow of a fan across your seating or patio space can give  just enough air movement to keep away mosquitos. Mosquitos are notoriously weak flyers, so this can be pretty effective. Try it!
1
0
文章
Abigal
2017年05月21日
Abigal
When the warmer seasons come around, most of us like to spend some evenings (or most!) lounging in our yards and gardens. Having good outdoor lighting can make your outdoor space a usable and enjoyable spot to visit with loved ones, have a late snack, or sip a good glass of red. Try these backyard lighting ideas and tutorials to get your yard in shape for when the sun goes down! Our feature photo below is a gorgeous backyard globe light set up by ‘Willow Jade Floral‘ in L.A. If I could have my whole yard look just like this!
Make these geometric light columns with this tutorial from ‘Martha’. This uses just three simple materials, and would be great for a graduation or Fourth of July party!
  From ‘House of Fifty’ magazine, make mason jar candle lanterns! These are easy, and who doesn’t love mason jars!
  Another version of a mason jar lantern, these we found on Pinterest, but can’t find the original source. Please share if you know where these are from! We really like how they look hanging against the wood fence. It makes for a really pretty look, but if you do this, consider using LED candles instead.
  This outdoor lighted cube table is a woodworking tutorial from ‘Lowes’… This would make additional lighting in your patio area unnecessary!
  A great idea from ‘Sunset‘… hang tea light lanterns from different heights as an outdoor chandelier…
  Robin at ‘All Things Heart and Home’ has a tutorial for her easy DIY outdoor chandelier made from grapevine balls! Love this project!
  Ok, these are just cool. These are cracked log lamps made by artist Duncan Meerding, via ‘Recycled Interiors’. You have to go check out how he makes these! I would love these all through a woodland garden! Fairy garden!
  Love the idea of string lights, but want to make it really amazing? Just use this photo from ‘Fondly Forever‘ to inspire you!
  Use uplighting to brighten dark corners or to light focal plantings at night. Photo by Laura Joliet for ‘The NY Times‘.
  Try lighting the pass through areas between yards to add dimension to your outdoor space. Photo by ‘Martha‘.
  Ok, last we have these moonlight globes from ‘Home Infatuation’… These. Are. Cool. Not cheap, but amazingly cool! They can float, or be mounted, and can be recharged over and over.
1
0
文章
Abigal
2017年05月21日
Abigal

I love art in the garden. You may have heard me say this a time or two before… :) I would have art painted onto my fence boards if I could get away with it! (And yes, I could, but I have a family that I don’t want to move away and leave me. They can only take so much.)  I love round shapes in the garden as well, they are a great representation of the circle of life, which is what a garden is about. Gazing globes have been popular since the Victorian times, but they are usually made of glass and are expensive and breakable. How about trying something a little more… well, different and unique! These creative DIY garden globe projects are prefect to tuck in a shady corner, to  punctuate a busy flowerbed, or to add some interest to a boring walkway. Love all these projects! Our feature project above, is from Alison at ‘Bonney Lassie’. She made these DIY gabion garden globes for $20! I love how different these are… organic with the use of rocks, yet still controlled. Genius to use the wire flower baskets too! ‘Greencube Landscapes‘ shows us how incredibly cool concrete globes in the garden can be. Be sure to check out their site for all the photos, they are inspiring! They don’t have a tutorial, but no worries, we do! Check out our post on DIY concrete garden globes.
  These marble garden globes are the genius design of Etsy shop ‘Ta Dah PDX’. If you are patient, you could DIY this with some E-6000 adhesive, an old thrift store bowling ball, marbles, and a lot of time. Or,  you could do it the easy way, and contact Ta Dah PDX!
  Here is another one that is a fun DIY project with adhesive… ‘Fine Gardening Magazine‘ Spring 2015 had this really unique stone covered garden globe project in it’s pages! Pick up a copy and see all the details, but again, we recommend E-6000 adhesive, or a landscape adhesive that is waterproof.
  Shayna at ‘The Wood Grain Cottage’ has a tutorial for her DIY wire garden globes with the help of her friend April. These are an easy project for beginners using wire and spray paint. I like how “light” they appear visually, and they look great in a grouping. You could even grow things through them, like they had been there forever. Love these!
  From Zoe at ‘Creative in Chicago’, this DIY driftwood orb tutorial makes this a fast project that you could use indoors or out! I love how simple she makes this project, with one little trick!
  ‘The Peaceful Axolotl’ shows us how to make these DIY wine barrel hoop globes. These are amazing! I wonder if you called a local winery, if they would sell you old hoops that have patina?
  From ‘Brabourne Farm‘ these rusty wire globes are quite unique, and you wouldn’t have to worry about leaving them in the weather! :) There is no tutorial, but lets face it, it’s a ball of wire. Ok, barb wire may need some good leather gloves. ;)
  Finally, ‘BHG’ shows us how to make a garden globe from yard cuttings. I like this tutorial because using branches from your own yard not only ties in the textures and colors of your garden, it gives it a little color and makes it different from the ordinary grape vine globes you can buy.
0
0
文章
Abigal
2017年05月21日
Abigal

I think sometimes we forget what our garden is supposed so be… A respite from the rest of the world. Some place calm, tranquil and relaxing, even if we play and entertain there as well! Introducing water as an element in our garden is a good way to disguise noise in the neighborhood, add a sense of nature, and soothe ourselves. These 7 soothing DIY garden fountains are meant to inspire you, but I hope you pick one to recreate for your own yard, or let one convince you that you need one of these. And BTW, making your own fountain saves money over buying one as well. More cash for those prize Dahlias! Our feature project above – Charlotte at ‘Ciburbanity’ made this DIY garden fountain created with concrete and Goodwill! Click on over to her tutorial to find out what I mean. I love spheres in the garden, they remind us about the circle of everything, which is nature’s deepest truth. From ‘Central Texas Gardener‘, learn how Elayne Lansford made this glass table top into a water wall! This is amazing! I think we need to head out to the thrift store to look for an old patio table! Good instructions and step by step photos.
  Want to go a step farther? Marie (well, her hubby!) at ‘The Interior Frugalista’ made this DIY water wall for her garden. Lot’s of photos in her tutorial to take you through it, and I love this project! Can you imagine such an amazing piece in your garden?
  Ok, time to go smaller scale. Jordan at ‘The Happy Homebodies’ has a tutorial on this DIY flower pot fountain that is perfect for a quiet corner. Lot’s of photo’s here too, and great instructions.
  Jen from ‘Tater Tots and Jello’ has a complete tutorial for her DIY recirculating ceramic pot fountain that would be perfect for my backyard! Lot’s of great photos and step by steps as well. BTW, if you haven’t visited her site yet, you have to check out her kitchen… one of my fav’s in the blogosphere!
  Ok, now for some inspiration! Teri from ‘Gone Walk About‘ took this photo of a copper tubing fountain at the Nashville Lawn and Garden Show. Check out all her great home and garden posts at her site! Steve and I think this may be added to our project list. If we decide to tackle it, we will update with a tutorial!
  This copper water wall is amazing, we found it on Pinterest. Unfortunately, look as we might, we could not find a good source for it. If anyone knows where this fountain comes from, please let us know so we can share it with you all! In the meantime, we’ll just dream about it!
So are you feeling the need for water in the garden yet? These great ideas should get you started!
0
0
文章
Abigal
2017年05月21日
Abigal

If your garden is on any kind of a slope, it’s possible a garden retaining wall might make your property more usable, and more valuable. Retaining walls hold back soil to allow a level planting area in a space that normally would have poor soil, drainage, and access. So banish the idea that only ground cover plants can grow on your slope! Build one of these DIY garden retaining walls and change the whole dynamic of your yard. Our first bit of retaining wall inspiration is from ‘Isbir Construction‘… there isn’t a tutorial, but it’s a great photo in that it shows you how simple a retaining wall can be. This is simply cedar timbers cut to different lengths for interest, a row of bricks to prevent erosion, and then soil and mulch to backfill. Obviously this simple project is better for a minor slope correction. Perfect for this flower beds where the water just seems to run right off…
  Want the same timber feel, but on a larger scale for a bigger job? Then follow along with this tutorial and video from ‘This Old House’ and build your own timber retaining wall. This particular one is not a small job, but with some DIY ability, you could save thousands over having this installed. Photo: Landscape Supplies
  Do you want a wall with a different look and feel? Build a concrete block retaining wall with this tutorial from ‘Family Handyman’. This also has no possibility of rot, making it a very long lasting solution.
  Also from ‘Family Handyman’, make a retaining wall from less expensive pressure treated 2×4’s…. This is a great plan for the gardener on a tighter budget. I love the look of this, it could go well with a modern or rustic style garden.
  From ‘BHG”, build this concrete block retaining wall in less than a weekend! I love the cap on the top of the blocks, it gives it a finished look, and also a place for seating.
  Use all those boulder size rocks you keep digging up by building a rock or stone retaining wall with this tutorial from ‘Las Pilitas Nursery’… They even have drawings to show how to layer the wire and mortar to make a strong wall…
 ‘DIY Network’ offers a great step by step tutorial for building a stone block wall, with lots of photos along the way.

  Finally, a little inspiration from “Down Under”, ‘Gabion 1‘ in Australia has two ideas for you using wire mesh to create a “gabion”. These can be filled with stones, bricks or recycled materials. Use your imagination on what kind of repurposed objects could fill the wall!

0
0
文章
Abigal
2017年05月16日
Abigal

We all know by now that
#composting is important to the #environment . It allows natural waste to return to the earth, while adding a nutrient rich material to our gardens. Here is a break down of the top 3 most common techniques for composting for the home #gardener .
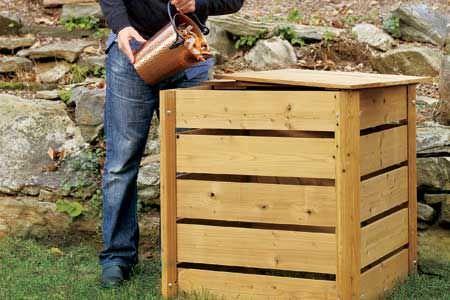
Hot Composting – Open Bins Hot composting is the most intensive method, but also the fastest way to get finished compost. It involves building compost piles that have a balance of green material (nitrogen), oxygen, water and brown material. The most common method is a three bin open bin method. Made of open slats to allow the piles to breathe, this option is not a great choice for those with limited space, or who will not keep up with turning the pile…. But for those with a little space in the back of the garden, it’s the fastest way to generate a larger amount of compost, and to utilize a larger amount of scraps. Here’s how to make an open bin hot compost pile. Build or buy three, side by side compost bins. ‘Backyard Feast’ has a complete tutorial on building the ultimate compost bin.
Bin #1 will be for brown materials…kind of a holding area for things you want to compost. Bin #2 is where all the action happens. In this bin, layer brown and green materials (green materials include fresh grass, leaves, veggie scraps, etc… browns include dried leaves, twigs, and dead plant material) until you have a ratio of approximately 2 parts brown to 1 part green. Wet the pile with water until moist, but not soggy. Turn the pile regularly with a spading fork to allow air to reach the pile and to mix the nitrogen throughout the pile. Wait for the pile to get hot, and to start composting for you! Basically, the more attentive you are to turning the pile, keeping it moist and not adding any new material until its finished, the faster you will get compost. That gives you a window of 6-12 months. Compost is done when it is warm, not hot, and smells and looks like a sweet soil amendment, and no longer like rotting cantaloupe. :) Move the compost in bin #2 to bin #3 to “settle” and continue to cool until you need to use it. Start another hot pile in bin #2 from all the stuff you have been holding in bin #1! The benefits to having the three bin system is that you can continue to collect brown materials during the season in bin #1, and that once you move the compost to bin #3 to settle, you can start over again with a new compost pile. Moves things along a lot faster! You can also create a hot compost pile in just one bin if you have don’t have space, or don’t have much material to compost… it just means you can only work on one pile of compost at a time. ‘This Old House’ shows you complete plans on making a single compost bin.
  Hot Composting – Closed Bins or Tumblers This is a one bin system where you use a closed bin or tumbler, add the same “hot” ratio of green to brown and water, then turn the bin itself to mix the ingredients once a week or so. This saves you from having to deal directly with the compost, and saves a little on your back as well! The downside is that you can only make a small amount of compost at a time. If you don’t want to buy a tumbler, ‘Full Measure of Happiness’ shows us how to make a DIY compost bin from a plastic garbage can!
  A more intensive project will keep you composting like a pro. ‘Urban Farm Online’ has a tutorial for this DIY compost tumbler you can use year after year.
  Cold Composting – Otherwise known as the lazy mans compost pile! So for all of you groaning out loud because all that sounds like so much work, I have good news. Stuff will compost with or without your help. It’s just a matter of how fast! Cold composting works, but it can take 1-2 years, depending on what kind of materials you have in your pile. Basically, this is the way to do it… Make a pile 3×3 feet of compostable materials, the smaller the pieces, the better, so shred! Add some water, or not, and cover if you want to speed the process along… or not. :) When, and if, you think of it… turn it, water it, and then forget it again. Wait until it’s done. Voila! This info graphic by Well Home tells your everything you need to know about hot and cold composting, and also some less well known (and one icky!) composting techniques.
That’s it! Three easy techniques for composting everyone should know! It’s not rocket science, and there is no compost police that is checking to make sure you have turned your pile this week. Just remember, the more attention you give it, the faster it will give you a wonderful, organic soil conditioner for your garden!
1
0
文章
Abigal
2017年05月16日
Abigal

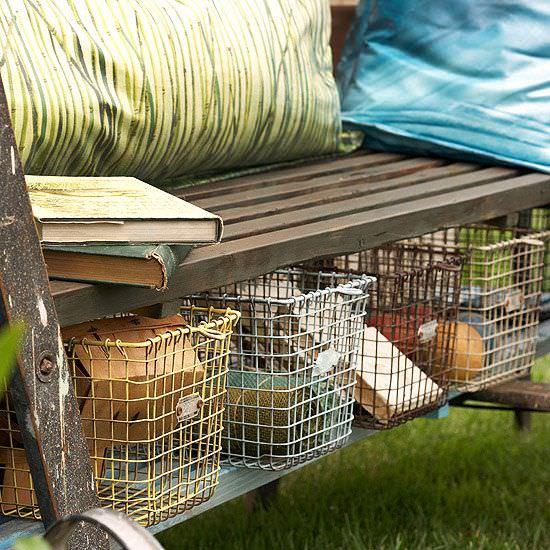
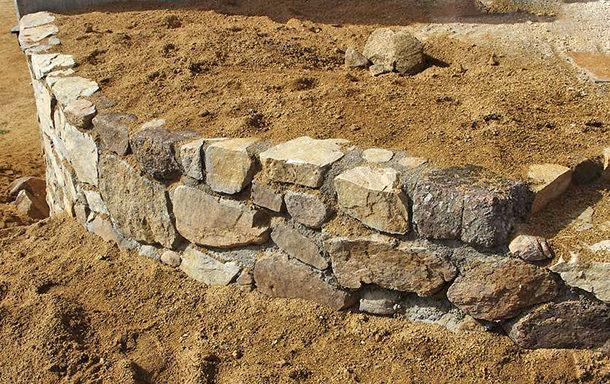
One of the most important design elements in a
#garden is structure. It’s easy (ok, it is a little bit of work!) to add structure by adding paths and walkways. They give the eye a place to rest, #follow , and let you lead visitors throughout the garden. Classic #DIY garden walkway #projects can be done in a weekend, and can seriously up the anty on any garden design. Even adding a simple pathway from the street to the front door adds value. Direct the garden wanderings, keep visitors out of special areas, and lead to the important focal points and recreation areas of your yard with a walkway. We’ve done a few posts on casual, creative paths, but it was time to make sure you all had the classic options as well. Try out these projects to give your garden a smart framework and foundation. Learn how to lay a paver or flagstone walkway from ‘BHG’… instructions for three different options of pathway.
  ‘Paint Speckled Paw Prints‘ transformed their existing “paver in the grass” walkway into one laid into rock for easier mowing… Make sure you scroll down to the end of their post and see the photo of the front yard with the finished path… Big improvement! I would have chosen a different rock, but I’m probably biased against red lava rock… saw too much in my youth in California…
  Another idea of the same type of project… with a different mulching material between the pavers! This walkway project is by Danielle from ‘Life Be Green‘…
  Find out how to lay a slate walkway from ‘Young House Love’… This one looks so high end!
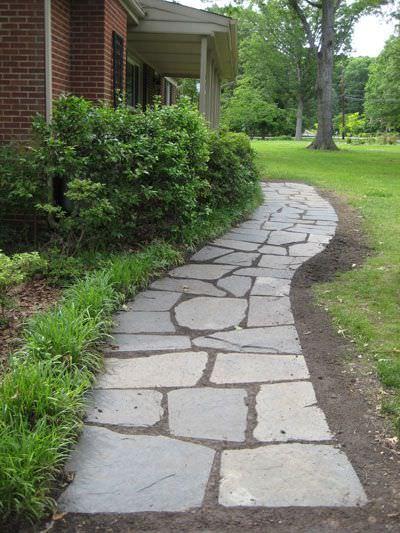
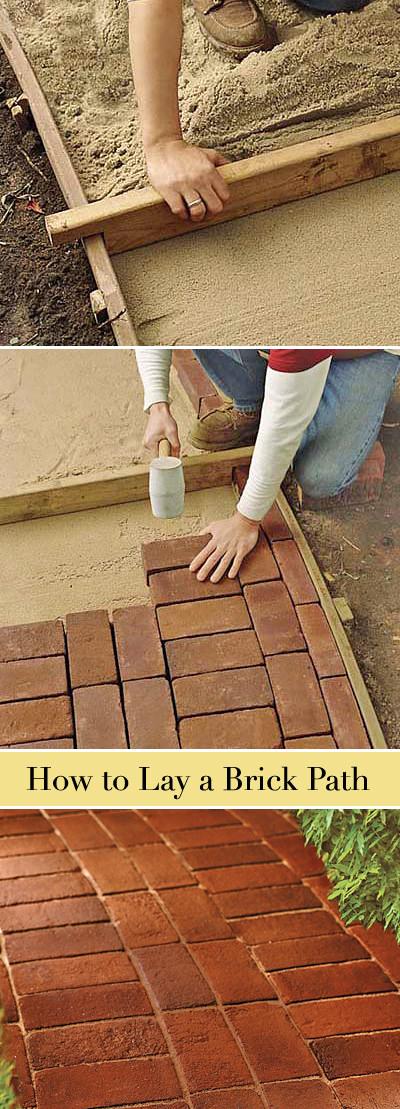
  How to lay a brick path, from ‘This Old House’. This is a great choice for a more traditional home…
  Also from ‘This Old House’, how to lay a gravel path. I would use this material for a more casual home, but remember to choose gravel that compacts together for easy walking. Round pea gravel is not easy to walk in!
  And number 7 is how to build a concrete walkway, by ‘Family Handyman’… This is the most permanent solution, so make sure of your placement before you take this one on. Good luck with adding a walkway to your garden!
1
0
文章
Abigal
2017年05月16日
Abigal

At least three seasons of the year, a
#hammock can be your best friend in the #garden . All the planning and work and planting you do in your garden space means nothing if you don’t spend time enjoying it. And isn’t the garden all about a peaceful retreat? Well, retreat to your #DIY hammock that you made, (here are lots of tutorials!) and spend time pondering life, reading a good book, or taking a well deserved nap. Better yet, snuggle up with your S.O. and take a nap for two! Our feature project, above and below, is a step by step DIY hammock by ‘The Little Dog Blog’. Steve came across this project, and thinks it’s one of the best, most complete tutorials he has seen! This is a great place to start!
  I really like this DIY hammock chair by ‘A Beautiful Mess’. You could use it outdoors, or even in a sunroom like she did. What a comfy place to have a cup of tea!
  Try ‘Gardenista’s DIY instant hammock version of an expensive store bought one! This is a short tutorial, so bring your DIY skills, but its a basic rectangle and grommets on the corners. You can find grommet kits in any craft store. Make sure you get heavy duty ones!
  If you aren’t lucky enough to have several mature trees or sturdy posts in your yard, you’re gonna need a stand. The tutorial at ‘Here comes the Sun’ for their DIY hammock stand will get you a good quality stand that will last… not some cheap metal thing that will rust the first season. You know the kind, the ones every discount store sells.
  From ‘The Merry Thought’… well oh me oh my… this is the quintessential vision of a day in the hammock, isn’t it? Learn how to make this DIY hammock with a very complete tutorial. (Including how to use those grommets!) This is true hammock heaven!
  Lastly, from ‘Instructables’, this DIY hammock stand has lots of photos to inspire you, but we’ve yet to discover the tutorial… however, after reading the comments, they posted a written plan for the hammock stand.
0
0
文章
举报 反馈

您有什么意见或建议,欢迎给我们留言。

请输入内容
设置
VIP
退出登录
分享

分享好文,绿手指(GFinger)养花助手见证你的成长。

请前往电脑端操作

请前往电脑端操作

转发
插入话题
提醒好友
发布
/
提交成功 提交失败 最大图片质量 成功 警告 啊哦! 出了点小问题 转发成功 举报 转发 显示更多 _zh 文章 求助 动态 刚刚 回复 邀你一起尬聊! 表情 添加图片 评论 仅支持 .JPG .JPEG .PNG .GIF 图片尺寸不得小于300*300px 最少上传一张图片 请输入内容