文章
Miss Chen
2022年04月13日

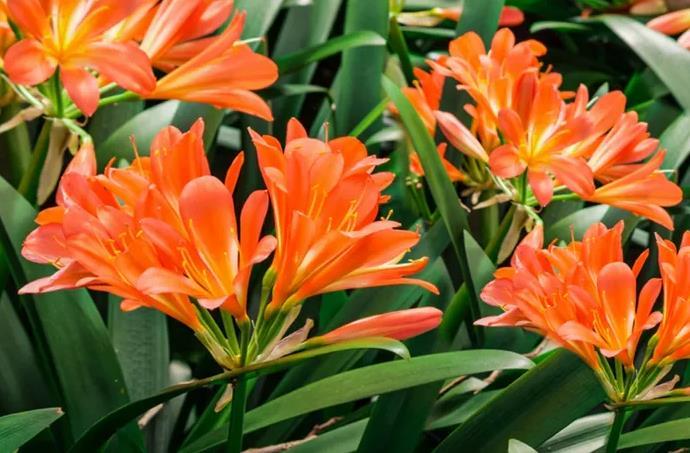
Few houseplants can boast blooms as vibrant as the fire lily (Clivia miniata). After your winter holiday when plants like poinsettias and amaryllis have faded, the fire lily fills a gap when the days are short and spring still seems far off. Despite its exotic appearance, the fire lily is easy to grow as a houseplant, producing large clusters of blooms in the dry environment of the typical home. This tropical perennial can also be grown as an outdoor landscape plant in USDA zones 10 to 11, where it is often massed in large drifts, much the way daylilies are used.
The Clivia genus is a member of the Amaryllidaceae family of plants, a group that includes the amaryllis—the popular winter houseplant. They can be introduced into the home as potted nursery plants at any time; if planted in the garden in warm climates, they are best planted at any time other than the hottest part of summer. These slow-growing plants can take several years to flower when they are planted from seeds.
Botanical Name Clivia miniata
Common Name Fire lily, natal lily, bush lily, clivia
Family Amaryllidaceae
Plant Type Perennial
Mature Size 2 ft. tall, 2–3 ft. wide
Sun Exposure Partial
Soil Type Well-drained
Soil pH Acidic, neutral
Bloom Time Winter
Flower Color Orange, yellow, cream, pink
Hardiness Zones 10, 11
Native Area South Africa
Toxicity Highly toxic in large quantities

Fire Lily Care
Like many South African plants, the fire lily is a tough and resilient specimen. Too much sun or water, though, will cause the plant's demise. If you've purchased a fire lily and it won't bloom, it is usually due to a lack of winter dormancy or immaturity. Fire lilies will grow for years in the same pot with little intervention.
Light
Fire lilies prefer partially shady conditions, which makes them valuable as a houseplant. If you grow your plant indoors all year, place it in a bright window. If you give your plant an outdoor location in the summer months, put it in a spot with dappled sunlight or morning sun.
Soil
Good drainage is important to a healthy fire lily plant. A chunky soil mix full of shredded bark, like those used for orchids, is suitable for a container-grown plant. A sandy cactus mix is also a good choice.
Water
Fire lilies need moderate water. Allow the soil to dry between waterings. When it's time for the early winter dormancy period, reduce watering to keep the soil just short of bone-dry.
Temperature and Humidity
Average room temperatures and low humidity help fire lilies look their best. A cool dormancy period increases the beauty of fire lily flowering. You can achieve this by keeping the plants in an unheated shed or garage in November and December. Plants should be kept between 40 and 60 degrees Fahrenheit during this time.
If moving fire lilies back and forth between indoors and an outdoor location, it's best to acclimate them slowly if the temperature range is substantial. Make sure to bring them back indoors before the weather approaches freezing.
Fertilizer
A slow-release houseplant fertilizer can help your fire lily thrive. Use a balanced 10-10-10 fertilizer from January until August, then use a fertilizer designed to increase blooming in September and October. Do not fertilize in the winter months leading up to bloom time.
Types of Fire Lily
Most fire lilies sold in garden centers are orange, fewer are yellow, and the rare and expensive cream or pink varieties are usually found through specialty nurseries.
'Doris' is dark orange with a yellow throat.
'Jenny' is orange with a yellow stripe.
'Tiny Tim' has shorter leaves and miniature orange blooms with white throats.
'Solomone Yellow' is a bright yellow.
'Vico Yellow' is a very pale yellow.
Pruning
No pruning is necessary for the fire lily. You can remove dead foliage as needed to keep the plant tidy.
Potting and Repotting Fire Lily
Fire lilies will grow happily in a container for years. A porous terra cotta pot will help with air circulation around the roots, preventing rot. Do not place a saucer under the pot; instead, you should use pot feet to let extra water drain away.
Fire lilies are slow-growing and like to be a little bit rootbound, so you won't need to repot them often. However, if the soil mix you used is getting compacted over time, give the fire lily a fresh pot of soil to maintain good aeration.
Propagating Fire Lily
You can propagate fire lilies by gently digging and dividing them. The base of the plant will branch off into thick roots that are easy to cut apart. Remove the plant from its pot and wash away the soil with a hose or sink sprayer. Each division should have one fan of leaves. If your plant doesn't have at least a dozen leaves, it won't flower.
How to Grow Fire Lily From Seed
Growing the fire lily from seed takes patience, as it may take several years for the slow-growing plants to bloom. Plant fresh seed collected from the fruiting capsule after bloom. Press seeds lightly into moist, sandy potting soil, and keep warm. Germination takes about three weeks.
Overwintering
When grown as houseplants, fire lilies require a rest period of about two to three months in fall and winter. For the first month, give them a temperature between 40- and 60-degrees Fahrenheit. After this, water just barely for six to eight weeks. When new flower stalks appear, you can give them more water and gradually acclimate them to normal room temperatures.
Common Pests
Mealybugs sometimes infest fire lilies. The fuzzy white pests will hide in the crown of the plant and suck out its juices. Dislodge them with a spray of water or use insecticidal soap.
FAQ
What is the difference between fire lilies and amaryllis?
Fire lilies are in the same plant family as the popular winter holiday gift plant amaryllis (Hippeastrum). Both have the same strappy foliage, and both are from South Africa. The amaryllis has larger flowers and blooms earlier in the year. The amaryllis has several hundred cultivars, so you can find a greater diversity in size, shape, and color within the amaryllis group than you can in the fire lilies.
How long does a fire lily live?
These hardy plants can survive for 10 years or so with proper care. Keep in mind that they might not bloom during the first season or two.
How can I keep animals away from my fire lily?
When growing the fire lily as a houseplant, keep it out of reach of curious dogs. When it's growing outside, consider covering the bed with wire mesh just underneath the soil, with appropriate-sized holes cut for the plant to grow through to prevent animals from digging up or munching on the bulbs.
The Clivia genus is a member of the Amaryllidaceae family of plants, a group that includes the amaryllis—the popular winter houseplant. They can be introduced into the home as potted nursery plants at any time; if planted in the garden in warm climates, they are best planted at any time other than the hottest part of summer. These slow-growing plants can take several years to flower when they are planted from seeds.
Botanical Name Clivia miniata
Common Name Fire lily, natal lily, bush lily, clivia
Family Amaryllidaceae
Plant Type Perennial
Mature Size 2 ft. tall, 2–3 ft. wide
Sun Exposure Partial
Soil Type Well-drained
Soil pH Acidic, neutral
Bloom Time Winter
Flower Color Orange, yellow, cream, pink
Hardiness Zones 10, 11
Native Area South Africa
Toxicity Highly toxic in large quantities
Fire Lily Care
Like many South African plants, the fire lily is a tough and resilient specimen. Too much sun or water, though, will cause the plant's demise. If you've purchased a fire lily and it won't bloom, it is usually due to a lack of winter dormancy or immaturity. Fire lilies will grow for years in the same pot with little intervention.
Light
Fire lilies prefer partially shady conditions, which makes them valuable as a houseplant. If you grow your plant indoors all year, place it in a bright window. If you give your plant an outdoor location in the summer months, put it in a spot with dappled sunlight or morning sun.
Soil
Good drainage is important to a healthy fire lily plant. A chunky soil mix full of shredded bark, like those used for orchids, is suitable for a container-grown plant. A sandy cactus mix is also a good choice.
Water
Fire lilies need moderate water. Allow the soil to dry between waterings. When it's time for the early winter dormancy period, reduce watering to keep the soil just short of bone-dry.
Temperature and Humidity
Average room temperatures and low humidity help fire lilies look their best. A cool dormancy period increases the beauty of fire lily flowering. You can achieve this by keeping the plants in an unheated shed or garage in November and December. Plants should be kept between 40 and 60 degrees Fahrenheit during this time.
If moving fire lilies back and forth between indoors and an outdoor location, it's best to acclimate them slowly if the temperature range is substantial. Make sure to bring them back indoors before the weather approaches freezing.
Fertilizer
A slow-release houseplant fertilizer can help your fire lily thrive. Use a balanced 10-10-10 fertilizer from January until August, then use a fertilizer designed to increase blooming in September and October. Do not fertilize in the winter months leading up to bloom time.
Types of Fire Lily
Most fire lilies sold in garden centers are orange, fewer are yellow, and the rare and expensive cream or pink varieties are usually found through specialty nurseries.
'Doris' is dark orange with a yellow throat.
'Jenny' is orange with a yellow stripe.
'Tiny Tim' has shorter leaves and miniature orange blooms with white throats.
'Solomone Yellow' is a bright yellow.
'Vico Yellow' is a very pale yellow.
Pruning
No pruning is necessary for the fire lily. You can remove dead foliage as needed to keep the plant tidy.
Potting and Repotting Fire Lily
Fire lilies will grow happily in a container for years. A porous terra cotta pot will help with air circulation around the roots, preventing rot. Do not place a saucer under the pot; instead, you should use pot feet to let extra water drain away.
Fire lilies are slow-growing and like to be a little bit rootbound, so you won't need to repot them often. However, if the soil mix you used is getting compacted over time, give the fire lily a fresh pot of soil to maintain good aeration.
Propagating Fire Lily
You can propagate fire lilies by gently digging and dividing them. The base of the plant will branch off into thick roots that are easy to cut apart. Remove the plant from its pot and wash away the soil with a hose or sink sprayer. Each division should have one fan of leaves. If your plant doesn't have at least a dozen leaves, it won't flower.
How to Grow Fire Lily From Seed
Growing the fire lily from seed takes patience, as it may take several years for the slow-growing plants to bloom. Plant fresh seed collected from the fruiting capsule after bloom. Press seeds lightly into moist, sandy potting soil, and keep warm. Germination takes about three weeks.
Overwintering
When grown as houseplants, fire lilies require a rest period of about two to three months in fall and winter. For the first month, give them a temperature between 40- and 60-degrees Fahrenheit. After this, water just barely for six to eight weeks. When new flower stalks appear, you can give them more water and gradually acclimate them to normal room temperatures.
Common Pests
Mealybugs sometimes infest fire lilies. The fuzzy white pests will hide in the crown of the plant and suck out its juices. Dislodge them with a spray of water or use insecticidal soap.
FAQ
What is the difference between fire lilies and amaryllis?
Fire lilies are in the same plant family as the popular winter holiday gift plant amaryllis (Hippeastrum). Both have the same strappy foliage, and both are from South Africa. The amaryllis has larger flowers and blooms earlier in the year. The amaryllis has several hundred cultivars, so you can find a greater diversity in size, shape, and color within the amaryllis group than you can in the fire lilies.
How long does a fire lily live?
These hardy plants can survive for 10 years or so with proper care. Keep in mind that they might not bloom during the first season or two.
How can I keep animals away from my fire lily?
When growing the fire lily as a houseplant, keep it out of reach of curious dogs. When it's growing outside, consider covering the bed with wire mesh just underneath the soil, with appropriate-sized holes cut for the plant to grow through to prevent animals from digging up or munching on the bulbs.
0
0
文章
Miss Chen
2021年11月26日
The bridal wreath spirea (Spirae aprunifolia) is a medium-sized deciduous shrub with an upright arching habit, featuring thick sprays of white double flowers that create a focal point in the landscape. Fully hardy in USDA hardiness zones 5-9, this is an easy-to-grow shrub that, once established, requires little care.
The Spiraea genus is found within the Rosaceae family of plants, and it bears some similarity to rose bushes, especially the shape of the leaves and the spiny stems. The species name, prunifolia, indicates that the leaves are similar to those of Prunus, the group that contains many of the familiar stone fruits such as cherries, plums, and peaches.
In spring blooming season, bridal wreath spireas create a cascading waterfall of white, with clusters of small white flowers that bloom all the way down the arching branches. Each leaf is 1- to 3-inches long with an ovate or elliptical shape. The spring flower display is followed by another show in the fall when the leaves turn to hues of red, orange, and yellow.
Spirea is a fast-growing shrub, and within a single growing season, it usually achieves full size. Like most shrubs, bridal wreath spirea is best planted early in the growing season, which will allow the shrub's root system plenty of time to become established before winter. If you must plant in the fall (this sometimes is when nurseries are discounting available stock), try to do it with enough time so the shrub's roots can settle in and begin growing before winter weather sets in.

Botanical Name Spiraea prunifolia
Common Name Spirea, bridal wreath, bridal veil spirea
Plant Type Deciduous shrub
Mature Size 4-8 ft. tall and wide
Sun Exposure Full sun
Soil Type Any well-draining soil
Soil pH 6.0-7.0 (slightly acidic to neutral)
Bloom Time Early spring
Flower Color White
Hardiness Zones 5-9, (USDA)
Native Area China, Korea, and Taiwan
Bridal Wreath Spirea Care
This shrub is very easy to grow in any average soil in a full sun location. It will tolerate some shade, and once established, it has a decent tolerance for occasional drought. Like most shrubs, it should be planted in a carefully prepared hole, at the same depth it was growing in its nursery pot. If planting in a row or mass, space the plant at least 3-feet apart, or 4- to 6-feet apart for a looser mass.
Bridal wreath spirea makes a great specimen plant, or it can be planted as a hedge or in masses as a screening plant. It also works well in foundation plantings. It is excellent when planted in the sunny margins abutting woodland areas, similar to the way azaleas are often used.
The bridal wreath spirea attracts butterflies, but its prickly stems repel grazing by deer. Make sure to plant this shrub where it will not scratch human passers-by—unless you are planting it to discourage intruders.
There are no serious pest or disease problems for the bridal wreath spirea, but they can be susceptible to many of the diseases and insects that attack other members of the rose family. This includes leaf spot, fire blight, powdery mildew, root rot, aphids, leaf roller, and scale.
Some varieties of spirea can escape gardens and become invasive in parts of the U.S., so before planting, check with your local extension office agent.1
Learn About Gold Mound Spirea
Light
This shrub will do best in a spot in your garden that receives full sun; it will tolerate part shade, though with slightly reduced flowering. When planting young bridal wreath spirea shrubs, make sure to provide plenty of room between them: They will grow and can block each other's light if planted too close together.
Soil
This plant is not picky about the soil it's planted in, and can thrive in clay, loam, and even acidic soils. Its biggest need is soil that's well-draining, so the roots never sit in water.
Water
Bridal wreath spirea prefers to grow in well-drained moist soil, though it is able to withstand some periods of drought. Water the plants once a week during the summer whenever rainfall is less than 1 inch. Keep the plants well-watered as they are becoming established.
Temperature and Humidity
This plant is quite hardy, surviving both cold winter and hot summer temperatures in its defined range. It thrives in any climate conditions within its hardiness zones (5-9).
Fertilizer
Every spring, add a 2-inch layer of compost over the soil under the shrub. This is usually sufficient to feed the plant, and it will also help to retain moisture and prevent weeds.

Bridal Wreath Spirea Varieties
‘Fire Light’ has pink flowers that show in summer, and fiery red fall color.
‘Anthony Waterer’ boasts carmine-red flowers and purple fall foliage.
‘Tor’ features tiny white flowers and dark green oval leaves that turn orange, red, and purple in fall.
‘Snowmound’ offers white flowers, attractive arching stems, and dark, blue-green foliage.
Pruning
This plant tends to spread through suckering, so ground suckers will need to be trimmed off if you want to keep the shrubs confined.
If desired, the shrubs can be pruned for shape or size immediately after the spring flowering period. Always use a clean, sharp gardening shear. A good pruning routine is to remove all dead wood, as well as some of the oldest stems all the way to ground level. This will open up the center of the shrub to sunlight, which will reinvigorate it. Tips of branches can also be trimmed to control the size of the shrub.
Propagating Bridal Wreath Spirea
The best way to propagate bridal wreath spirea shrubs is by rooting softwood cuttings. To do so, cut segments of flexible stem tips 6- to 8-inches long. Remove the bottom leaves from these trimmed segments. Dip the cut end into powdered rooting hormone.
Fill a 6-inch pot with moist potting mix, then plant four or five prepared stems around the inner edge of the pot, embedding the exposed nodes into the potting mix. Cover the pot with a large plastic bag and seal it. Place the pot in a dappled shade location and allow the cuttings to root over the next few weeks. Check periodically to make sure the potting mix remains moist.
After about four weeks, you should see new, green growth on the stems, indicating that roots are forming. At this point, repot the cuttings into their own individual containers, then tuck the pots into a sheltered location and allow them to continue growing until they go dormant in winter. The next spring, transplant the rooted cuttings into the garden.
The Spiraea genus is found within the Rosaceae family of plants, and it bears some similarity to rose bushes, especially the shape of the leaves and the spiny stems. The species name, prunifolia, indicates that the leaves are similar to those of Prunus, the group that contains many of the familiar stone fruits such as cherries, plums, and peaches.
In spring blooming season, bridal wreath spireas create a cascading waterfall of white, with clusters of small white flowers that bloom all the way down the arching branches. Each leaf is 1- to 3-inches long with an ovate or elliptical shape. The spring flower display is followed by another show in the fall when the leaves turn to hues of red, orange, and yellow.
Spirea is a fast-growing shrub, and within a single growing season, it usually achieves full size. Like most shrubs, bridal wreath spirea is best planted early in the growing season, which will allow the shrub's root system plenty of time to become established before winter. If you must plant in the fall (this sometimes is when nurseries are discounting available stock), try to do it with enough time so the shrub's roots can settle in and begin growing before winter weather sets in.
Botanical Name Spiraea prunifolia
Common Name Spirea, bridal wreath, bridal veil spirea
Plant Type Deciduous shrub
Mature Size 4-8 ft. tall and wide
Sun Exposure Full sun
Soil Type Any well-draining soil
Soil pH 6.0-7.0 (slightly acidic to neutral)
Bloom Time Early spring
Flower Color White
Hardiness Zones 5-9, (USDA)
Native Area China, Korea, and Taiwan
Bridal Wreath Spirea Care
This shrub is very easy to grow in any average soil in a full sun location. It will tolerate some shade, and once established, it has a decent tolerance for occasional drought. Like most shrubs, it should be planted in a carefully prepared hole, at the same depth it was growing in its nursery pot. If planting in a row or mass, space the plant at least 3-feet apart, or 4- to 6-feet apart for a looser mass.
Bridal wreath spirea makes a great specimen plant, or it can be planted as a hedge or in masses as a screening plant. It also works well in foundation plantings. It is excellent when planted in the sunny margins abutting woodland areas, similar to the way azaleas are often used.
The bridal wreath spirea attracts butterflies, but its prickly stems repel grazing by deer. Make sure to plant this shrub where it will not scratch human passers-by—unless you are planting it to discourage intruders.
There are no serious pest or disease problems for the bridal wreath spirea, but they can be susceptible to many of the diseases and insects that attack other members of the rose family. This includes leaf spot, fire blight, powdery mildew, root rot, aphids, leaf roller, and scale.
Some varieties of spirea can escape gardens and become invasive in parts of the U.S., so before planting, check with your local extension office agent.1
Learn About Gold Mound Spirea
Light
This shrub will do best in a spot in your garden that receives full sun; it will tolerate part shade, though with slightly reduced flowering. When planting young bridal wreath spirea shrubs, make sure to provide plenty of room between them: They will grow and can block each other's light if planted too close together.
Soil
This plant is not picky about the soil it's planted in, and can thrive in clay, loam, and even acidic soils. Its biggest need is soil that's well-draining, so the roots never sit in water.
Water
Bridal wreath spirea prefers to grow in well-drained moist soil, though it is able to withstand some periods of drought. Water the plants once a week during the summer whenever rainfall is less than 1 inch. Keep the plants well-watered as they are becoming established.
Temperature and Humidity
This plant is quite hardy, surviving both cold winter and hot summer temperatures in its defined range. It thrives in any climate conditions within its hardiness zones (5-9).
Fertilizer
Every spring, add a 2-inch layer of compost over the soil under the shrub. This is usually sufficient to feed the plant, and it will also help to retain moisture and prevent weeds.
Bridal Wreath Spirea Varieties
‘Fire Light’ has pink flowers that show in summer, and fiery red fall color.
‘Anthony Waterer’ boasts carmine-red flowers and purple fall foliage.
‘Tor’ features tiny white flowers and dark green oval leaves that turn orange, red, and purple in fall.
‘Snowmound’ offers white flowers, attractive arching stems, and dark, blue-green foliage.
Pruning
This plant tends to spread through suckering, so ground suckers will need to be trimmed off if you want to keep the shrubs confined.
If desired, the shrubs can be pruned for shape or size immediately after the spring flowering period. Always use a clean, sharp gardening shear. A good pruning routine is to remove all dead wood, as well as some of the oldest stems all the way to ground level. This will open up the center of the shrub to sunlight, which will reinvigorate it. Tips of branches can also be trimmed to control the size of the shrub.
Propagating Bridal Wreath Spirea
The best way to propagate bridal wreath spirea shrubs is by rooting softwood cuttings. To do so, cut segments of flexible stem tips 6- to 8-inches long. Remove the bottom leaves from these trimmed segments. Dip the cut end into powdered rooting hormone.
Fill a 6-inch pot with moist potting mix, then plant four or five prepared stems around the inner edge of the pot, embedding the exposed nodes into the potting mix. Cover the pot with a large plastic bag and seal it. Place the pot in a dappled shade location and allow the cuttings to root over the next few weeks. Check periodically to make sure the potting mix remains moist.
After about four weeks, you should see new, green growth on the stems, indicating that roots are forming. At this point, repot the cuttings into their own individual containers, then tuck the pots into a sheltered location and allow them to continue growing until they go dormant in winter. The next spring, transplant the rooted cuttings into the garden.
0
0


文章
ritau
2020年01月30日

Hello everybody, welcome back to our channel! Today we are going to teach you how to grow delicious grapes at home. Here are 7 steps to go:
1. Plant your grapevines.
Depending on the species of grapes you are planting, spacing will be different for each plant. For American and European grapes, plant each vine 6–10 feet (1.8–3.0 m) apart. Muscadines require much more space, and should be planted approximately 16 feet (4.9 m) apart. Plant the cuttings in a trench with the basal and center bud covered. The top bud should be just above the soil surface. Press the soil firmly around the newly planted grapevine cuttings.
2. Give your plants a good watering.
Grapevines don’t prefer heavy water or rain, so after the first watering keep the amount of water you give them to a minimum. Keep water near the roots so that the majority of it gets absorbed rather than evaporated by the sun. If your area doesn’t get much rain, set up a drip system directly at the roots so that the grapevines get small amounts of water on a regular basis.

3. Prune your grapevines.
The first year, the grapevine should not be allowed to produce any fully matured fruits as these can damage the young vine with their weight. Cut back all the fruit, as well as all the vines except for the strongest that branch off the cane. In later years prune as needed following established local practices, and prune back 90% of the new growth on older vines each year.
4. Prune vines when dormant.
Always always prune grapevines when they are dormant. They will otherwise bleed their sap - losing vigour. This is typically in late winter when it is no longer cold enough to frost outside.

5. Mulch around the vines.
A layer of mulch around your plants will regulate soil temperature, retain water, and reduce weeds.
6. Apply pest control as needed.
Little pest control is needed as grapevines are naturally hardy. Keep weeds at bay by hand-weeding on a regular basis, and cover you grapevines in bird net to keep birds away if necessary. Seek guidance from your local gardening club or agricultural extension on how to combat the Vine Moth. It is one of the few pests that can decimate grapevines.
7. Harvest your grapes when appropriate. Strong, edible fruit likely won’t appear for anywhere from 1-3 years. When it appears, test its ripeness by picking a few grapes from different areas and tasting them. If the grapes are sweet, start picking as they ready for harvesting and eating.
source:wikihow

Hope you can enjoy a fine harvest!
1. Plant your grapevines.
Depending on the species of grapes you are planting, spacing will be different for each plant. For American and European grapes, plant each vine 6–10 feet (1.8–3.0 m) apart. Muscadines require much more space, and should be planted approximately 16 feet (4.9 m) apart. Plant the cuttings in a trench with the basal and center bud covered. The top bud should be just above the soil surface. Press the soil firmly around the newly planted grapevine cuttings.
2. Give your plants a good watering.
Grapevines don’t prefer heavy water or rain, so after the first watering keep the amount of water you give them to a minimum. Keep water near the roots so that the majority of it gets absorbed rather than evaporated by the sun. If your area doesn’t get much rain, set up a drip system directly at the roots so that the grapevines get small amounts of water on a regular basis.
3. Prune your grapevines.
The first year, the grapevine should not be allowed to produce any fully matured fruits as these can damage the young vine with their weight. Cut back all the fruit, as well as all the vines except for the strongest that branch off the cane. In later years prune as needed following established local practices, and prune back 90% of the new growth on older vines each year.
4. Prune vines when dormant.
Always always prune grapevines when they are dormant. They will otherwise bleed their sap - losing vigour. This is typically in late winter when it is no longer cold enough to frost outside.
5. Mulch around the vines.
A layer of mulch around your plants will regulate soil temperature, retain water, and reduce weeds.
6. Apply pest control as needed.
Little pest control is needed as grapevines are naturally hardy. Keep weeds at bay by hand-weeding on a regular basis, and cover you grapevines in bird net to keep birds away if necessary. Seek guidance from your local gardening club or agricultural extension on how to combat the Vine Moth. It is one of the few pests that can decimate grapevines.
7. Harvest your grapes when appropriate. Strong, edible fruit likely won’t appear for anywhere from 1-3 years. When it appears, test its ripeness by picking a few grapes from different areas and tasting them. If the grapes are sweet, start picking as they ready for harvesting and eating.
source:wikihow
Hope you can enjoy a fine harvest!
0
0


