文章
Miss Chen
2017年11月13日

Warm-season crops such as tomatoes (Lycopersicon esculentum) can be a bit finicky when it comes to temperature. While tomatoes are short-lived perennials in tropical climates, they are grown as annual plants throughout the U.S. The late spring snows and early autumn frosts often experienced in Missouri can leave many gardeners gambling on the best dates to start seeds and set out transplants. While there are no guarantees when it comes to weather, following a few standard guidelines can take a bit of the guesswork out of tomato gardening.

Check Up on Climate Data
A long history of record-keeping has provided farmers and gardeners alike with data on average frost dates and precipitation. The Missouri Climate Center at the University of Missouri-Columbia divides the state up based on latitudinal variation and elevation. On average, the last frost of spring for northern Missouri is April 20 and for central locations is April 10. Areas with higher elevations, such as the Ozark Plateau, tend to be cooler even though they are in the south, so tax day, April 15, is a good guideline. With these regional variations aside, most of Missouri has an average of 180 frost-free days in which to grow tomatoes. Choosing the right varieties, as well as a little pre-planning, will reap the biggest rewards.
Sow Seeds Indoors
Tomatoes are very sensitive to cold and will show damage at any temperatures below 50 degrees Fahrenheit. Since most varieties of tomatoes will produce fruit until the first frost, the sooner you can move plants into the garden, the more tomatoes you'll harvest.
For gardeners who like to sow their own seeds, start inside mid-March in a sunny window. Soil needs to be warm, at least 62 degrees F, and seeds will sprout within two weeks. Seedlings will be transplant-ready by the last week in April, but still a bit tender. Rather than put them out directly, try acclimating them over a period of a few days by putting them outside for a few hours and bringing them back in.
Transplanting Seedlings in the Garden
If you'd rather purchase seedlings from a garden center than wait for seeds, don't be tricked by size. The ideal height for a tomato seedling to transplant is around 8 inches, with a sturdy stem. Many places will sell much larger plants -- often at a higher cost -- but tomatoes of this size do not tend to transplant well and any extra growth will be lost as it adjusts to its new environment.

Seedlings bought from a garden center may not have been acclimated to Missouri's climate if they are fresh off a truck from a greenhouse, so consider putting them out for a few hours each day for several days before planting them in the ground the first week of May.
Choose the Right Variety
As America's most popular garden crop, tomatoes come in a wide variety of sizes, colors and cultivars. Heirloom varieties, those that have been cultivated for more than 50 years, have an old-fashioned taste, but typically take longer to mature -- often needing more than 80 days to flower, fruit and ripen.
Newer, hybrid varieties have been developed over the years to be both more resistant to diseases that cause blight and wilt as well as faster to ripen. The University of Missouri Extension recommends mid-sized hybrid cultivars such as "Celebrity" and "Better Boy," which can ripen within 75 days, and the smaller "Early Girl" variety, which ripens in less than 60 days. Cherry tomatoes and smaller varieties, such as "Supersweet 100s" take around 65 days.
Check Up on Climate Data
A long history of record-keeping has provided farmers and gardeners alike with data on average frost dates and precipitation. The Missouri Climate Center at the University of Missouri-Columbia divides the state up based on latitudinal variation and elevation. On average, the last frost of spring for northern Missouri is April 20 and for central locations is April 10. Areas with higher elevations, such as the Ozark Plateau, tend to be cooler even though they are in the south, so tax day, April 15, is a good guideline. With these regional variations aside, most of Missouri has an average of 180 frost-free days in which to grow tomatoes. Choosing the right varieties, as well as a little pre-planning, will reap the biggest rewards.
Sow Seeds Indoors
Tomatoes are very sensitive to cold and will show damage at any temperatures below 50 degrees Fahrenheit. Since most varieties of tomatoes will produce fruit until the first frost, the sooner you can move plants into the garden, the more tomatoes you'll harvest.
For gardeners who like to sow their own seeds, start inside mid-March in a sunny window. Soil needs to be warm, at least 62 degrees F, and seeds will sprout within two weeks. Seedlings will be transplant-ready by the last week in April, but still a bit tender. Rather than put them out directly, try acclimating them over a period of a few days by putting them outside for a few hours and bringing them back in.
Transplanting Seedlings in the Garden
If you'd rather purchase seedlings from a garden center than wait for seeds, don't be tricked by size. The ideal height for a tomato seedling to transplant is around 8 inches, with a sturdy stem. Many places will sell much larger plants -- often at a higher cost -- but tomatoes of this size do not tend to transplant well and any extra growth will be lost as it adjusts to its new environment.
Seedlings bought from a garden center may not have been acclimated to Missouri's climate if they are fresh off a truck from a greenhouse, so consider putting them out for a few hours each day for several days before planting them in the ground the first week of May.
Choose the Right Variety
As America's most popular garden crop, tomatoes come in a wide variety of sizes, colors and cultivars. Heirloom varieties, those that have been cultivated for more than 50 years, have an old-fashioned taste, but typically take longer to mature -- often needing more than 80 days to flower, fruit and ripen.
Newer, hybrid varieties have been developed over the years to be both more resistant to diseases that cause blight and wilt as well as faster to ripen. The University of Missouri Extension recommends mid-sized hybrid cultivars such as "Celebrity" and "Better Boy," which can ripen within 75 days, and the smaller "Early Girl" variety, which ripens in less than 60 days. Cherry tomatoes and smaller varieties, such as "Supersweet 100s" take around 65 days.
0
0


文章
Miss Chen
2017年10月08日
Cultivar en las estaciones frías tus propias verduras puede ser una solución perfecta para ahorrarte un buen dinero. En otoño e invierno las verduras y hortalizas suelen encarecerse pues los gastos por transporte se incrementan. Además no hay nada comparable a la frescura de tus propias verduras recién cosechadas.
Estas 8 verduras que os proponemos son fáciles de cultivar en jardineras y macetas en tu propia casa. Así resguardadas del frío tendrás una buena y fresca despensa para tus recetas más saludables. Sólo necesitas los recipientes adecuados, un poco de sustrato, las semillas y un lugar soleado para que tus verduras crezcan fuertes y verdes.
1.- Rúcula: Es muy fácil de cultivar y resulta muy rentable pues su precio no suele ser bajo. Magnífica para ensaladas y recetas de cocina italiana.
2.- Ajo: Con un sólo diente tendrás una cabeza de ajos. Y no necesita muchos cuidados ni que lo resguardes demasiado del frío. Lo puedes cultivar en el alféizar de una ventana incluso en invierno.
3.- Col rizada o kale: Verdura de moda en los países anglosajones. Un clásico de la cocina del norte de Italia y Alemania. Muy resistente al frío, de hecho dicen que necesita de alguna helada para suavizar su sabor.
4.- Espinacas: Otra verdura de hoja que prefiere un clima fresco para desarrollarse aunque no excesívamente frío. El exterior le irá muy bien si no vives en una zona de inviernos muy duros.
5.- Espárragos: Es un proyecto a largo plazo, la planta necesita un par de años para producir pero es un buen momento comenzar ahora y así tendremos producción la temporada que viene.
6.- Coles de Bruselas: Soportan muy bien el frío. Si cultivamos en plántulas tendremos que esperar dos o tres meses para comenzar a recolectar.
7.- Nabos: Necesitarás una maceta con suficiente profundida pero conseguirás una buena cosecha en tu huerta urbana. Imprescindible para asados, cocidos y otoros platos de cuchara.
8.- Zanahorias: Una hortaliza polivalente y todo un clásico de las huertas urbanas. Muy fácil de cultivar y sin ningún manenimiento.
0
1
文章
Dummer. ゛☀
2017年10月02日

Scientific Name
Carpobrotus edulis (L.) N. E. Br.
Common Names
Ice Plant, Highway Ice Plant, Freeway Ice Plant, Pigface, Hottentot Fig, Sour Fig, Sea Fig, Cape Fig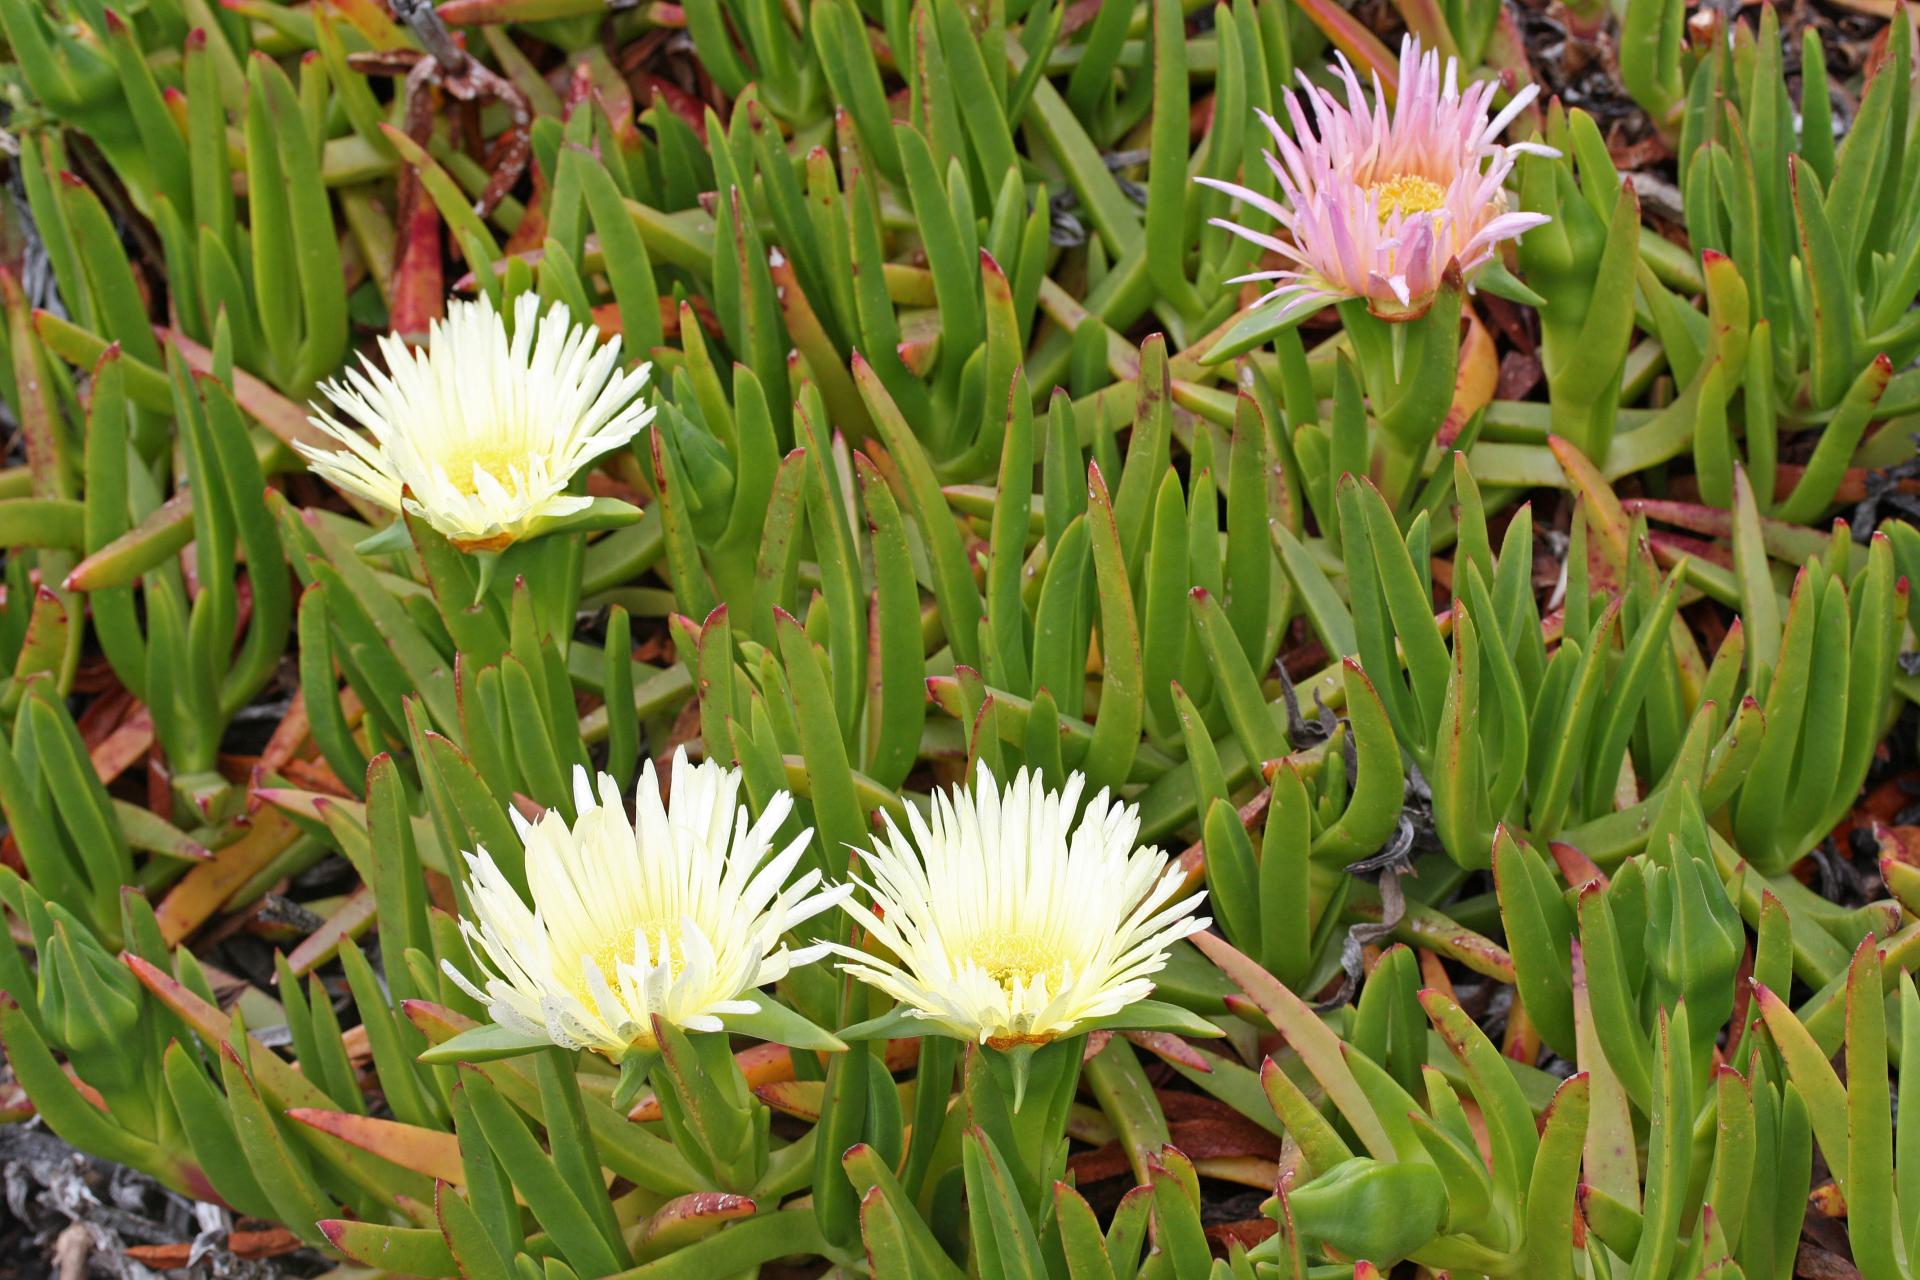
Synonyms
Mesembryanthemum edule (basionym)
Scientific Classification
Family: Aizoaceae
Subfamily: Ruschioideae
Tribe: Ruschieae
Genus: Carpobrotus
Description
Carpobrotus edulis is a creeping, mat-forming perennial succulent with leaves crowded along the stem, up to 5 inches (12.5 cm) long and up to 0.5 inch (1.2 cm) thick, sharply 3-angled and triangular in cross-section, yellowish to grass-green and reddish when older. The flowers are yellow or light pink, up to 6 inches (15 cm) in diameter. The fruit is up to 1.4 inches (3.5 cm) in diameter, fleshy, shaped like spinning top, on a winged stalk, becoming yellow when ripe.
How to Grow and Care
Growing Carpobrotus in containers is ideal, and you can overwinter them in temperate regions. Just bring the pot in and water it deeply. Cut back the plant and let it dry out and languish for the winter in a warm location. In March, resume regular watering and move the plant to a full light situation where it has some protection from burning rays. Gradually reintroduce the plant to temperatures outdoors until it can tolerate a full day outside.
The only serious threats to the plant’s health are spittle bugs and some root rots and stem rots. You can avoid the rot by minimizing overhead watering during periods in which the plant will not dry off before nightfall. The bugs will remove themselves if you spray with a horticultural soap.
0
1
文章
Dummer. ゛☀
2017年10月02日
Scientific Name
Euphorbia ingens E. Mey. ex Boiss.
Common Names
Candelabra Tree, Common Tree Euphorbia, Cactus Euphorbia, Cactus Spurge, Naboom (African), Kaktus-Wolfsmilch (German)
Synonyms
Euphorbia similis
Scientific Classification
Family: Euphorbiaceae
Subfamily: Euphorbioideae
Tribe: Euphorbieae
Subtribe: Euphorbiinae
Genus: Euphorbia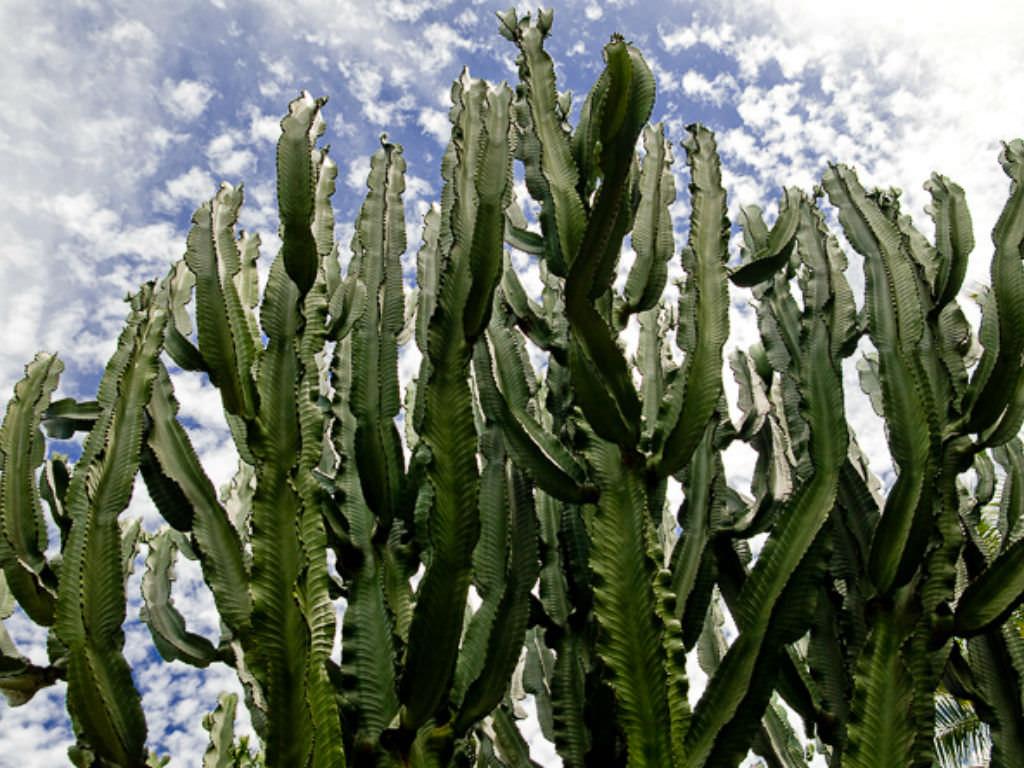
Description
Euphorbia ingens is an upright, succulent tree, up to 40 feet (12 m) tall, with a dark green crown which is well rounded and often shaped like a hot-air balloon. The branches are segmented with spines running along the ridges of the segments. It produces small, greenish yellow flowers on the ridges of the topmost segment of every branch from autumn to winter. The fruit is a round 3-lobed capsule, turns red to purple when ripening.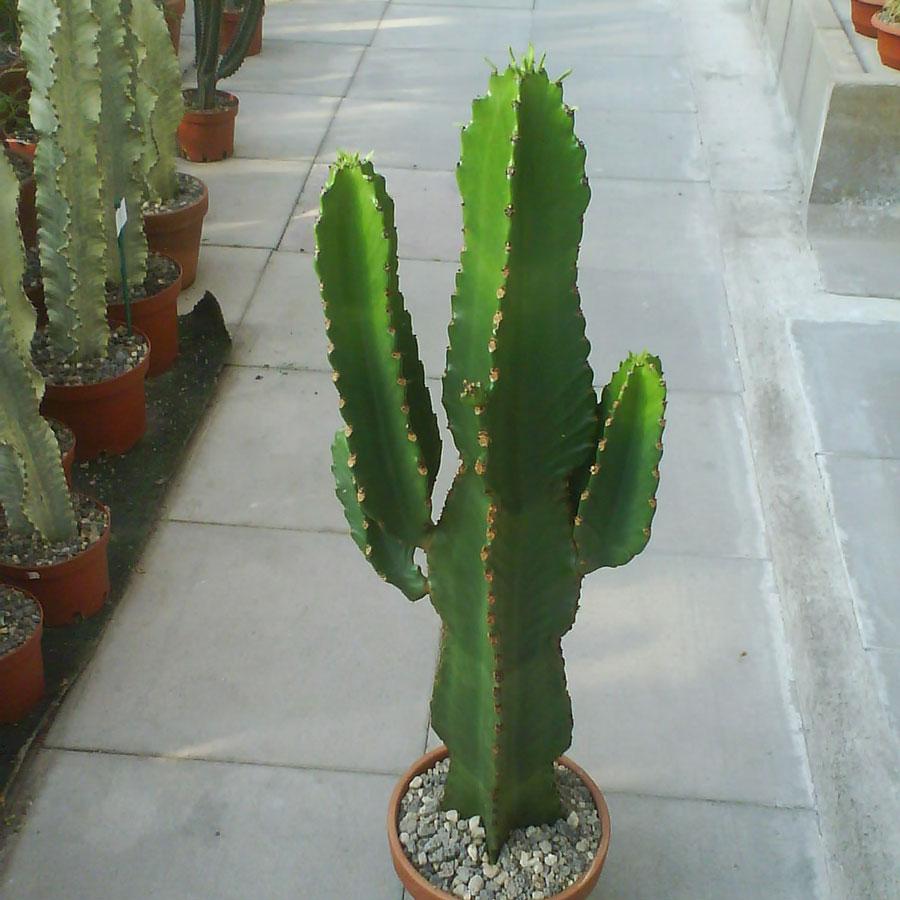
How to Grow and Care
Euphorbias are very easy to care for. They require a little pampering to become established, but once they are, they are self-sufficient. In fact, more die from too much care and watering than from neglect. Euphorbias need well-draining soil and lots of sunlight. They are not particular about soil pH, but they cannot tolerant wet soil. Unlike most succulents, Euphorbia does not handle long periods of drought well. It may need weekly watering during the summer.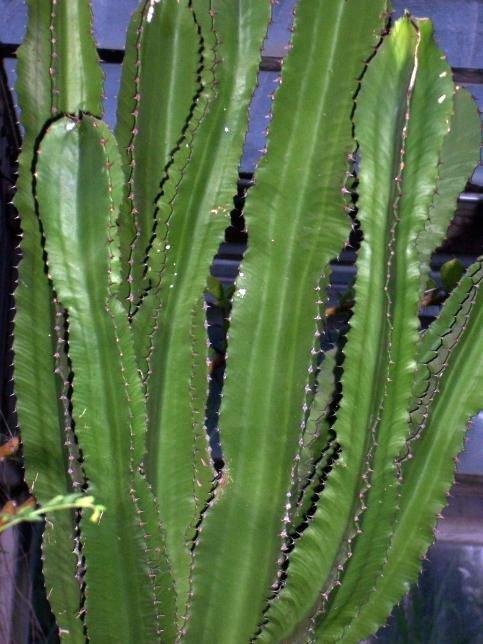
Euphorbia can be grown from seed, but they can be difficult to germinate (or even find). It is usually propagated by cuttings. This can be tricky, because of the exuding sap.
1
1
文章
Dummer. ゛☀
2017年10月02日
Scientific Name
Conophytum calculus (A. Berger) N. E. Br.
Common Names
Marble Buttons, Cone Plants, Dumplings, Button Plants, Living Pebbles
Synonyms
Mesembryanthemum calculus (basionym), Conophytum calculus var. calculus, Conophytum komkansicum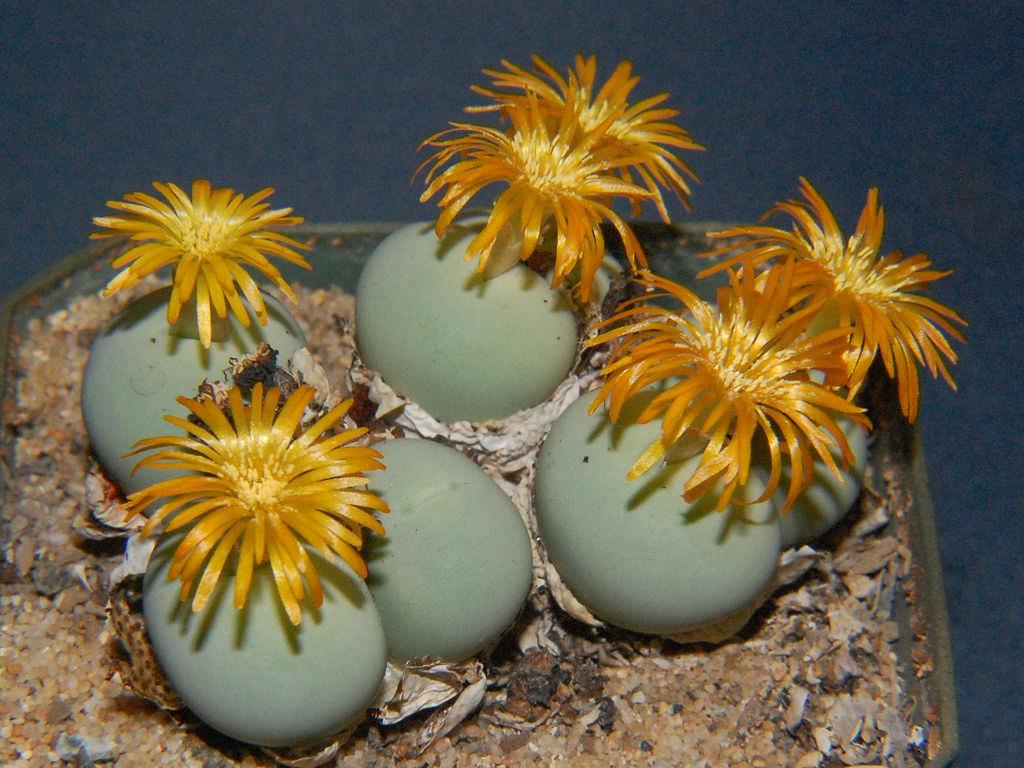
Scientific Classification
Family: Aizoaceae
Subfamily: Ruschioideae
Tribe: Ruschieae
Genus: Conophytum
Description
Conophytum calculus is a small, but very tough, low growing, stemless succulent with individual rounded “leaves” (fused together into one body) that multiply with age and cluster together to form a dome-shaped cushion. The spherically-shaped leaf bodies are completely smooth and hairless, characteristically opaque (non-transparent and non-glossy) and have a chalky-green to pale yellowish green color. The leaf bodies are always without any spot or detail and up to 1.2 inches (3 cm) in diameter. New leaves are formed inside the existing ones and when, after a year, the leaf body starts to die, a new one emerges from inside. The old leaf becomes a thin, dry, and smooth, beige colored sheath, sometimes turning black, which persists on the plant. It flowers in autumn and has spicy, clove-scented, golden yellow to dark orange flowers which are nocturnal. They only open at night.
How to Grow and Care
Conophytums are usually grown in dish gardens where they spread slowly but make good ornamental plants for window gardening. They also do well in rockeries where they can be grown in crevices.The Conophytum vegetate during the winter season. They must then be kept dry during hot, gradually wet upon autumn arrival: the moisture stimulate the release of new root hairs and the plant will grow for the entire winter season, foliar issuing new pairs from inside the existing ones. Flowering usually occurs in autumn and the color of the flowers is extremely variable from species to species.
3
2
文章
Dummer. ゛☀
2017年10月02日
Scientific Name
Echeveria x imbricata Deleuil ex E. Morren
Common Names
Blue Rose Echeveria, Hens and Chicks
Synonyms
Echeveria ‘Imbricata’, Echeveria imbricata
Scientific Classification
Family: Crassulaceae
Subfamily: Sedoideae
Tribe: Sedeae
Subtribe: Sedinae
Genus: Echeveria
Description
Echeveria x imbricata is a popular and vigorous succulent, up to 8 inches (20 cm) wide, with tight rosettes of flat grey-green leaves that, when mature, form offsets freely to form large solid clumps up to 6 inches (15 cm) tall. Blue Rose Echeveria has a branched arching inflorescence bearing clusters of red and yellow flowers in the spring and early summer.
How to Grow and Care
Most of the common Echeveria species are not complicated succulents to grow, provided you follow a few basic rules. First, be careful never to let water sit in the rosette as it can cause rot or fungal diseases that will kill the plant. Additionally, remove dead leaves from the bottom of the plant as it grows. These dead leaves provide a haven for pests, and Echeveria are susceptible to mealy bugs. As with all succulents, careful watering habits and plenty of light will help ensure success.
Repot as needed, preferably during the warm season. To repot a succulent, make sure the soil is dry before repotting, then gently remove the pot. Knock away the old soil from the roots, making sure to remove any rotted or dead roots in the process. Treat any cuts with a fungicide.
10
6
文章
Dummer. ゛☀
2017年10月02日
Scientific Name
Echeveria affinis E. Walther
Common Names
Black Echeveria
Scientific Classification
Family: Crassulaceae
Subfamily: Sedoideae
Tribe: Sedeae
Subtribe: Sedinae
Genus: Echeveria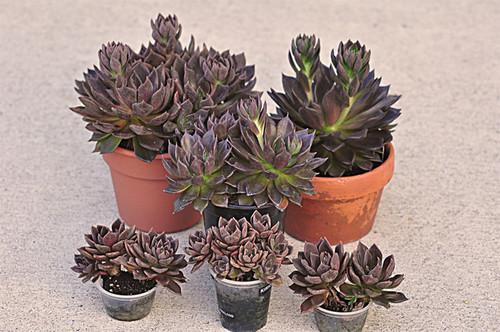
Description
Echeveria affinis is evergreen, low-growing, perennial succulent, up to 8 inches (20 cm) tall and wide. The levaes are fleshy, olive-brownish, up to 2 inches (5 cm) long and up to 0.8 inch (2 cm) wide, formed on rosettes. The red star-shaped flowers sprout on a stem during the summer.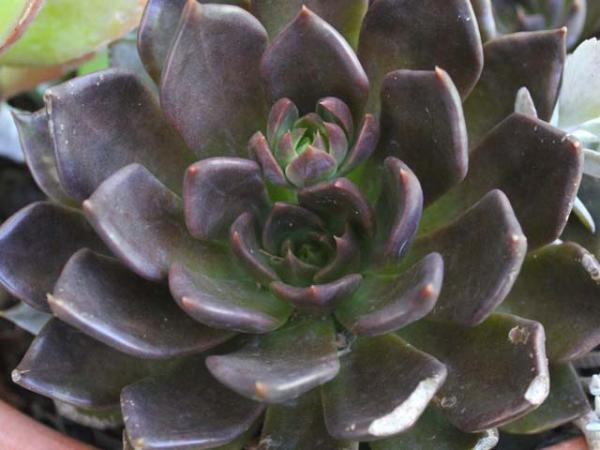
How to Grow and Care
Most of the common Echeveria species are not complicated succulents to grow, provided you follow a few basic rules. First, be careful never to let water sit in the rosette as it can cause rot or fungal diseases that will kill the plant. Additionally, remove dead leaves from the bottom of the plant as it grows. These dead leaves provide a haven for pests, and Echeveria are susceptible to mealy bugs. As with all succulents, careful watering habits and plenty of light will help ensure success.
Repot as needed, preferably during the warm season. To repot a succulent, make sure the soil is dry before repotting, then gently remove the pot. Knock away the old soil from the roots, making sure to remove any rotted or dead roots in the process. Treat any cuts with a fungicide.
8
6
ksc:wow. so beautiful
文章
Dummer. ゛☀
2017年10月01日
Scientific Name
Euphorbia grandicornis Goebel ex N. E. Br.
Common Names
Cow’s Horn, Cow’s Horn Euphorbia, Big Horn, Big Horned Euphorbia, Big Horned Spurge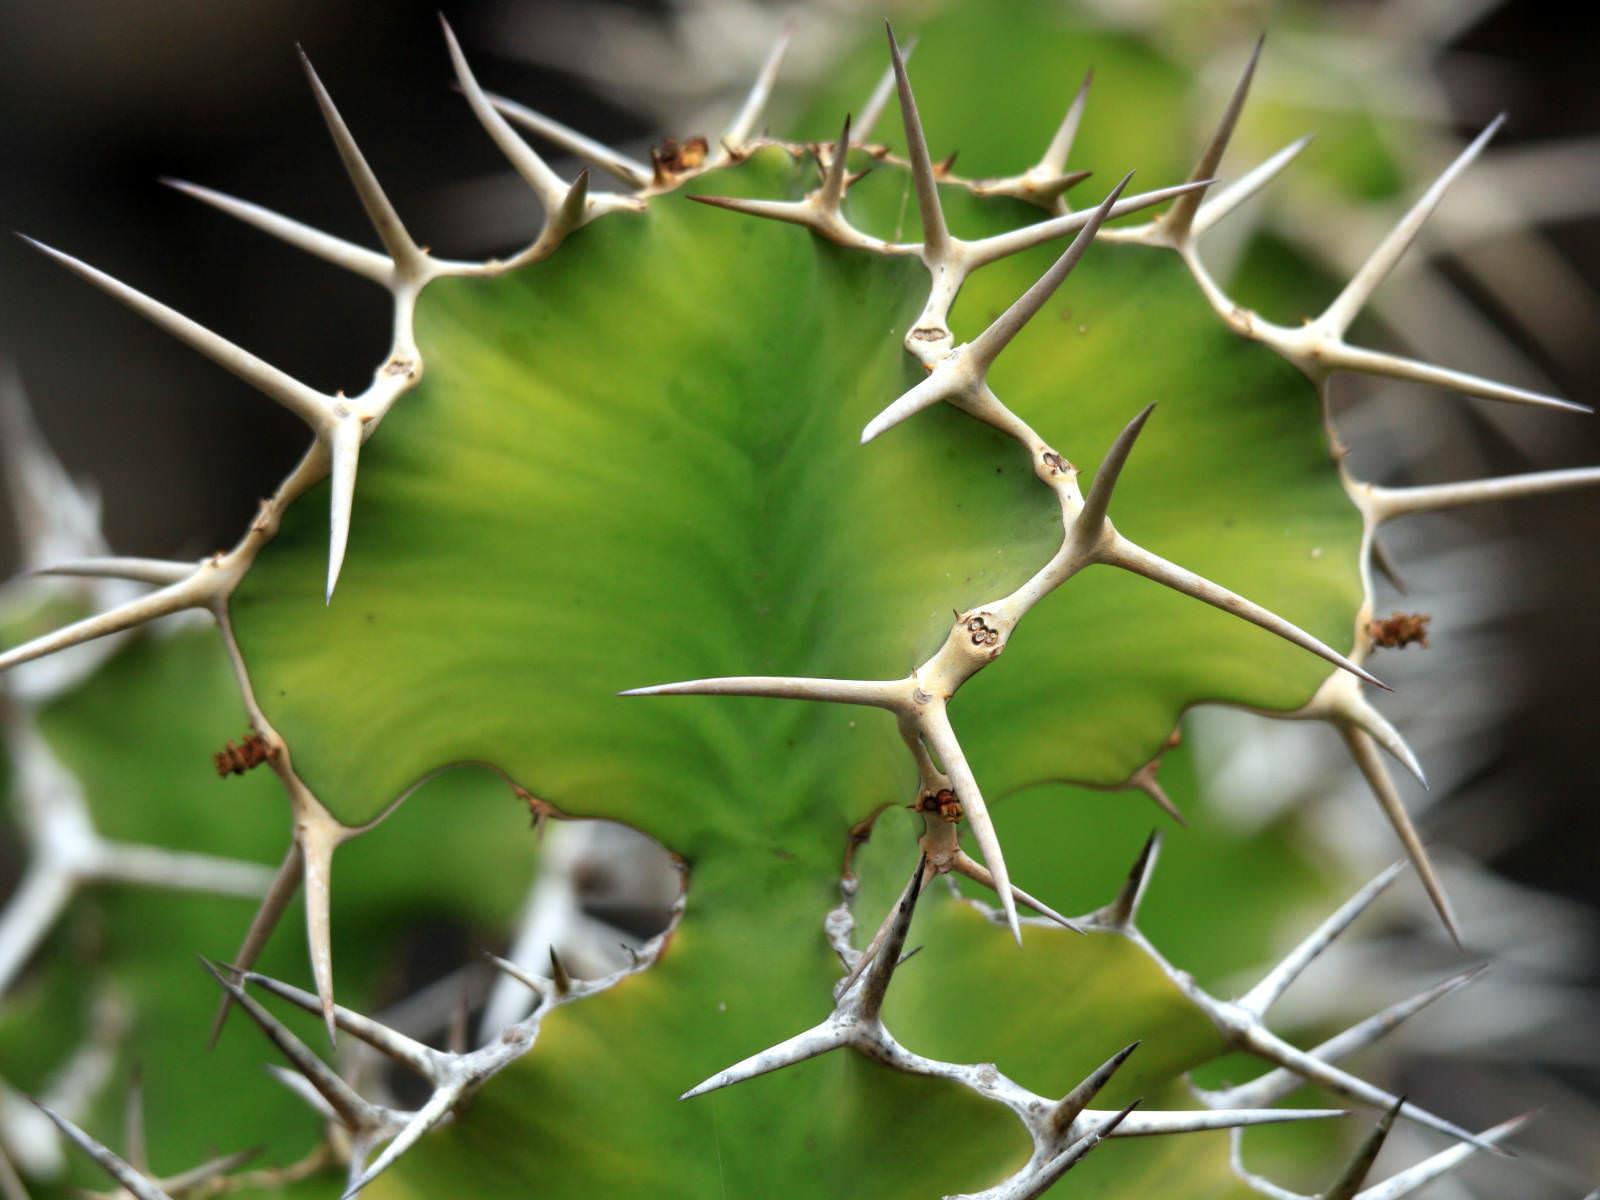
Synonyms
Euphorbia grandicornis subsp. grandicornis
Scientific Classification
Family: Euphorbiaceae
Subfamily: Euphorbioideae
Tribe: Euphorbieae
Subtribe: Euphorbiinae
Genus: Euphorbia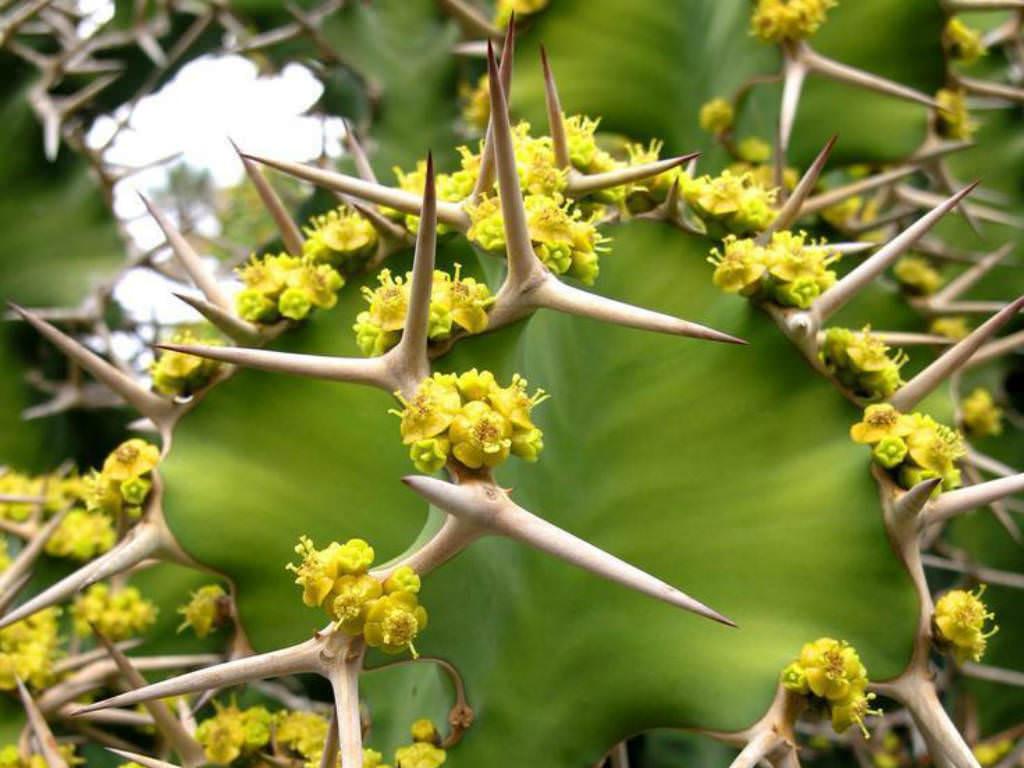
Description
Euphorbia grandicornis is an upright multistemmed succulent shrub, up to 6.6 feet (2 m) tall and about the same in width. The stem is up to 4 inches (10 cm) in diameter, 3 or 4 winged, irregular, constricted in broad, twisted, with triangular segments about 6 inches (15 cm) long. Leaves are tiny, scale-like between the spines. The spines are grey or brownish, joined, forming a horny continuous ridge, up to 3 inches (7.5 cm) long. The flowers are brilliant yellow, growing just above the spines.
How to Grow and Care
Euphorbias are very easy to care for. They require a little pampering to become established, but once they are, they are self-sufficient. In fact, more die from too much care and watering than from neglect. Euphorbias need well-draining soil and lots of sunlight. They are not particular about soil pH, but they cannot tolerant wet soil. Unlike most succulents, Euphorbia does not handle long periods of drought well. It may need weekly watering during the summer. Water whenever the soil is dry several inches below the surface. Water deeply, but don’t let them sit in wet soil, which can cause root rot.
0
0
文章
Dummer. ゛☀
2017年10月01日
Scientific Name
Fenestraria rhopalophylla (Schltr. & Diels) N. E. Br.
Common Names
Baby Toes, Baby’s Toes, Window Plant
Scientific Classification
Family: Aizoaceae
Subfamily: Ruschioideae
Tribe: Ruschieae
Genus: Fenestraria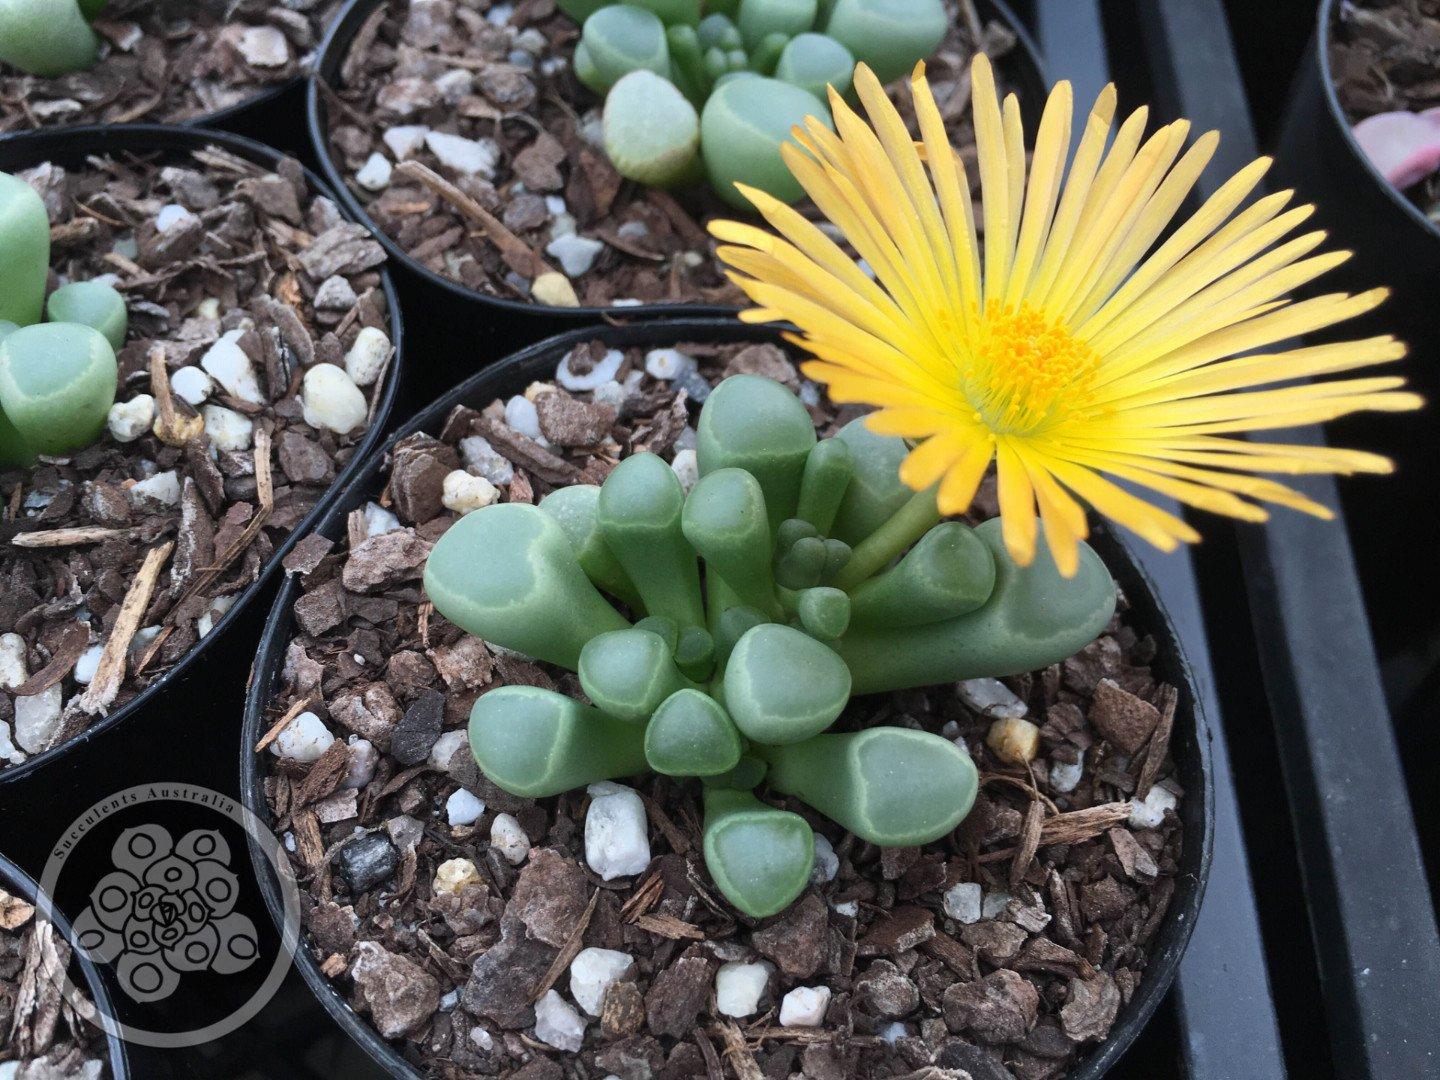
Description
Fenestraria rhopalophylla is an evergreen, perennial succulent, up to 6 inches (15 cm) tall. Not present or very reduced stem. The tip of each leaf is transparent, and diffuse the light to the rest of the leaf. The roots are thick, shallow, and spreading. The leaves are glaucous green, smooth, up to 1.5 inches (4 cm) long and with a convex apex. Medium-large up to 1.2 inch (3 cm) in diametar, pure white, solitary or in groups of up to three flowers borne on long pedicels.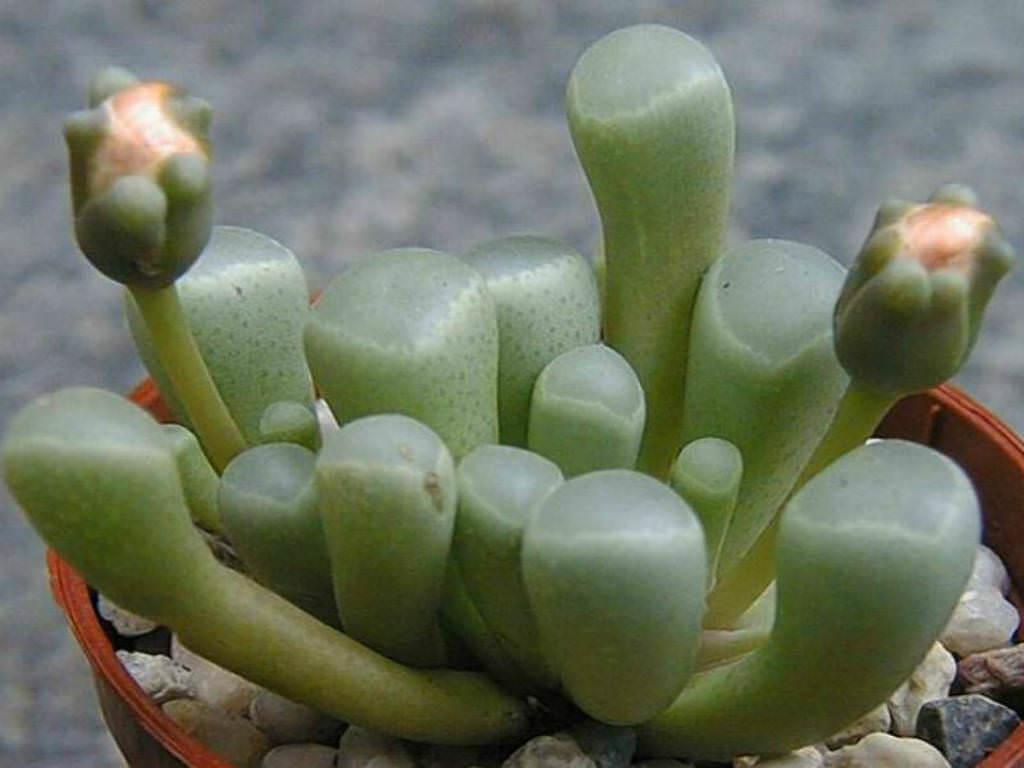
Hardiness
USDA hardiness zone 10a to 11b: from 30 °F (−1.1 °C) to 50 °F (+10 °C).
How to Grow and Care
Fenestraria prefer sandy soil and should be watered sparingly at all times to avoid root rot and split leaves. They need to be kept somewhat dry in the summer. Mix equals parts potting soil with pumice or perlite. Outdoors, grow in full to part sun; indoors, provide bright indirect light. Water thoroughly when soil is dry to the touch. Fenestrarias are somewhat frost tolerant, but protection is advisable to prevent scarring.
They are usually propagated by seed but sometimes by cuttings. Like many succulents, Fenestrarias produces offsets as the clusters of leaves mature and spread. These are easy to divide from the main clump and will readily produce another plant.
1
0
文章
Miss Chen
2017年10月01日
Aparte de las características propias de cada especie como el riego o las necesidades de luz de cada árbol que tengamos en nuestro jardín, os vamos a hablar de cuatro características interesantes comunes tanto a árboles de hoja cadica como perenne. Estas son el tamaño, la longevidad, la forma y la velocidad de crecimiento.
En cuanto al tamaño, podemos clasificarlos en pequeños, medianos y grandes. Que nuestro árbol sea pequeño quiere decir que alcanzará una altura de unos 6 metros y una anchura de unos 4 metros, si es mediano, alcanzará una altura de hasta 15 metros y entre 4 y 6 metros de anchura y si es grande superará estos valores. Ejemplos de estos árboles podrían ser el naranjo, la morera y el eucalipto como árboles pequeño, mediano y grande respectivamente.
En cuanto a la forma, decir que cada árbol tiene la suya propia, pero estas son las más comunes:

Un árbol puede crecer rápida lo lentamente, que crezca rápido quiere decir que avanzará más de 1 metro al año como es el caso de los chopos o los eucaliptos.
Los árboles son especies increíbles en cuanto a longevidad se refiere, el récord lo tiene el Pinus longaeva con una asombrosa cifra de más de 4000 años. Si bien que un árbol sea más o menos longevo dependerá de los cuidados que tenga.
En cuanto al tamaño, podemos clasificarlos en pequeños, medianos y grandes. Que nuestro árbol sea pequeño quiere decir que alcanzará una altura de unos 6 metros y una anchura de unos 4 metros, si es mediano, alcanzará una altura de hasta 15 metros y entre 4 y 6 metros de anchura y si es grande superará estos valores. Ejemplos de estos árboles podrían ser el naranjo, la morera y el eucalipto como árboles pequeño, mediano y grande respectivamente.
En cuanto a la forma, decir que cada árbol tiene la suya propia, pero estas son las más comunes:
Un árbol puede crecer rápida lo lentamente, que crezca rápido quiere decir que avanzará más de 1 metro al año como es el caso de los chopos o los eucaliptos.
Los árboles son especies increíbles en cuanto a longevidad se refiere, el récord lo tiene el Pinus longaeva con una asombrosa cifra de más de 4000 años. Si bien que un árbol sea más o menos longevo dependerá de los cuidados que tenga.
0
0
文章
Miss Chen
2017年10月01日
Seguro que alguna vez habréis visto una botella de licor con una fruta dentro y seguro que os habréis preguntado cómo se hace eso, cómo alguien puede introducir una fruta dentro de una botella cuando es evidente que la fruta es mucho más grande que el gollete de la botella. Es muy sencillo pero hay un requisito imprescindible para tener éxito en la operación: contar con un peral, en nuestro caso, en el jardín. A continuación os explicamos el truco.
Necesitamos un peral y una botella de cristal. En el momento adecuado, es decir cuando la pera todavía es pequeña, la introduciremos en el interior de la botella que hayamos escogido. Ataremos la botella al tronco del árbol o a una rama para que quede bien fija. Es importante que la botella no se mueva bajo ningún concepto, viento, inclemencias… pues podría romper el pedúnculo de la pera y se acabó el invento. También es importante poner la botella boca abajo para que no entre suciedad ni agua de lluvia. La pera seguirá su desarrollo natural dentro de la botella y cuando sea el momento de la cosecha sólo habrá que cortar el pedúnculo y retirar la botella del árbol.

Una vez cosechada nuestra pera con su botella tendremos que limpiar bien el interior de la misma con agua caliente y algún desinfectante de uso alimentario. Si vamos a usar la botella para embotellar licor de pera introduciremos en ella nuestra mezcla personal. También puede servir como elemento decorativo y rellenando con alcohol se conservará bastante tiempo.
Necesitamos un peral y una botella de cristal. En el momento adecuado, es decir cuando la pera todavía es pequeña, la introduciremos en el interior de la botella que hayamos escogido. Ataremos la botella al tronco del árbol o a una rama para que quede bien fija. Es importante que la botella no se mueva bajo ningún concepto, viento, inclemencias… pues podría romper el pedúnculo de la pera y se acabó el invento. También es importante poner la botella boca abajo para que no entre suciedad ni agua de lluvia. La pera seguirá su desarrollo natural dentro de la botella y cuando sea el momento de la cosecha sólo habrá que cortar el pedúnculo y retirar la botella del árbol.
Una vez cosechada nuestra pera con su botella tendremos que limpiar bien el interior de la misma con agua caliente y algún desinfectante de uso alimentario. Si vamos a usar la botella para embotellar licor de pera introduciremos en ella nuestra mezcla personal. También puede servir como elemento decorativo y rellenando con alcohol se conservará bastante tiempo.
0
0
文章
Miss Chen
2017年10月01日
Tal vez sea excesivo tener un árbol de navidad todo el año. Pero podemos tener este árbol todo el año dentro de casa y cuando llegue la Navidad decorarlo para la ocasión. Se trata de Araucaria heterophylla un árbol originario de la isla de Norfolk en Nueva Zelanda, de ahí que se le conozca también como pino de Norfolk y fue introducido en Europa ya en el siglo XVIII.
Su follaje es verde persistente, sin brillo y las agujas no pinchan ya que son delgadas y flexibles. Es compatible con el interior de nuestros apartamentos aunque el aire seco puede quemar unas cuantas agujas. Su crecimiento es lento, sobre todo al principio, lo que anima a tenerlo en nuestros hogares. En su ecosistema puede alcanzar los 50 metros de altura, en casa puede llegar a los dos metros dependiendo del recipiente en que esté plantado. Precisa un suelo con buen drenaje, fértil y puede soportar incluso que sea un poco calizo. De joven precisa riegos constantes, de más maduro puede soportar una ligera sequía. Mejor dejar que el suelo se seque entre riegos.

Instalar en un lugar donde reciba luz, pero también es compatible con la sombra parcial. Soporta las corrientes de aire siempre que no sean demasiado frías. No dude en rociar agua para humidificar el aire alrededor de la araucaria para que las agujas no se sequen y se vuelvan marrones. No lo coloque cerca de un radiador. Cuanto mayor sea la temperatura ambiente más humedad precisará.

Se debe trasplantar cada dos años, lo cambiaremos a una maceta más grande para que las raíces tengan más sitio. Se puede reproducir por semillas y por esquejes, aunque por este último método es muy difícil conseguir la reproducción. Los ácaros y las cochinillas son sus peores enemigos, en cuanto veamos algunas agujas que se vuelven marrones hay que cortar la rama.

Podemos decorarlo en Navidad como si de un abeto se tratase, aunque no tiene su olor. Hay que tener cuidado con el peso de la decoración pues sus ramas son muy flexibles, pero soporta perfectamente los pequeños ornamentos, esferas, estrellas, dulces y guirnaldas. Tendremos un árbol de Navidad ecológico y económico pues nos puede durar muchos años.
Su follaje es verde persistente, sin brillo y las agujas no pinchan ya que son delgadas y flexibles. Es compatible con el interior de nuestros apartamentos aunque el aire seco puede quemar unas cuantas agujas. Su crecimiento es lento, sobre todo al principio, lo que anima a tenerlo en nuestros hogares. En su ecosistema puede alcanzar los 50 metros de altura, en casa puede llegar a los dos metros dependiendo del recipiente en que esté plantado. Precisa un suelo con buen drenaje, fértil y puede soportar incluso que sea un poco calizo. De joven precisa riegos constantes, de más maduro puede soportar una ligera sequía. Mejor dejar que el suelo se seque entre riegos.
Instalar en un lugar donde reciba luz, pero también es compatible con la sombra parcial. Soporta las corrientes de aire siempre que no sean demasiado frías. No dude en rociar agua para humidificar el aire alrededor de la araucaria para que las agujas no se sequen y se vuelvan marrones. No lo coloque cerca de un radiador. Cuanto mayor sea la temperatura ambiente más humedad precisará.
Se debe trasplantar cada dos años, lo cambiaremos a una maceta más grande para que las raíces tengan más sitio. Se puede reproducir por semillas y por esquejes, aunque por este último método es muy difícil conseguir la reproducción. Los ácaros y las cochinillas son sus peores enemigos, en cuanto veamos algunas agujas que se vuelven marrones hay que cortar la rama.
Podemos decorarlo en Navidad como si de un abeto se tratase, aunque no tiene su olor. Hay que tener cuidado con el peso de la decoración pues sus ramas son muy flexibles, pero soporta perfectamente los pequeños ornamentos, esferas, estrellas, dulces y guirnaldas. Tendremos un árbol de Navidad ecológico y económico pues nos puede durar muchos años.
1
0
文章
Miss Chen
2017年09月29日
Los arces japoneses son de una gran belleza y nos aportarán color estacional a nuestro jardín. Desde verdes brillantes e intensos en primavera y verano hasta rojos, amarillos y púrpuras en otoño. Hay una gran variedad de especies para elegir en distintos tamaños y formas. Vamos a conocerlos un poco más.
Acer palmatum ‘Dissectum Atropurpureum’, también conocido como arce japonés palmeado, arce palmado japonés, arce japonés o arce polimorfo, arce enano, arce palmado púrpura. Este arce de escasa altura es idóneo para jardines pequeños. Su forma además nos ayudará a crear bonitos contrastes, no crece más allá de los 2.5 metros y sus ramas caídas y sus hojas plumosas son de gran belleza. Lo plantaremos en una zona de sombra y con suelo húmedo pero bien drenado.

Acer palmatum ‘Coonara Pigmeo’ es otro arce de pequeño tamaño como el anterior. El color rosado de sus hojas en primavera, al brotar, se pierde en verano. En otoño adquiere una brillante tonalidad anaranjada y rojiza. Tanto esta variedad como la anterior por su tamaño pueden cultivarse también en maceta.

Acer japonicum ‘Green Cascade’ es un poco más grande que los anteriores y llega a los tres metros de altura. Tiene una suave caída de sus ramas y las hojas adquieren un intenso rojo brillante en otoño.

Acer palmatum ‘Beni kawa’ es un arce que embellecerá tu jardín en cualquier estación del año. Sus hojas verdes en primavera y verano se tornan de un sutil amarillo dorado en otoño. En invierno nos permite disfrutar de sus ramas y troncos rojos. Su talla llega a los 4.5 metros de altura.
Acer palmatum ‘Higasayama’ se caracteriza por su follaje variegado con dos tonos de verde en primavera y verano y dorado en otoño. Aunque alcanza también los 4.5 metros de altura es la variedad más usada para crear bonsáis de arce.

Acer palmatum ‘Wolf’ destaca por el intenso color púrpura de sus hojas en otoño. También es el más apropiado para las zonas geográficas situadas más al norte pues sus hojas brotan más tarde que en otras variedades. Ayudando así a evitar las heladas de primavera. Su altura máxima son también 4.5 metros.

Acer palmatum ‘Sumi nagashi’ resulta espectacular con sus más de 5 metros de altura y sus hojas palmadas de color rojo, incluso durante la primavera y verano. En otoño las hojas se tornan de un brillante color carmesí.

Acer palmatum ‘Bloodgood’ es otra variedad de gran tamaño, casi 6 metros de altura puede alcanzar. Sus hojas palmadas y aserradas se mantienen rojas en verano y se vuelven de un rojo carmesí brillante en otoño.

Acer japonicum ‘Aconitifolium’ con sus preciosas hojas embellece cualquier jardín. Sus hojas verdes en primavera y verano van virando al amarillo, naranja y rojo en otoño. Todo un lujo para cualquier jardín ya que su altura no pasa de los 3 metros.

Acer palmatum ‘Caperci Dwarf’ es otro espectacular arce de pequeño tamaño pues no llega más allá de 1.80 metros. Las hojas rosadas al brotar van virando a verde según avanza la temporada para llegar al dorado en otoño. También se puede cultivar en maceta por sus dimensiones. En general todos los arces japoneses precisan de sombra y suelo húmedo y bien drenado.
Acer palmatum ‘Dissectum Atropurpureum’, también conocido como arce japonés palmeado, arce palmado japonés, arce japonés o arce polimorfo, arce enano, arce palmado púrpura. Este arce de escasa altura es idóneo para jardines pequeños. Su forma además nos ayudará a crear bonitos contrastes, no crece más allá de los 2.5 metros y sus ramas caídas y sus hojas plumosas son de gran belleza. Lo plantaremos en una zona de sombra y con suelo húmedo pero bien drenado.
Acer palmatum ‘Coonara Pigmeo’ es otro arce de pequeño tamaño como el anterior. El color rosado de sus hojas en primavera, al brotar, se pierde en verano. En otoño adquiere una brillante tonalidad anaranjada y rojiza. Tanto esta variedad como la anterior por su tamaño pueden cultivarse también en maceta.
Acer japonicum ‘Green Cascade’ es un poco más grande que los anteriores y llega a los tres metros de altura. Tiene una suave caída de sus ramas y las hojas adquieren un intenso rojo brillante en otoño.
Acer palmatum ‘Beni kawa’ es un arce que embellecerá tu jardín en cualquier estación del año. Sus hojas verdes en primavera y verano se tornan de un sutil amarillo dorado en otoño. En invierno nos permite disfrutar de sus ramas y troncos rojos. Su talla llega a los 4.5 metros de altura.
Acer palmatum ‘Higasayama’ se caracteriza por su follaje variegado con dos tonos de verde en primavera y verano y dorado en otoño. Aunque alcanza también los 4.5 metros de altura es la variedad más usada para crear bonsáis de arce.
Acer palmatum ‘Wolf’ destaca por el intenso color púrpura de sus hojas en otoño. También es el más apropiado para las zonas geográficas situadas más al norte pues sus hojas brotan más tarde que en otras variedades. Ayudando así a evitar las heladas de primavera. Su altura máxima son también 4.5 metros.
Acer palmatum ‘Sumi nagashi’ resulta espectacular con sus más de 5 metros de altura y sus hojas palmadas de color rojo, incluso durante la primavera y verano. En otoño las hojas se tornan de un brillante color carmesí.
Acer palmatum ‘Bloodgood’ es otra variedad de gran tamaño, casi 6 metros de altura puede alcanzar. Sus hojas palmadas y aserradas se mantienen rojas en verano y se vuelven de un rojo carmesí brillante en otoño.
Acer japonicum ‘Aconitifolium’ con sus preciosas hojas embellece cualquier jardín. Sus hojas verdes en primavera y verano van virando al amarillo, naranja y rojo en otoño. Todo un lujo para cualquier jardín ya que su altura no pasa de los 3 metros.
Acer palmatum ‘Caperci Dwarf’ es otro espectacular arce de pequeño tamaño pues no llega más allá de 1.80 metros. Las hojas rosadas al brotar van virando a verde según avanza la temporada para llegar al dorado en otoño. También se puede cultivar en maceta por sus dimensiones. En general todos los arces japoneses precisan de sombra y suelo húmedo y bien drenado.
0
0
文章
Miss Chen
2017年09月28日
Originario de Asia y África, el albaricoquero es un árbol frutal propio de las zonas templadas. De tamaño medio (alcanza entre seis y ocho metros en edad adulta), el albaricoquero común se presenta como un árbol uniforme, de copa redondeada y ramas extendidas. Su madera es de color rojizo y no está muy valorada en la industria maderera. El albaricoquero requiere suelos ligeros, fértiles, drenados, profundos y con un clima benigno. Requiere humedad constante pero no hace falta regarlos con asiduidad pues el exceso de agua les puede perjudicar.
Albaricoquero 1
Aunque prefiere el calor al frío, podemos cultivar el albaricoquero en zonas frías siempre y cuando protejamos la planta manteniéndola a cubierto. En ocasiones, además, se suele emplear la técnica del abanico. Esta consiste en adosar el árbol, con las ramas laterales abiertas, a una pared o muro, eliminando las ramas centrales. Con esta práctica se pretende aprovechar el calor y la luz que arroja la pared al ser iluminada por el sol.

En cualquier caso, si vamos a plantar un albaricoquero en nuestro jardín nos conviene conocer antes qué especie nos viene mejor dependiendo del lugar en que nos encontremos. De hecho, existe media docena de variedades de albaricoque. Entre las más frecuentes se encuentran:
Albaricoquero de Manchuria: variedad de gran porte que puede alcanzar los veinte metros de altura y soporta los veinte grados bajo cero.
Albaricoquero de la Siberia: frutal de tamaño medio (unos cinco metros) que soporta los cincuenta grados bajo cero. Sus frutos son pequeños y no tienen mucho sabor.
Albaricoquero del Japón: esta variedad se caracteriza por sus hojas largas y puntiagudas y por una cosecha que se consume elaborada en forma de licores, confituras y sazonadores.
Albaricoquero del Tíbet: muy similar al de Manchuria, se originario del país que le da nombre.
Albaricoquero de Los Alpes o albaricoquero Briançon: este árbol se encuentra en zonas de pocas precipitaciones, alcanza los seis metros de altura y, a diferencia de sus compañeros, sus frutos no son dulces, sino picantes.


El albaricoquero común se reproduce, principalmente, por esquejes aunque también podemos obtenerlos por semillas o realizando injertos en ciruelos o manzanos. Su fruto es el albaricoque, una pieza redondeada y dulce, de hueso fuerte y piel aterciopelada. Los albaricoques se cosechan, por lo general, de mayo a julio, aunque estas fechas pueden modificarse dependiendo de la climatología. Las cosechas son limitadas y se deben realizar cuando los frutos están maduros. Se pueden consumir frescos o secos. En este último caso nos referiremos a ellos como orejones.
Deben plantarse en exterior una vez que hayan cumplido los dos años, pues antes podrían morir por el frío. Hay que dejar una separación de cinco metros entre ellos para que puedan crecer sin estorbarse mutuamente.
Albaricoquero 1
Aunque prefiere el calor al frío, podemos cultivar el albaricoquero en zonas frías siempre y cuando protejamos la planta manteniéndola a cubierto. En ocasiones, además, se suele emplear la técnica del abanico. Esta consiste en adosar el árbol, con las ramas laterales abiertas, a una pared o muro, eliminando las ramas centrales. Con esta práctica se pretende aprovechar el calor y la luz que arroja la pared al ser iluminada por el sol.
En cualquier caso, si vamos a plantar un albaricoquero en nuestro jardín nos conviene conocer antes qué especie nos viene mejor dependiendo del lugar en que nos encontremos. De hecho, existe media docena de variedades de albaricoque. Entre las más frecuentes se encuentran:
Albaricoquero de Manchuria: variedad de gran porte que puede alcanzar los veinte metros de altura y soporta los veinte grados bajo cero.
Albaricoquero de la Siberia: frutal de tamaño medio (unos cinco metros) que soporta los cincuenta grados bajo cero. Sus frutos son pequeños y no tienen mucho sabor.
Albaricoquero del Japón: esta variedad se caracteriza por sus hojas largas y puntiagudas y por una cosecha que se consume elaborada en forma de licores, confituras y sazonadores.
Albaricoquero del Tíbet: muy similar al de Manchuria, se originario del país que le da nombre.
Albaricoquero de Los Alpes o albaricoquero Briançon: este árbol se encuentra en zonas de pocas precipitaciones, alcanza los seis metros de altura y, a diferencia de sus compañeros, sus frutos no son dulces, sino picantes.
El albaricoquero común se reproduce, principalmente, por esquejes aunque también podemos obtenerlos por semillas o realizando injertos en ciruelos o manzanos. Su fruto es el albaricoque, una pieza redondeada y dulce, de hueso fuerte y piel aterciopelada. Los albaricoques se cosechan, por lo general, de mayo a julio, aunque estas fechas pueden modificarse dependiendo de la climatología. Las cosechas son limitadas y se deben realizar cuando los frutos están maduros. Se pueden consumir frescos o secos. En este último caso nos referiremos a ellos como orejones.
Deben plantarse en exterior una vez que hayan cumplido los dos años, pues antes podrían morir por el frío. Hay que dejar una separación de cinco metros entre ellos para que puedan crecer sin estorbarse mutuamente.
0
0

