文章
Dummer. ゛☀
2017年09月20日

Disocactus is a genus of epiphytic cacti in the tribe Hylocereeae found in Central America, the Caribbean and northern South America. It should not be confused with Discocactus, which is a different genus.
Species of Disocactus grow in tropical regions either on trees as epiphytes or on rocks as lithophytes. They have two distinct growth habits. Species such as D. phyllanthoides have stems which are round at the base but then become flattened and leaf-like. Other species, such as D. flagelliformis have stems which are round throughout their length.
Many of the cultivated plants known as Epiphyllum hybrids or just Epiphyllums are derived from crosses between species of Disocactus (rather than Epiphyllum) and other genera in the Hylocereeae.

Growing Conditions
Light: Like all cacti, give them lots of direct sunlight, especially during the summer.
Water: During the growing period the plants need frequent watering; from October to March and waterings should be rather abundant, so that the soil becomes completely soaked, but let dry between watering. Keep relatively dry in winter or when night temperatures remain below 10° C.
Soil: Well-drained soil is best, and most Disocactus perform well in a soil that contains some organic material.

Propagation
Disocactus can be reproduced both by seeds and cuttings.

Grower’s Tips
Disocactus should be grown in a rich but still well draining soil. They should be watered regularly and fertilized as well. This is essential for good growth and flowering. Disocactus dislike extreme heat and cold, so they are best green-housed during the depth of winter and heat of summer in hot dry climates. They also prefer shade to sun, and like a little extra humidity in the air. Flowering in spring and summer the flower color varies from white, yellow red or purple depending on species.
Species of Disocactus grow in tropical regions either on trees as epiphytes or on rocks as lithophytes. They have two distinct growth habits. Species such as D. phyllanthoides have stems which are round at the base but then become flattened and leaf-like. Other species, such as D. flagelliformis have stems which are round throughout their length.
Many of the cultivated plants known as Epiphyllum hybrids or just Epiphyllums are derived from crosses between species of Disocactus (rather than Epiphyllum) and other genera in the Hylocereeae.
Growing Conditions
Light: Like all cacti, give them lots of direct sunlight, especially during the summer.
Water: During the growing period the plants need frequent watering; from October to March and waterings should be rather abundant, so that the soil becomes completely soaked, but let dry between watering. Keep relatively dry in winter or when night temperatures remain below 10° C.
Soil: Well-drained soil is best, and most Disocactus perform well in a soil that contains some organic material.
Propagation
Disocactus can be reproduced both by seeds and cuttings.
Grower’s Tips
Disocactus should be grown in a rich but still well draining soil. They should be watered regularly and fertilized as well. This is essential for good growth and flowering. Disocactus dislike extreme heat and cold, so they are best green-housed during the depth of winter and heat of summer in hot dry climates. They also prefer shade to sun, and like a little extra humidity in the air. Flowering in spring and summer the flower color varies from white, yellow red or purple depending on species.
0
0
文章
Miss Chen
2017年09月20日

El gato doméstico come hierba por diversos motivos o más bien diríamos que creemos que lo hace por diversas causas. Se dice que es para añadir a su dieta ácido fólico y algunas vitaminas de las que carece en su dieta habitual. Puede ser pero si le estás dando a tu gato una dieta equilibrada no debería necesitar nada más. Otra hipótesis es que la precisa para purgarse y limpiar su aparato digestivo. Los gatos suelen comer un poco de hierba para acelerar el tránsito de las bolas de pelo. Sea como sea a algunos gatos les encanta comer un poco de hierba fresca. Vamos a ver aquí cómo podemos cultivar nuestra propia hierba fresca para gatos dentro de casa.

Sencillamente necesitaremos unos recipientes adecuados para el sustrato. Que no sean muy altos para que el gato pueda comer de ellos con facilidad. A esto añadiremos sustrato corriente y las semillas que queremos germinar. No hay un tipo determinado de hierba que prefieran los gatos en general, aunque particularmente sí que pueden tener sus preferencias. Aquí os mostramos algunas de las especies que podéis cultivar pero hay muchas más.

Ya tienes el recipiente o recipientes listos y sólo necesitas enterrar las semillas elegidas y regar. Puedes poner el recipiente en una bolsa de plástico y colocarlo en un lugar luminoso. Esto favorecerá la germinación y evitará la evaporación del agua. El sustrato debe mantenerse húmedo mientras se produce la germinación. Una vez salgan las plántulas podemos quitar la bolsa de plástico y seguiremos pulverizando regularmente para que el sustrato siga ligeramente húmedo.

La avena es un cereal muy conocido. Para esta finalidad nos valdrá sólo mientras es tierno y fácil de comer por el gato. Suele gustarles mucho por su sabor dulce. Necesita mucho sol directo para crecer bien.

El trigo contiene gran cantidad de aminoácidos, minerales y vitaminas. No sólo es saludable para los gatos sino también para los humanos. También necesita mucho sol directo.

El raigrás o Lolium es una hierba que se usa en ganadería como forraje y también para el control de la erosión en terrenos afectados por la misma. Es pequeña y fácil de cultivar. El polen del raigrás es un potente alérgeno pero como vamos a usarlo fresco, sin que llegue a su madurez, no tiene que ser ningún problema para nadie.
La cebada también es muy rica en vitaminas, minerales y aminoácidos, como todos los cereales. Estos nutrientes, cuando consuminos la planta joven y tierna, son fácilmente asimilados por el organismo.
Hay, como decíamos, muchas más especies que puedes cultivar para tus gatos. Por ejemplo si tienes pájaros en casa puedes cultivar el alpiste que comen para que al germinar puedan comerlo también tu gato. Y así muchas especies más que puedes ir probando hasta encontrar la que más le apetezca a tu adorado gato.
Sencillamente necesitaremos unos recipientes adecuados para el sustrato. Que no sean muy altos para que el gato pueda comer de ellos con facilidad. A esto añadiremos sustrato corriente y las semillas que queremos germinar. No hay un tipo determinado de hierba que prefieran los gatos en general, aunque particularmente sí que pueden tener sus preferencias. Aquí os mostramos algunas de las especies que podéis cultivar pero hay muchas más.
Ya tienes el recipiente o recipientes listos y sólo necesitas enterrar las semillas elegidas y regar. Puedes poner el recipiente en una bolsa de plástico y colocarlo en un lugar luminoso. Esto favorecerá la germinación y evitará la evaporación del agua. El sustrato debe mantenerse húmedo mientras se produce la germinación. Una vez salgan las plántulas podemos quitar la bolsa de plástico y seguiremos pulverizando regularmente para que el sustrato siga ligeramente húmedo.
La avena es un cereal muy conocido. Para esta finalidad nos valdrá sólo mientras es tierno y fácil de comer por el gato. Suele gustarles mucho por su sabor dulce. Necesita mucho sol directo para crecer bien.
El trigo contiene gran cantidad de aminoácidos, minerales y vitaminas. No sólo es saludable para los gatos sino también para los humanos. También necesita mucho sol directo.
El raigrás o Lolium es una hierba que se usa en ganadería como forraje y también para el control de la erosión en terrenos afectados por la misma. Es pequeña y fácil de cultivar. El polen del raigrás es un potente alérgeno pero como vamos a usarlo fresco, sin que llegue a su madurez, no tiene que ser ningún problema para nadie.
La cebada también es muy rica en vitaminas, minerales y aminoácidos, como todos los cereales. Estos nutrientes, cuando consuminos la planta joven y tierna, son fácilmente asimilados por el organismo.
Hay, como decíamos, muchas más especies que puedes cultivar para tus gatos. Por ejemplo si tienes pájaros en casa puedes cultivar el alpiste que comen para que al germinar puedan comerlo también tu gato. Y así muchas especies más que puedes ir probando hasta encontrar la que más le apetezca a tu adorado gato.
0
0
文章
Miss Chen
2017年09月18日
Los rábanos prefieren un suelo mojado y rico en nutrientes. Es conveniente incorporar compost a la tierra donde los vamos a plantar. Al igual que la mayoría de las plantas pertenecientes a las crucíferas, no les gustan los suelos ácidos. Si tu suelo es ácido, debes ponerle cal a la tierra.

Los rábanos los podemos plantar desde el inicio de la primavera hasta fines del otoño. La idea es plantar pocos, cada 15 días, de esta forma se tendrán rábanos frescos por toda la temporada.
En un huerto las semillas grandes y negras se depositan en surcos, separadas por unos 5 cm la una de la otra. Si se tiene más de un surco de rábanos en el huerto, se deben separar entre sí, también por 5 cm. Si plantamos en maceteros, necesitamos maceteros que tengan una profundidad mínima de 15 cm y al menos el volumen de 1 Litro, esto para lograr el deseado desarrollo del rábano. Si queremos plantar más rábanos en un macetero le damos a cada semilla una separación de 5 cm en relación a las otras y debemos fijarnos que nuestro macetero tenga el volumen necesario por la cantidad de rábanos. Ej: 1 rábano , 1 Litro, 2 rábanos; 2 litros y así para más rábanos.
A los rábanos les gusta el sol, pero pueden tolerar con mucha efectividad la falta de éste. Se les puede poner en un lugar que reciba a lo menos 4 horas de sol directo y podrán desarrollarse bien.
Los rábanos son más sensibles a la falta de riego que otros vegetales de raíz. Es por esto que hay que tener especial cuidado de que la tierra esté siempre húmeda. (No un charco de Barro).

Los sacamos del suelo en el instante en que los vamos a comer. Si se tienen demasiados rábanos los regalamos o hacemos algo con ellos. Nunca se deben dejar crecer por mucho tiempo, dado que se vuelven duros y correosos o pueden semillar, y en ambos casos el rábano no tendrá muy buen sabor.
Los rábanos los podemos plantar desde el inicio de la primavera hasta fines del otoño. La idea es plantar pocos, cada 15 días, de esta forma se tendrán rábanos frescos por toda la temporada.
En un huerto las semillas grandes y negras se depositan en surcos, separadas por unos 5 cm la una de la otra. Si se tiene más de un surco de rábanos en el huerto, se deben separar entre sí, también por 5 cm. Si plantamos en maceteros, necesitamos maceteros que tengan una profundidad mínima de 15 cm y al menos el volumen de 1 Litro, esto para lograr el deseado desarrollo del rábano. Si queremos plantar más rábanos en un macetero le damos a cada semilla una separación de 5 cm en relación a las otras y debemos fijarnos que nuestro macetero tenga el volumen necesario por la cantidad de rábanos. Ej: 1 rábano , 1 Litro, 2 rábanos; 2 litros y así para más rábanos.
A los rábanos les gusta el sol, pero pueden tolerar con mucha efectividad la falta de éste. Se les puede poner en un lugar que reciba a lo menos 4 horas de sol directo y podrán desarrollarse bien.
Los rábanos son más sensibles a la falta de riego que otros vegetales de raíz. Es por esto que hay que tener especial cuidado de que la tierra esté siempre húmeda. (No un charco de Barro).
Los sacamos del suelo en el instante en que los vamos a comer. Si se tienen demasiados rábanos los regalamos o hacemos algo con ellos. Nunca se deben dejar crecer por mucho tiempo, dado que se vuelven duros y correosos o pueden semillar, y en ambos casos el rábano no tendrá muy buen sabor.
0
0
文章
Miss Chen
2017年09月18日
Berenjena, Solanum melongena L., una planta hortícola anual originaria de Asia cuyos frutos podemos encontrar en blanco, morado, jaspeados e incluso verdes. Las propiedades y beneficios de la berenjena son muy interesantes y es una hortaliza que podemos cultivar de manera ecológica y aprovechar así al máximo sus bondades.
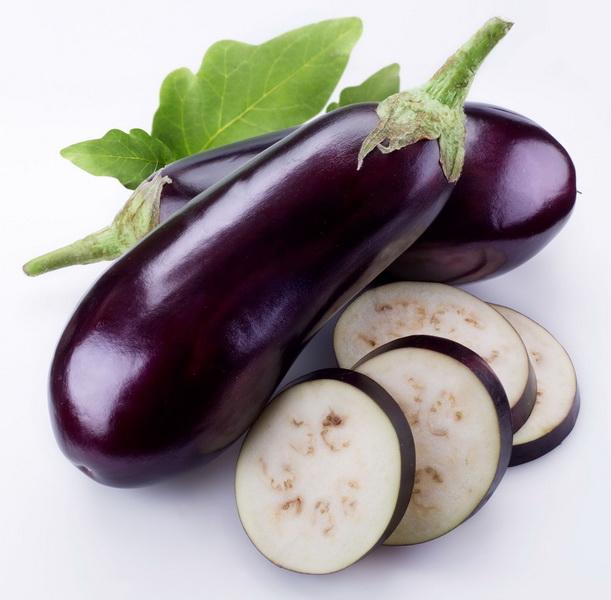
Incluso puedes animarte a cultivar berenjenas en macetas si tienes un pequeño huerto urbano en tu terraza, balcón o patio.
La berenjena es una hortaliza de fruto que pertenece a la familia botánica de las Solanaceae, igual que los tomates, las patatas o los pimientos.
En este post quiero darte las pautas más importantes e imprescindibles que debes dominar para cultivar berenjenas en tu huerto ecológico.
Cultivo de la berenjena en el huerto ecológico
Sembrar berenjenas: de finales de febrero y abril se siembra la berenjena (calendario de siembra). Puedes preparar semilleros o plantones si estás en una zona con un clima continental o bien sembrar directamente si estás en una zona con clima templado. Lo común es que las semillas tarden en germinar un par de semanas. Procura mantenerlas a una temperatura aproximada de entre 19 y 23 ºC, esto favorecerá el éxito de la germinación. Los semilleros o plantines son muy sencillos de hacer… siempre y cuando sepas, para que no tenas dudas y todo vaya bien, lee este post.
Trasplante de la berenjena: si has optado por la siembra en plantines o semilleros, en unas 6 a 9 semanas deberás trasplantar las plántulas a su lugar definitivo de cultivo en el huerto ecológico. Si por el contrario has adquirido plantones también deberás trasplantarlos a tu huerto. El trasplante puede ser un momento delicado para la pequeña plantita, así que asegúrate de que conoces bien los pasos a dar, te los explico aquí. No dejes menos de 40 cm² entre planta y planta porque sino se masifica el espacio y ni reciben bien la luz solar ni el aire puede circular debidamente entre las partes aéreas de la planta.

Sustrato: es un tipo de cultivos que prefieren los suelos fértiles y ricos en materia orgánica para crecer correctamente. Antes de cultivar la berenjena aplica compost o humus de lombriz a la tierra. El sustrato debe tener buen drenaje, estar bien aireado, mullido y con un pH entre 6.5 y 8. Si vas a cultivar berenjenas en maceta el container debe tener idealmente 40 cm de profundidad para permitir un buen desarrollo de las raíces, que en el caso concreto de la berenjena son bastante profundas.
Clima: esta planta es sensible al frío y prefiere los climas templados tirando a cálidos. De hecho, las temperaturas demasiado bajas o húmedas hacen que las flores se caigan y pueden reducir el proceso de floración y de fecundación, obteniendo menos frutos. Evita cultivar las berenjenas en zonas con corrientes o vientos fuertes porque pueden dañarlas.
Riego de la berenjena: mantén los riegos regulares, especialmente durante la floración y la formación de los frutos, pero sin excesos porque la berenjena no aguanta la tierra demasiado húmeda y enseguida hace estragos. El riego por goteo es muy útil y eficiente, ponlo en práctica.
Luz: busca una buena ubicación con sol directo para cultivar berenjenas. Este tipo de plantas necesitan mínimo 6 a 7 horas de sol directo para desarrollarse en las mejores condiciones. Es una de las plantas más exigentes en cuanto a la luz.
Tutorado de las berenjenas: para guiar el crecimiento del tallo principal y evitar que se doble o tuerza por el peso de ramas y frutos, es recomendable tutorar las plantas. Aquí tienes algunas ideas para realizar el tutorado.
Plagas y enfermedades de la berenjena: entre las plagas las más comunes son el pulgón, los trips, la araña roja y mosca blanca. Y de las enfermedades que más se dan en el cultivo de berenjenas la principal es el mildiu.
Cosecha de las berenjenas: en un periodo aproximado de 6 meses desde el momento de la siembra ya podrás empezar a cosechar tus berenjenas ecológicas del huerto.
Y si no se te ocurre qué hacer con las berenjenas, te propongo algunas recetas variadas en las que esta hortaliza queda riquísima.
Incluso puedes animarte a cultivar berenjenas en macetas si tienes un pequeño huerto urbano en tu terraza, balcón o patio.
La berenjena es una hortaliza de fruto que pertenece a la familia botánica de las Solanaceae, igual que los tomates, las patatas o los pimientos.
En este post quiero darte las pautas más importantes e imprescindibles que debes dominar para cultivar berenjenas en tu huerto ecológico.
Cultivo de la berenjena en el huerto ecológico
Sembrar berenjenas: de finales de febrero y abril se siembra la berenjena (calendario de siembra). Puedes preparar semilleros o plantones si estás en una zona con un clima continental o bien sembrar directamente si estás en una zona con clima templado. Lo común es que las semillas tarden en germinar un par de semanas. Procura mantenerlas a una temperatura aproximada de entre 19 y 23 ºC, esto favorecerá el éxito de la germinación. Los semilleros o plantines son muy sencillos de hacer… siempre y cuando sepas, para que no tenas dudas y todo vaya bien, lee este post.
Trasplante de la berenjena: si has optado por la siembra en plantines o semilleros, en unas 6 a 9 semanas deberás trasplantar las plántulas a su lugar definitivo de cultivo en el huerto ecológico. Si por el contrario has adquirido plantones también deberás trasplantarlos a tu huerto. El trasplante puede ser un momento delicado para la pequeña plantita, así que asegúrate de que conoces bien los pasos a dar, te los explico aquí. No dejes menos de 40 cm² entre planta y planta porque sino se masifica el espacio y ni reciben bien la luz solar ni el aire puede circular debidamente entre las partes aéreas de la planta.
Sustrato: es un tipo de cultivos que prefieren los suelos fértiles y ricos en materia orgánica para crecer correctamente. Antes de cultivar la berenjena aplica compost o humus de lombriz a la tierra. El sustrato debe tener buen drenaje, estar bien aireado, mullido y con un pH entre 6.5 y 8. Si vas a cultivar berenjenas en maceta el container debe tener idealmente 40 cm de profundidad para permitir un buen desarrollo de las raíces, que en el caso concreto de la berenjena son bastante profundas.
Clima: esta planta es sensible al frío y prefiere los climas templados tirando a cálidos. De hecho, las temperaturas demasiado bajas o húmedas hacen que las flores se caigan y pueden reducir el proceso de floración y de fecundación, obteniendo menos frutos. Evita cultivar las berenjenas en zonas con corrientes o vientos fuertes porque pueden dañarlas.
Riego de la berenjena: mantén los riegos regulares, especialmente durante la floración y la formación de los frutos, pero sin excesos porque la berenjena no aguanta la tierra demasiado húmeda y enseguida hace estragos. El riego por goteo es muy útil y eficiente, ponlo en práctica.
Luz: busca una buena ubicación con sol directo para cultivar berenjenas. Este tipo de plantas necesitan mínimo 6 a 7 horas de sol directo para desarrollarse en las mejores condiciones. Es una de las plantas más exigentes en cuanto a la luz.
Tutorado de las berenjenas: para guiar el crecimiento del tallo principal y evitar que se doble o tuerza por el peso de ramas y frutos, es recomendable tutorar las plantas. Aquí tienes algunas ideas para realizar el tutorado.
Plagas y enfermedades de la berenjena: entre las plagas las más comunes son el pulgón, los trips, la araña roja y mosca blanca. Y de las enfermedades que más se dan en el cultivo de berenjenas la principal es el mildiu.
Cosecha de las berenjenas: en un periodo aproximado de 6 meses desde el momento de la siembra ya podrás empezar a cosechar tus berenjenas ecológicas del huerto.
Y si no se te ocurre qué hacer con las berenjenas, te propongo algunas recetas variadas en las que esta hortaliza queda riquísima.
0
0
文章
Dummer. ゛☀
2017年09月15日
Found in all apple-growing areas of the world, the codling moth (Cydia pomonella) is considered to be one of the most destructive pests of apples. Adults are gray to brown moths with a 3/4 inch wingspan. They have a chocolate-colored patch at the tip of each forewing and coppery transverse markings.
Codling moth larvae are pink or creamy white caterpillars with mottled brown heads that tunnel through apples directly to the core. As they feed, they push out mounds of fecal material, called frass, which gathers around the entrance hole. Damage lowers the market value of the fruit and makes it unfit for human consumption. Alternate host plants include pears, crabapples, walnuts and stone fruits.
Note: The codling moth was introduced to North America by the colonists more than 200 years ago and is now one of the leading pests in home orchards.
Life Cycle
Full grown larvae pass through the winter in a cocoon beneath loose bark or in orchard litter. Pupation takes place in the spring. Moths begin emerging about the time that apple trees are in bloom and lay an average of 50 to 60 eggs on leaves, twigs and fruits. Once eggs hatch the larvae feed briefly on leaves, then damage fruit by boring into the centers. Larvae feed for three weeks, then leave to seek a suitable place to spin cocoons. There are two generations per year.
Control
Scrape loose bark in early spring to remove overwintering cocoons and then spray All Seasons® horticultural oil to eradicate eggs and first generation early instar stages.
Beneficial nematodes are microscopic, worm-like parasites that actively hunt, penetrate and destroy immature stages of this pest. Spray on trunks and main branches, and also over the soil out to the drip line for a 60% to 90% mortality in pre-pupae.
Use pheromone traps to determine the peak flight period for moths, then release trichogramma wasps to attack eggs. Pheromone traps will also help reduce male moths where populations are low and trees are isolated.
Surround WP — a wettable kaolin clay — can be used to deter a broad range of fruit tree pests (and diseases), and will reduce codling moth damage by 50-60%. Apply before moths arrive and continue for 6-8 weekly applications, or until the infestation is over.
In areas of severe infestation, spray plant-derived insecticides when 75% of petals have fallen, followed by three sprays at 1-2 week intervals. These natural pesticides have fewer harmful side effects than synthetic chemicals and break down more quickly in the environment.
0
0
文章
Dummer. ゛☀
2017年09月14日
What does one do to treat "fire blight" on Bradford pear trees? And what exactly is this horrible-sounding problem? No good can come, surely, from a condition that unites those two ominous words, given the destructive power of fire and the downcast mood evoked by "blight" (which, in the general sense, is defined as any cause of impairment, destruction, ruin, or frustration).
A reader wrote in to inquire about just this problem.
"The flowers on my Bradford pear trees turned black this year, and the new growth has died," he scribed. "The ends of the limbs are dead. What is wrong? Is this some sort of disease? And if so, how should I treat it?"
What Is Fire Blight, Exactly?
The symptoms that the reader reports indicate fire blight. Before you learn what to do about it, let's explore precisely what it is.
Fire blight (sometimes spelled as one word) is a bacterial disease. The type of bacterium that causes it has the Latin name of Erwinia amylovora. The disease attacks trees and bushes in the rose family. If you have not been introduced to the rose family, please note that this designation does not refer simply to the fragrant rose bushes with which you have probably been familiar since childhood. Both apple trees and pear trees belong to this plant family, for example.
Not only do the pear trees grown for their edible fruit succumb to fire blight, but also ornamental types such as 'Aristocrat' pear trees.
While Bradford pear trees are relatively resistant to fire blight, that does not mean that they are totally immune to it (especially in warmer climates). Blackened flowers are an indication of fire blight. Fire blight bacteria can move down a branch and form a canker; it can eventually kill the branch or even the entire specimen.
Remember that, since bacteria is at the root of the problem, treatment with a fungicide will have no effect on fire blight.
What to Do About Fire Blight on Bradford Pear Trees
Taking care of fire blight DIY-style is somewhat problematic, according to the University of California. They write, “Copper products are the only materials available to homeowners for fire blight control, and they often don’t provide adequate control even with multiple applications.” They suggest that some good can be done by a weak “Bordeaux mixture or other copper product applied several times as blossoms open,” but they go on to say that this will not solve your fire blight problem entirely.
Have an arborist look at your Bradford pear tree if it is infested with fire blight. The disease can be treated if it is caught in time. An arborist will locate, prune off and dispose of the affected branches to stop the spread of the bacteria. As professionals, arborists also have access to sprays to which the average homeowner would not have access. An arborist may elect to use a bactericide (with streptomycin sulfate) on your Bradford pear tree to control fire blight.
0
0
文章
Miss Chen
2017年09月03日
Aquí tienes 6 remedios caseros con plantas medicinales que nos pueden ser de gran ayuda.

Diuréticos:
La correcta eliminación de toxinas mediante la orina es primodial e indispensable para que nuestro organismo se mantenga sano.
Un diurético natural y muy eficaz es la infusión de retama, bebida en dosis de 2-4 tacitas al día. Se hierven 25 g de flores en un litro de agua durante 20 minutos, se deja reposar 5 minutos, colamos y bebemos. La retama es una excelente diurética, pero además se utiliza, como infusión de las hojas y sus aromáticas flores amarillas, para enfermedades hepáticas, abscesos, reumatismo, gota, ciática, afecciones de la piel y herpes.
Otro remedio muy efectivo es la infusión de malva. Necesitaremos 25 g de hojas tiernas de malva en 5 decilítros de agua, se filtra y bebenos en ayunas durante 25 días. La malva posee propiedades emolientes (desinflama los tejidos), está indicada en casos de afecciones pulmonares, y también actúa como laxante.
Conviene recordar que para evitar retención de líquidos no debemos abusar de la sal, asegurarnos de incluir el máximo posible de frutas y verduras frescas en nuestra dieta y realizar ejercicio moderado regularmente.
Manos suaves:
Si tenemos manos secas o poco suaves, basta con tomar los brotes más tiernos de ortiga (es aconsejable usar guantes para recolectarla) y hervirlos durante un cuarto de hora con agua. Dejamos enfriar y colamos. Aplicamos con compresas o algodones dando golpecitos sobe la zona que queramos tratar. Con respecto a la piel, la ortiga elimina imperfecciones, granitos, eccemas, herpes, rojeces, acné, también regenera el cuero cabelludo y combate problemas relacionados con caspa, seborrea y caída del cabello. Antiguamente la ortiga se utilizaba en casos de reumatismo, además de poseer acción hemostática (detiene o disminuye las hemorragias), reconstituyente, estimula el aparato digestivo, también es galactógena (incrementa la producción de leche materna), es antianémica o antidiabética.

Impurezas de la piel:
Hervimos durante tan sólo 2 minutos 50 g de hojas de malva en un litro de agua, dejamos enfriar y colamos. Beberemos 3-4 tazas al día.
Caspa:
Necesitaremos 100 g de ortiga, incluyendo las raíces, y hervimos en un litro de agua durante 15 minutos. Lo aplicaremos después de lavar el pelo y aclararlo a los 10 minutos.
Caída del cabello:
Perparamos una infusión de albahaca con 10 g de hojas por un litro de agua. Dejamos reposar 20-30 minutos, colamos y para aplicarla friccionamos enérgicamente en el cuero cabelludo. La albahaca además de fortalecer el cabello ayuda a frenar su caída. Pero además la albahaca tiene otras propiedades como por ejemplo casos de gastritis, digestiones difíciles, dolores de estómago, meteorismo, vómitos, vértigos, inflamación de boca y garganta, etc.
Ojos irritados:
Hacemos una infusión con manzanilla, 20 g por cada litro de agua, dejamos reposar 10 minutos y filtramos. Cuando la esté a temperatura ambiente la aplicamos empapando compresas y dando ligeros golpecitos sobre los ojos cerrados. También se puede usar en casos de conjuntivitis, ojos cansados, ya que posee acción antiinflamatoria y antiséptica. La manzanilla además actúa como calmante sobre el sistema nervioso, es sedante y también es efectivo su uso en casos de diarreas.
Diuréticos:
La correcta eliminación de toxinas mediante la orina es primodial e indispensable para que nuestro organismo se mantenga sano.
Un diurético natural y muy eficaz es la infusión de retama, bebida en dosis de 2-4 tacitas al día. Se hierven 25 g de flores en un litro de agua durante 20 minutos, se deja reposar 5 minutos, colamos y bebemos. La retama es una excelente diurética, pero además se utiliza, como infusión de las hojas y sus aromáticas flores amarillas, para enfermedades hepáticas, abscesos, reumatismo, gota, ciática, afecciones de la piel y herpes.
Otro remedio muy efectivo es la infusión de malva. Necesitaremos 25 g de hojas tiernas de malva en 5 decilítros de agua, se filtra y bebenos en ayunas durante 25 días. La malva posee propiedades emolientes (desinflama los tejidos), está indicada en casos de afecciones pulmonares, y también actúa como laxante.
Conviene recordar que para evitar retención de líquidos no debemos abusar de la sal, asegurarnos de incluir el máximo posible de frutas y verduras frescas en nuestra dieta y realizar ejercicio moderado regularmente.
Manos suaves:
Si tenemos manos secas o poco suaves, basta con tomar los brotes más tiernos de ortiga (es aconsejable usar guantes para recolectarla) y hervirlos durante un cuarto de hora con agua. Dejamos enfriar y colamos. Aplicamos con compresas o algodones dando golpecitos sobe la zona que queramos tratar. Con respecto a la piel, la ortiga elimina imperfecciones, granitos, eccemas, herpes, rojeces, acné, también regenera el cuero cabelludo y combate problemas relacionados con caspa, seborrea y caída del cabello. Antiguamente la ortiga se utilizaba en casos de reumatismo, además de poseer acción hemostática (detiene o disminuye las hemorragias), reconstituyente, estimula el aparato digestivo, también es galactógena (incrementa la producción de leche materna), es antianémica o antidiabética.
Impurezas de la piel:
Hervimos durante tan sólo 2 minutos 50 g de hojas de malva en un litro de agua, dejamos enfriar y colamos. Beberemos 3-4 tazas al día.
Caspa:
Necesitaremos 100 g de ortiga, incluyendo las raíces, y hervimos en un litro de agua durante 15 minutos. Lo aplicaremos después de lavar el pelo y aclararlo a los 10 minutos.
Caída del cabello:
Perparamos una infusión de albahaca con 10 g de hojas por un litro de agua. Dejamos reposar 20-30 minutos, colamos y para aplicarla friccionamos enérgicamente en el cuero cabelludo. La albahaca además de fortalecer el cabello ayuda a frenar su caída. Pero además la albahaca tiene otras propiedades como por ejemplo casos de gastritis, digestiones difíciles, dolores de estómago, meteorismo, vómitos, vértigos, inflamación de boca y garganta, etc.
Ojos irritados:
Hacemos una infusión con manzanilla, 20 g por cada litro de agua, dejamos reposar 10 minutos y filtramos. Cuando la esté a temperatura ambiente la aplicamos empapando compresas y dando ligeros golpecitos sobre los ojos cerrados. También se puede usar en casos de conjuntivitis, ojos cansados, ya que posee acción antiinflamatoria y antiséptica. La manzanilla además actúa como calmante sobre el sistema nervioso, es sedante y también es efectivo su uso en casos de diarreas.
0
1
文章
Miss Chen
2017年09月03日
¿Qué beneficios tiene la Genciana? ¿Cómo puedo preparar remedios caseros?

La Genciana, Gentiana lutea, es una planta perenne herbácea que mide entre 1 y 2 metros de altura y posee flores amarillas. Es muy común encontrarla en el sur de Europa mas específicamente en España y la cordillera Cantábrica. La época de floración es de junio a agosto y la raíz se cosecha en octubre y noviembre.
Esta planta tiene diversas propiedades medicinales, entre ellas se encuentran las siguientes:
Es un buen tónico estomacal de beneficios eupépticos, es decir, que es digestivo.
También su eficacia está comprobada para curar heridas externas.
Se emplea en casos de gota y artritis.
Estimula la glándula tiroides, por lo que resulta recomendada en el caso de hipotiroidismo.
Depura la sangre
Por su elevado contenido en zinc es muy beneficioso añadirla a preparados para un cabello sano.
Es útil para bajar la fiebre.
funciona como estimulante de apetito.
Evita la descamación de la piel, típica en la psoriasis
Normaliza la presión arterial.
Funciona como acción vermífuga: expulsa los parásitos intestinales
Incentiva la formación de leucocitos en la sangre.
Contine una sustancia antibiótica denominada genciopiricina, que combate con eficacia varios gérmenes infecciosos.
Pueden evitarla quienes padecen de úlcera gastroduodenal activa, pues al aumentar la secreción de jugo gástrico, puede agravar la enfermedad
Cumple también una acción tónica sobre el hígado y sobre lo vesícula biliar, así como sobre todo el organismo.
Repele los mosquitos
Es muy eficaz contra los cólicos intestinales.
Cómo realizar preparados terapéuticos con Genciana:

Solo se utilizan las raíces para la elaboración de los remedios caseros que podrán presentarse bajo la forma de infusiones , extractos, jarabes y aplicaciones externas.
¿Cómo prepararla?
Infusión:
Colocar un puñado de raíces de genciana en una taza previamente calentada y llenarla de agua hirviendo. Tapar la taza y dejar en reposo de 5 a 10 minutos.
Aplicaciones externas:
Lavar las raíces y colocarlas sobre la piel, abiertas en una sola capa. Dejar sobre la herida 20 minutos aproximadamente retirar y repetir el procedimiento las veces que quieras.
Decocción:
Echar un puñado de raíces en el recipiente y agregar medio litro de agua; hervir durante tres minutos a fuego moderado. Luego colar y esta listo.
Jarabes:
Verter 100g de raíces en un litro de agua. Hervir un minuto y dejar que la mezcla repose unos pocos minutos. Después exprimir y filtrar.
La Genciana, Gentiana lutea, es una planta perenne herbácea que mide entre 1 y 2 metros de altura y posee flores amarillas. Es muy común encontrarla en el sur de Europa mas específicamente en España y la cordillera Cantábrica. La época de floración es de junio a agosto y la raíz se cosecha en octubre y noviembre.
Esta planta tiene diversas propiedades medicinales, entre ellas se encuentran las siguientes:
Es un buen tónico estomacal de beneficios eupépticos, es decir, que es digestivo.
También su eficacia está comprobada para curar heridas externas.
Se emplea en casos de gota y artritis.
Estimula la glándula tiroides, por lo que resulta recomendada en el caso de hipotiroidismo.
Depura la sangre
Por su elevado contenido en zinc es muy beneficioso añadirla a preparados para un cabello sano.
Es útil para bajar la fiebre.
funciona como estimulante de apetito.
Evita la descamación de la piel, típica en la psoriasis
Normaliza la presión arterial.
Funciona como acción vermífuga: expulsa los parásitos intestinales
Incentiva la formación de leucocitos en la sangre.
Contine una sustancia antibiótica denominada genciopiricina, que combate con eficacia varios gérmenes infecciosos.
Pueden evitarla quienes padecen de úlcera gastroduodenal activa, pues al aumentar la secreción de jugo gástrico, puede agravar la enfermedad
Cumple también una acción tónica sobre el hígado y sobre lo vesícula biliar, así como sobre todo el organismo.
Repele los mosquitos
Es muy eficaz contra los cólicos intestinales.
Cómo realizar preparados terapéuticos con Genciana:
Solo se utilizan las raíces para la elaboración de los remedios caseros que podrán presentarse bajo la forma de infusiones , extractos, jarabes y aplicaciones externas.
¿Cómo prepararla?
Infusión:
Colocar un puñado de raíces de genciana en una taza previamente calentada y llenarla de agua hirviendo. Tapar la taza y dejar en reposo de 5 a 10 minutos.
Aplicaciones externas:
Lavar las raíces y colocarlas sobre la piel, abiertas en una sola capa. Dejar sobre la herida 20 minutos aproximadamente retirar y repetir el procedimiento las veces que quieras.
Decocción:
Echar un puñado de raíces en el recipiente y agregar medio litro de agua; hervir durante tres minutos a fuego moderado. Luego colar y esta listo.
Jarabes:
Verter 100g de raíces en un litro de agua. Hervir un minuto y dejar que la mezcla repose unos pocos minutos. Después exprimir y filtrar.
0
0
文章
Dummer. ゛☀
2017年09月02日
What is a rumberry tree? If you are an adult beverage enthusiast, you may be more familiar with its alternate name of guavaberry. Guavaberry liquor is made from rum and the fruit of the rumberry. It is a common Christmas drink on many Caribbean islands, especially on St. Maarten and the Virgin Islands. What are some other rumberry tree uses? Read on to find out what other rumberry tree information we can dig up.
What is a Rumberry Tree?
Growing rumberry trees (Myrciaria floribunda) are native to the Caribbean islands, Central and South America through North Brazil. Rumberry is shrub or slim tree that reaches 33 feet and up to 50 feet in height. It has reddish brown branches and flakey bark. An evergreen, the leaves are wide, glossy and slightly leathery – dotted speckled with oil glands.
Blossoms are born in small clusters and are white with about 75 obvious stamens. The resulting fruit is small, (the size of a cherry) round, dark red to nearly black or yellow/orange. They are extremely fragrant, redolent of pine resin, tangy and acidic accompanied by a degree of sweetness. There is a large pit or stone surrounded by translucent flesh that is discarded.
As mentioned, native growing rumberry trees are found throughout parts of the Caribbean and Central and South America. Specifically, they have a broad reach and spread out over Cuba, Hispaniola, Jamaica, Puerto Rico, the Virgin Islands, St. Martin, St Eustatius, St. Kitts, Guadeloupe, Martinique, Trinidad, southern Mexico, Guiana and eastern Brazil.
Care of Rumberry Tree
It is not generally cultivated for commercial harvest. Where it grows wild, however, when land is cleared for pasture, the trees are left standing for continued harvest of the wild fruit. Only minimal attempts have been made growing rumberry trees for study and almost none for commercial production. Because of this, there is very little information on the care of rumberry trees. The trees do tolerate a short frost to the upper 20 degrees F. (-6 C.). They thrive in both dry and moist climates in warm temperatures. They grow naturally along coastal forests from sea level up to 700 feet in elevation as well as in dry forests in some countries up to 1,000 feet.
Rumberry Tree Uses
Besides the celebratory aperitif mentioned above, rumberry can be eaten fresh, juiced, or made into jams or desserts such as tarts. The guavaberry liqueur is made from the fruit along with rum, pure grain alcohol, raw sugar and spices. The fruit also used to be made into a wine and liqueur beverage that was exported from St. Thomas to Denmark. Rumberry is also purported to have medicinal effects and is sold by herbalists in Cuba to treat liver ailments and as a cleansing remedy.
0
0
文章
Dummer. ゛☀
2017年09月02日
The Osage orange tree is an unusual tree. Its fruit are wrinkled green balls the size of grapefruit. On the other hand, the trees’ yellow wood is strong and flexible, and so dense that it is immune to termites. Growing an Osage orange tree is fast and easy. Read on for information about Osage orange trees.
What is Osage Orange?
Many people have never heard of this tree. If you mention it, expect questions like: “What is Osage orange?”
The Osage orange tree (Maclura pomifera) is no kin to the citrus, but the fruit has a faint orangey fragrance strong enough to result in the common name. Its odd shape and color have given it many nicknames, including green brains and hedge apple. The tree also bears long, tough thorns, sharp as steel and can bust tires. These make it a top choice as a defensive hedge. For years, these trees were used for hedges throughout the eastern half of the nation. Farmers planted the tough little trees in tight rows and pruned them well to keep them bushy.
The invention of barbed wire put an end to living Osage hedges, but the wood continued being used for fence posts. It contains tetrahydroxystilbene, an anti-fungicide that may deter insects. Perhaps this chemical is what gives the dense wood its resistance to rot. It’s an excellent wood for fence posts and ship masts. If you are interested in growing an Osage orange tree in a hedge, it will likely stay under 20 feet tall, but in the wild, trees can grow much taller. The trunk grows to several feet in diameter.
Osage Orange Growing Conditions
Growing an Osage orange trees is not difficult since the trees grow readily from both seeds and cuttings. Separating the seeds can be a challenge. It is easiest if you wait for fruit to fall to the ground and freeze in winter, since the cold temperatures facilitate seed-removal. Start growing Osage orange trees by planting individual seeds in pots indoors. Don’t start them outside unless you know exactly where you want them to stand in the garden. These trees are not easy to transplant from one place to another outside.
Osage are tough native trees and are not picky about growing conditions. This makes the care of Osage orange trees easy. Well-drained soil, adequate irrigation and a sunny location helps the tree grow rapidly and stay healthy. If all this information about Osage orange trees makes you want to start growing one, the squirrels will thank you. Osage orange seeds are a favorite squirrel snack.
0
1


文章
Dummer. ゛☀
2017年08月29日
Ground covers are an attractive way to cover a lot of area in a garden quickly. Snow in summer flower, or Cerastium silver carpet, is an evergreen ground cover that flowers from May to June and grows well in USDA plant hardiness zones 3-7. This stunning European native is a member of the carnation family and is deer resistant. Flowering is profuse, with blooms that are silvery white and star-shaped, and when in full bloom, this mounded plant resembles a pile of snow, hence the plant’s name. However, the flowers are not the only attractive part of this showy plant. The silver, grayish green foliage is a dainty addition to this plant and retains its rich color year round.
Growing Snow in Summer Plants
Growing snow in summer plants (Cerastium tomentosum) is relatively easy. Snow in summer likes full sun but will also thrive in partial sun in warm climates. New plants can be started from seed, either directly sown into the flower garden in early spring or started indoors four to six weeks before the last expected frost date. The soil must be kept moist for proper germination but once the plant is established, it is very drought tolerant.
Established plants may be propagated by division in the fall or by cuttings. Space the snow in summer flower 12 to 24 inches apart to give plenty of room for spread. Mature plants grow to 6 to 12 inches and have a spread of 12 to 18 inches.
Care of Snow in Summer Ground Cover
Snow in summer ground cover is very easy to maintain but will spread rapidly and may become invasive, even earning the nickname mouse-ear chickweed. The plant spreads quickly by reseeding and sending out runners. However, a 5-inch deep edge will usually keep this plant in its borders. Use a high-nitrogen fertilizer when planting and a phosphorus fertilizer after plants bloom.
Don’t let Cerastium silver carpet ground cover go unnoticed. Growing snow in summer plants in rock gardens, on slopes or hillsides, or even as a knockout border in the garden will provide long-lasting pearly white blooms and stunning silvery color year round.
0
0
文章
Dummer. ゛☀
2017年08月28日
Sprays of slender foliage and bright flower tips create a look of electric excitement on fiber optic grass. What is fiber optic grass? Fiber optic grass s not really a grass but is actually sedge. It is useful around moist spaces and ponds. The plant is easy to grow and has few pest or disease problems. Ornamental fiber optic grass is also deer resistant, which makes it a great addition to gardens prone to these often pesky plant eaters.
What is Fiber Optic Grass?
The plant is hardy in USDA plant hardiness zones 8-11. It can be potted up and moved indoors in other areas or just enjoy it as an annual.
Ornamental fiber optic grass forms a mound with sprays of errant stems springing from the center of the plant like a punk hairdo. The ends of the stems have tiny white flowers that give the overall effect of little lights at the end of the foliage. The plant is native to Western and Southern Europe and found in sandy to peaty zones, often near the sea or other water bodies. Try growing fiber optic grass in a container or water garden.
Growing Fiber Optic Grass
Plant the grass in a mixture of potting soil and peat moss for container plants. The grass grows best in full sun to partial sun. If you want to use it as part of a water garden, allow the roots to sit in deeper and deeper water levels to acclimate. The plant can be trimmed back if it sustains cold or other types of damage. Cut it to within 2 inches of the ground and it will re-sprout within a couple of weeks. Divide ornamental fiber optic grass every two to three years and plant each section for more of this interesting grass. Growing fiber optic grass from seed is easy. Simply sow in flats with a light dusting of soil. Keep the flat covered and moderately moist in a bright warm area. Allow the seedlings to grow a substantial root system before transplanting them.
Fiber Optic Plant Care
If you want a spectacular plant for soggy situations that brings grace and movement to any bed or display, ornamental fiber optic plant is a great choice. This is a low maintenance grass that just needs consistent moisture and good light to perform well. Re-pot or divide the plant in spring. Plants in the lower zones benefit from a layer of mulch around the root zone to protect them from cold snaps. Feed monthly with a half dilution of plant food up until fall. Then suspend food during the winter. Not much more is needed for fiber optic plant care.
Ornamental fiber optic grass can be overwintered in the colder zones. Bring the plant indoors to a draft free room with moderate light. Water once per week and keep a fan going to prevent humidity build up and the promotion of fungal issues.
0
0
文章
Dummer. ゛☀
2017年08月26日
Is there anything more satisfying than stepping out into your garden after a day of hard work and plucking delicious herbs for your dinner menu? The herbs are fresh, pungent and delicious. You grew them yourself too! Growing herbs for cocktail drinks is equally enjoyable. It is especially satisfying when you have friends and family over for happy hour.
Garden Inspired Cocktails
There are a number of good herbs for mixed drinks. Here are some of the most common:
Spearmint (Mentha spicata) is the mint of choice for mint julips. Sweet Basil (Ocimum basilicum) is terrific in vodka or gin gimlets. Shiso (Perilla frutescens) can replace mint and add a snazzy zip to mojitos. Rosemary (Rosmarinus officinalis) will enlighten your average gin and tonic. Lemon Verbena (Aloysia triphylla) is yummy in sangria. English Lavender (Lavandula angustifolia) pairs well with sparkling wine. If you are a Cilantro (Coriandrum sativum) lover, experiment with a placing dried cilantro and sea salt on the rim of your Bloody Mary glass.
Making Cocktails with Fresh Herbs
Making cocktails with fresh herbs is easy but requires a few extra steps. One of the most basic techniques is to muddle the herbs prior to putting them in the shaker. Muddling is where you crush the herb leaves in a mortar and pestle to release flavor. The herbs are then added to the shaker with all the other ingredients. You can make simple herbal syrup by combining the fresh or dried herbs with boiled and cooled sugar water. Infused simple syrup typically keeps a few weeks in the fridge and is ready to go when making cocktails with fresh herbs. Some herbs can be added whole to a drink to add visual flourish. Consider adding a sprig of lavender or rosemary to sparkling wine or gin and tonic. Float a shiso leaf in your mojito.
Tips on Growing Herbs for Cocktail Drinks
Growing an herbal cocktail garden depends on where you live. If you live in Coastal California or other warmer climates, you can depend on your rosemary, lemon verbena, lavender and mint to be available almost year round. All of these plants can be installed in your ornamental planting beds too. Note that spearmint should be placed in a pot, as it can be invasive. Sweet basil, shiso and cilantro are annuals. Put them in your raised beds or in pots each summer and you will be rewarded with some delightful garden cocktail ingredients. If you live in a cold winter area, you might consider putting all your herbs in pots near the kitchen door so you can access them easily and possibly even bring them indoors for winter. Make sure your herbs get full sun and sufficient water. Lavender and rosemary are water-wise plants, but all the other herbs need regular water and benefit from organic fertilizers once a month.
0
0
文章
Miss Chen
2017年08月26日
1. Métodos para propagar plantas
2. ¿En qué consiste un injerto?
3. ¿A qué se le llama patrón e injerto?
4. ¿Qué utilidades tienen los injertos?
5. Tipos de injertos: de púa y de yema
6. Epoca para injertar
7. Compatibilidad entre plantas
8. Consejos generales para hacer injertos
6. Epoca para injertar
Depende del tipo de injerto a realizar.
Injertos de púa
La mejor época para hacer injertos de púa va desde enero a marzo (Hemisferio Norte), antes de que surjan los nuevos brotes. Si el clima es frío, se espera a marzo. Las púas una vez recogidas se pueden injertar directamente o guardar en el frigorífico uno o dos meses antes de usarlas. El resultado es el mismo.
Si las guardas en el frigorífico debes mojarlas un poco, envolverlas en papel de cocina o de periódico y meterlas en una bolsa de plástico para evitar que se sequen.
En cítricos, higueras y olivo, no es necesario que estén en reposo cuando se tomen las púas, pero son excepciones.
Injertos de yema
Los injertos de yema en T, también llamados de escudete, se hacen desde principios de primavera al otoño, es decir, cuando la corteza del patrón se pueda despegar con facilidad y el árbol esté en vegetación, fluyendo savia. En invernaderos se pueden efectuar injertos durante todo el año, ya que es posible regular artificialmente las condiciones naturales.
7. Compatibilidad entre plantas
Para que el injerto tenga éxito es fundamental que el patrón sea compatible con la variedad a injertar, si no, no se unirán.
Las especies del mismo género botánico pueden ser injertadas entre ellas perfectamente.
Las especies de géneros botánicos distintos no suelen funcionar, aunque hay excepciones. Por ejemplo:
El Membrillero, género Cydonia, suele emplearse como patrón para injertar el Peral, género Pyrus.
El Pistacho (Pistacia vera) y el Terebinto (Schinus terebinthifolius), ambas especies de géneros distintos, Pistacia y Schinus respectivamente, admiten el injerto entre ellas.
El Naranjo (Citrus sinensis) sobre Poncirus trifoliata, etc..
8. Consejos generales para hacer injertos
• Usa un cuchillo especial para injertos o una navaja muy afilada que produzca cortes limpios. Ten a mano una piedra de afilar que te hará falta.
• Una clave fundamental de los injertos es que queden en contacto el cambium del patrón y elcambium de la variedad. Este es el secreto. Hay que poner en contacto las dos piezas adecuadamente dispuestas, si no, no prenderá. • El cambium es una capa de células muy fina, de menos de 1 milímetro de espesor, que tiene la característica de que produce las células que forman los tejidos vasculares por los que circula el agua y la savia con nutrientes; con este tejido nuevo que produce el cambium se produce la soldadura.
• Si se raspa la corteza de una rama, la capita verde que aparece antes de lo blanco, eso es elcambium. O si cortas una rama de un árbol o arbusto, el cambium está entre la capa verde de la corteza y la zona blanca de la madera de la rama.
• Repito: lo fundamental es poner bien en contacto los cambiums del patrón y de la variedad o injerto (púa o yema). Si se pone sólo un poquito en contacto, el injerto fracasa.
• Ata firmemente con rafia o con una cinta adhesiva especial para injertos.
• Recubre las superficies cortadas con cera o mástic para injertar. Una marca comercial es Arbokol. Con esto quedará protegido de la desecación.
• En los injertos de yema en T o también llamados de escude, no hace falta poner cera, sólo atarlo.
• Elimina los brotes tiernos que salgan por debajo de la zona del injerto.
• Los injertos de yema debes desatarlos a los 15 días aproximadamente porque agarran muy rápidamente. Si no los desatas se pueden perder por quedar ahogados una vez brotados.
• Los injertos de púa no los desates hasta que las yemas hayan brotado y midan unos 5-10 cm. Si ves que para deshacerla corre peligro algún injerto o brote, coge un cuchillo de cocina de sierra y corta toda la atadura a lo largo. De esta manera, una vez cortada, la rafia te vendrá toda entera como si fuera un cartón al estar pegada con el mastic, no harás ningún daño al injerto.
• Si los desatas demasiado pronto, el tejido de unión es muy tierno y escaso y no puede pasarle la savia suficiente al injerto, con lo que éste muere y se seca cuando parecía que ya estaba brotando.
• Pon un tutor a la ramita injertada para que el viento no los arranque, especialmente si es zona de vientos, y déjales unas pasadas de cinta o cuerda para mantener la unión unos días más y asegurarte de que el tejido intermedio se consolida bien.
• Mantener la atadura más tiempo del recomendado es perjudicial para el injerto ya que lo estrangula, dificulta el paso de la savia.
• Por último, decir que hay plantas más difíciles de injertar que otras. Por ejemplo, lo más probable es que no funcione hacer un injerto sobre un Roble o sobre un Abedul; sin embargo, los injertos de Cerezo pueden agarrar casi el 100%.
0
0

