文章
柠檬加盐
2017年05月26日

#枸骨 的栽培养护与用途
栽培管理
移栽可在春秋两季进行,而以春季较好。移时需带土球,因枸骨须根稀少,操作时要特?e防止散球,同时要剪去部分枝?,以减少蒸腾,否则难以成活。枸骨耐修剪,可修剪成各种树姿,供观赏。
枸骨耐修剪,每年的6、7月份和10月份各做一次修剪,剪去枯枝、病虫枝、过密枝及徒长枝,过长的枝条要剪短。冬季移至阳光充足的低温室内,保持盆土偏干一些,0℃以上即可安全过冬。每年春季换盆一次,盆土可用腐?土、园土和沙土各1份的混合土,并加入少量的蹄甲片或骨粉等含磷量较高的肥料作基肥。枸骨生长期常有红蜡蚧为害枝干,要注意及时防治。
景观用途
岩石园、庭植、刺篱 。枸骨主要以盆栽观赏为主,其?形、树姿奇特,具有很高的观赏价值,果实红色经久不凋落,颇为美观,可供观赏,亦可作切果材料。由于枝?浓绿硬挺,可作圣诞树。
0
0
文章
丫头
2017年05月25日

圆白菜的食疗保健作用主要包括以下几个方面:
圆白菜中含有丰富的维生素C、维生素E、β-胡萝卜素等,总的维生素含量比番茄多出3倍,因此,具有很强的很强的抗氧化作用及抗衰老的功效。
#圆白菜 富含叶酸,而叶酸对巨幼细胞贫血和胎儿畸形有很好的预防作用,因此,怀孕妇女及生长发育时期的儿童、青少年应该多吃。
新鲜的圆白菜有杀菌、消炎的作用。咽喉疼痛、外伤肿痛、胃痛、牙痛时,可以将圆白菜榨汁后饮下或涂于患处。
圆白菜含有丰富的异硫氰酸丙酯衍生体,能杀死人体内导致白血病的异常细胞.圆白菜富含维生素U,维生素U对溃疡有很好的治疗作用,能加速溃疡的愈合,还能预防胃溃疡恶变。
圆白菜中含有丰富的吲哚类化合物。实验证明,“吲哚”具有抗癌作用,可以避免人类罹患肠癌。
圆白菜中含有丰富的萝卜硫素。这种物质能刺激人体细胞产生对身体有益的酶,进而形成一层对抗外来致癌物侵蚀的保护膜。萝卜硫素是迄今为止所发现的蔬菜中最强的抗癌成分。
由此可见,人们为了自身的健康应该常吃圆白菜。营养学家指出,圆白菜生吃的食疗保健效果最好。我们可以将圆白菜凉拌、做沙拉或榨汁。如果熟吃,也不宜加热过久,以避免其中的有效成分被破坏。
0
0


文章
Abigal
2017年03月21日


The garden season is upon us, and what better way to spend time in a garden than in a DIY garden swing? Make it yourself and save money, but better still, customize it to your style and needs. Many of these projects repurpose supplies, and most are easy even for a beginner DIY’er with these instructions and tutorials. So get out your basic tools and let’s get to it!
Our featured project, above, is from A Beautiful Mess. Find out how to make their DIY tree swing! So cute!
From Sheryl Salisbury Photography, this DIY pallet swing looks easy, and I love this for a front porch! She even tackles some FAQ’s on her tutorial page.

Looking for something different, and a little organic looking? Oh, and it’s repurposed! Try the instructions for this laced pallet chair swing.

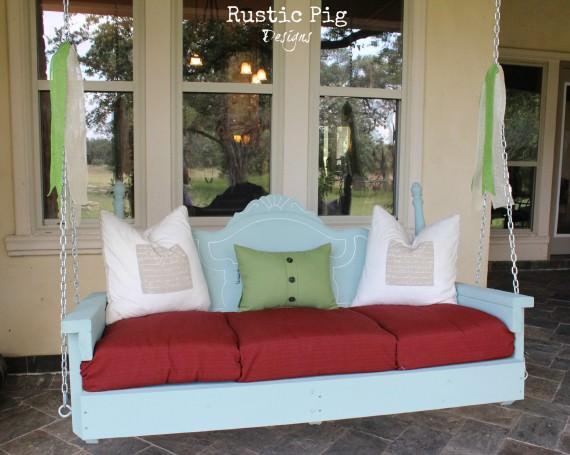
From The Rustic Pig, any country garden will love this back porch headboard swing! Great instructions too!
This DIY chair swing from This DIY Life is really fun, and inventive! Full tutorial with photos!

From Ana White, our fav DIY woodworking plan source, this large modern porch swing has a complete plan at the site. What would this be like painted a delicate pink?

From Julie at Life at Fire Lake Camp, this dreamy DIY hanging bed swing is exactly where I want to spend many long hours this summer reading novels and sipping lemonade. Ok, red wine, who am I kidding?

Download complete plans for this DIY garden swing from Sunset magazine for free. Amazing!

Relive your childhood with this DIY tire swing from Live Dan 330…

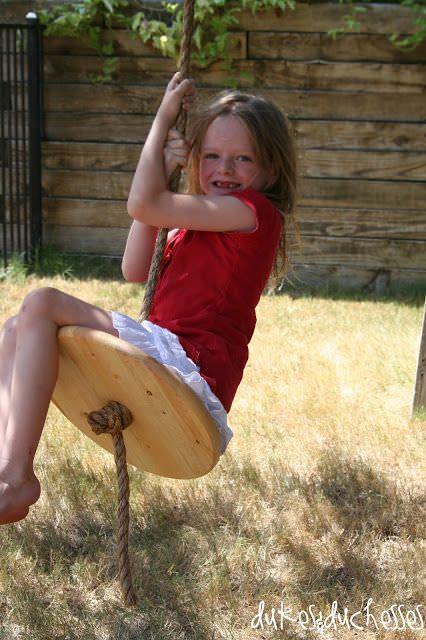
Lastly, a super simple DIY rope swing from Dukes and Duchesses. Not just for kids!
2
0
文章
Abigal
2017年02月16日
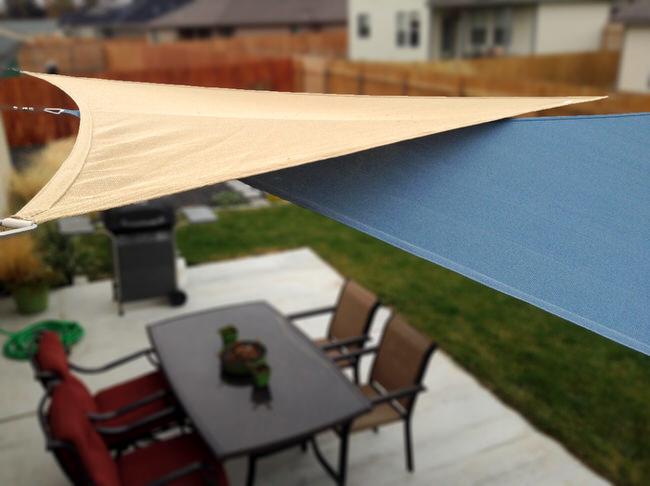
Steve and I were looking for an outdoor patio cover that was a little different, and that didn’t require major construction either. We found it in shade sails. Popular in Europe for quite awhile, they are catching on in the US quickly because of their ease of installation, ability to adjust them to each lighting situation, and let’s face it… they are just plain awesome. If you want to use shade sails to cover your outdoor room, this is how to install them, and to get around the issues these types of coverings present.
Buy your shade sails to cover the area you intend. There are many brands, shapes and sizes. Be careful you don’t purchase ones made of cheap materials, unless you only expect them to last one season. We bought Cooleroo brand from Amazon. They have lasted us three seasons so far, without fading. They come with all the hardware to hang, though you can buy an extra hardware kit if you need it. You should have mounting brackets and turnbuckles, which tighten to adjust. We preferred to layer several triangle shaped sails, but if you prefer, they come in squares and rectangles too. If I didn’t have Steve to think through the triangle thing, I would have gone with a rectangle. Sounds simpler, but not as cool!

Installing the shade sails is as easy as making sure you have strong supports, such as the side of a building, or a post. Keep in mind, these shade sails require a lot of tension to get them to stretch tight enough so that they look right, and don’t flap around in the wind. Make sure you attach them to a stud on a building, a sturdy metal pole, or learn how to make a wooden post work, as we did. (More on that below!)
The first challenge we encountered is that our sturdy supports were not close enough together to directly attach the three sides of the triangle. We laid out the shade sails on the ground in the manner in which we wanted to hang them, then measured how much we would need to extend each end to reach a fastener. Then we mounted the brackets at each corresponding support with a drill and screws. We got some metal cable and crimps from home depot. The metal cable goes through one end of the crimp, loops through the buckle on the shade sail, then back through the other side of the crimp. See photo, below. Use a hammer to pound the crimp closed, and it locks it tight.
Measure the length to the turnbuckle for the opposite fastener, and create another loop at that end. It doesn’t have to be a perfect measurement because the turnbuckle tightens down. Make sure when you measure the length of your extension wire, the turnbuckle is adjusted at its most open position. That way, you have room to tighten it down. It will tighten more then you think. When you have extension wire made for all the ends that needs it, move to the next step.

Attach the turnbuckles to the mounting bracket, and loop the extension end of the wire onto the open end of the turnbuckle, tighten each turnbuckle until the sail is taut.
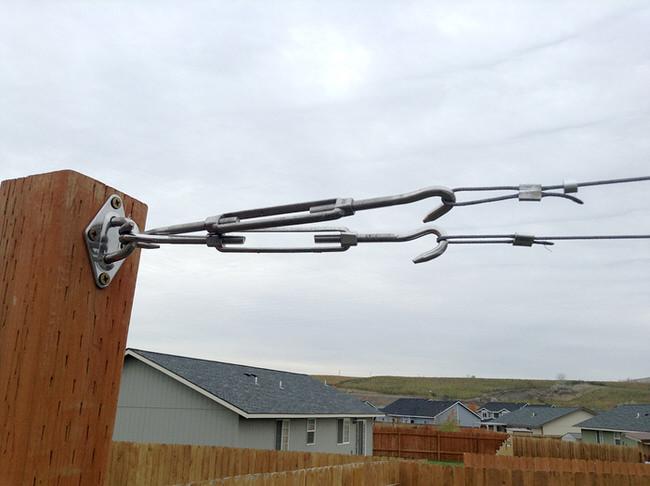
Now you want to really tighten the turnbuckles. We stuck a screwdriver throughout the open body of the turnbuckle, and used it to turn the buckle when it got tight, to tighten it even further. Tighten each end a little at a time, so that all the ends tighten evenly.

We mounted one of our mounting brackets lower on a pole, so that we could angle one of the sails against the afternoon sun.


This last photo, below, gives you a picture of one of our issues with the wooden poles we used as supports. (Please ignore the ugly patio, these photos were right after I moved in!) We installed these poles ourselves for the purpose of mounting the shade sails. (We also hang bird feeders off them!) We used several bags of concrete and buried them two feet under, 4×4 pressure treated lumber. When we attached the extension wires and tightened them down, they still bent! That is what we mean when we say a lot of tension! Possibly that won’t be an issue for you, or you will decide the slight amount of bending of the pole doesn’t bother you, (Steve’s a perfectionist… and it’s a good thing, too, or we never would have pulled this off to look so great! Me? I would have planted a vine on it and called it done. Yes, I can be a little lazy. :)) But if you decide to go with our brilliant plan, we found a fix. We used the same metal cable, and braced the pole by wiring it down to the base of a fence post that is also cemented in the ground, you can see a touch of the cable to the right side of the photo…. I know, sounds like a lot… But it turned out to be awesome! Any questions? In the end we found out that if you need to use poles to attach to, the best thing would be very sturdy 4 to 5 inch (diameter) metal poles.

Want to see more shade sails used to make amazing outdoor spaces? Be inspired!


0
0


